Introduction
Unlock the full potential of your Linux system with this comprehensive guide to essential Linux commands. Whether you’re a seasoned administrator or just starting out, mastering these commands is crucial for efficient server management, script writing, and troubleshooting. In this tutorial, you will learn the most frequently used and powerful commands for file management, process control, user access, network configuration, and system debugging.
You will learn over 50+ must-know Linux commands that will transform you into a Linux power user. From basic to advanced, these commands will become your go-to tools for tackling any task that comes your way.
[P…
Introduction
Unlock the full potential of your Linux system with this comprehensive guide to essential Linux commands. Whether you’re a seasoned administrator or just starting out, mastering these commands is crucial for efficient server management, script writing, and troubleshooting. In this tutorial, you will learn the most frequently used and powerful commands for file management, process control, user access, network configuration, and system debugging.
You will learn over 50+ must-know Linux commands that will transform you into a Linux power user. From basic to advanced, these commands will become your go-to tools for tackling any task that comes your way.
Prerequisites
We will be running these commands on a Ubuntu server, but you can follow along on any modern Linux distribution. You can set up a Ubuntu server for this tutorial by following our guide to Initial Server Setup on Ubuntu.
Deploy your frontend applications from GitHub using DigitalOcean App Platform. Let DigitalOcean focus on scaling your app.
Let’s get right into it!
Top 50 Linux Commands You Must Know as a Regular User
- ls - The most frequently used command in Linux to list directories
- pwd - Print working directory command in Linux
- cd - Linux command to navigate through directories
- mkdir - Command used to create directories in Linux
- mv - Move or rename files in Linux
- cp - Similar usage as mv but for copying files in Linux
- rm - Delete files or directories
- touch - Create blank/empty files
- ln - Create symbolic links (shortcuts) to other files
- clear - Clear the terminal display
- cat - Display file contents on the terminal
- echo - Print any text that follows the command
- less - Linux command to display paged outputs in the terminal
- man - Access manual pages for all Linux commands
- uname - Linux command to get basic information about the OS
- whoami - Get the active username
- tar - Command to extract and compress files in linux
- grep - Search for a string within an output
- head - Return the specified number of lines from the top
- tail - Return the specified number of lines from the bottom
- diff - Find the difference between two files
- cmp - Allows you to check if two files are identical
- comm - Combines the functionality of diff and cmp
- sort - Linux command to sort the content of a file while outputting
- export - Export environment variables in Linux
- zip - Zip files in Linux
- unzip - Unzip files in Linux
- ssh - Secure Shell command in Linux
- service - Linux command to start and stop services
- ps - Display active processes
- kill and killall - Kill active processes by process ID or name
- df - Display disk filesystem information
- mount - Mount file systems in Linux
- chmod - Command to change file permissions
- chown - Command for granting ownership of files or folders
- ifconfig - Display network interfaces and IP addresses
- traceroute - Trace all the network hops to reach the destination
- wget - Direct download files from the internet
- ufw - Firewall command
- iptables - Base firewall for all other firewall utilities to interface with
- apt, pacman, yum, rpm - Package managers depending on the distribution
- sudo - Command to escalate privileges in Linux
- cal - View a command-line calendar
- alias - Create custom shortcuts for your regularly used commands
- dd - Majorly used for creating bootable USB sticks
- whereis - Locate the binary, source, and manual pages for a command
- whatis - Find what a command is used for
- top - View active processes live with their system usage
- useradd and usermod - Add a new user or change existing user data
- passwd - Create or update passwords for existing users
File and Directory Commands
| Command | Description | Example |
|---|---|---|
| ls | List directory contents. | ls |
| cd | Change directory. | cd /path/to/directory |
| pwd | Show current directory. | pwd |
| mkdir | Create a new directory. | mkdir new_directory |
| rmdir | Remove an empty directory. | rmdir empty_directory |
| rm | Delete files or directories. | rm file.txt |
| touch | Create an empty file. | touch new_file.txt |
| cp | Copy files or directories. | cp file.txt /path/to/destination |
| mv | Move or rename files. | mv file.txt /path/to/new_location |
| cat | Display file contents. | cat file.txt |
| nano / vim | Edit files in terminal. | nano file.txt |
| find | Search for files in a directory hierarchy. | find . -name "file.txt" |
| grep | Search text using patterns. | grep "pattern" file.txt |
| tar | Archive and compress files. | tar -cvf archive.tar file1.txt file2.txt |
| df | Show disk usage of file systems. | df |
| du | Show directory/file size. | du -sh /path/to/directory |
| chmod | Change file permissions. | chmod 755 file.txt |
| chown | Change file owner. | chown user:group file.txt |
| mount | Mount a filesystem. | mount /dev/sdb1 /mnt |
| umount | Unmount a filesystem. | umount /mnt |
Networking Commands
| Command | Description | Sample Usage |
|---|---|---|
| ping | Test connectivity to a host. | ping google.com |
| ifconfig / ip a | Display network interfaces. | ifconfig or ip a |
| netstat / ss | Show network connections. | netstat -tuln or ss -tuln |
| wget | Download files via HTTP/FTP. | wget http://example.com/file.zip |
| curl | Transfer data using URL syntax. | curl -O http://example.com/file.zip |
| nc (Netcat) | Network debugging and data transfer. | nc -zv 192.168.1.1 80 |
| tcpdump | Capture and analyze network packets. | tcpdump -i eth0 |
| iptables | Configure firewall rules. | iptables -A INPUT -p tcp --dport 22 -j ACCEPT |
| traceroute | Trace the path packets take to a network host. | traceroute example.com |
| nslookup | Query DNS to obtain domain name or IP address mapping. | nslookup example.com |
| ssh | Securely connect to a remote host. | ssh user@example.com |
Process and System Monitoring Commands
| Command | Description | Example Command |
|---|---|---|
| ps | Show running processes. | ps aux |
| top | Dynamic process viewer. | top |
| htop | Enhanced version of top. | htop |
| kill | Send a signal to a process. | kill <PID> |
| killall | Kill processes by name. | killall <process_name> |
| uptime | System uptime and load. | uptime |
| whoami | Current logged-in user. | whoami |
| env | Display environment variables. | env |
| strace | Trace system calls of a process. | strace -p <PID> |
| systemctl | Manage systemd services. | systemctl status <service_name> |
| journalctl | View system logs. | journalctl -xe |
| free | Display memory usage. | free -h |
| vmstat | Report virtual memory statistics. | vmstat 1 |
| iostat | Report CPU and I/O statistics. | iostat |
| lsof | List open files by processes. | lsof |
| dmesg | Print kernel ring buffer messages. | dmesg |
User and Permission Management Commands
| Command | Description | Example Command |
|---|---|---|
| passwd | Change user password. | passwd <username> |
| adduser / useradd | Add a new user. | adduser <username> or useradd <username> |
| deluser / userdel | Delete a user. | deluser <username> or userdel <username> |
| usermod | Modify user account. | usermod -aG <group> <username> |
| groups | Show group memberships. | groups <username> |
| sudo | Execute commands as root. | sudo <command> |
| chage | Change user password expiry information. | chage -l <username> |
| id | Display user identity information. | id <username> |
| newgrp | Log in to a new group. | newgrp <group> |
File Transfer and Synchronization Commands
| Command | Description | Example Command |
|---|---|---|
| scp | Securely copy files over SSH. | scp user@remote:/path/to/file /local/destination |
| rsync | Efficiently sync files and directories. | rsync -avz /local/directory/ user@remote:/path/to/destination |
| ftp | Transfer files using the File Transfer Protocol. | ftp ftp.example.com |
| sftp | Securely transfer files using SSH File Transfer Protocol. | sftp user@remote:/path/to/file |
| wget | Download files from the web. | wget http://example.com/file.zip |
| curl | Transfer data from or to a server. | curl -O http://example.com/file.zip |
Text Processing Commands
| Command | Description | Example Command |
|---|---|---|
| awk | Pattern scanning and processing. | awk '{print $1}' file.txt |
| sed | Stream editor for filtering/modifying text. | sed 's/old/new/g' file.txt |
| cut | Remove sections from lines of text. | cut -d':' -f1 /etc/passwd |
| sort | Sort lines of text. | sort file.txt |
| grep | Search for patterns in text. | grep 'pattern' file.txt |
| wc | Count words, lines, and characters. | wc -l file.txt |
| paste | Merge lines of files. | paste file1.txt file2.txt |
| join | Join lines of two files on a common field. | join file1.txt file2.txt |
| head | Output the first part of files. | head -n 10 file.txt |
| tail | Output the last part of files. | tail -n 10 file.txt |
Shell Utilities and Shortcuts Commands
| Command | Description | Example Command |
|---|---|---|
| alias | Create shortcuts for commands. | alias ll='ls -la' |
| unalias | Remove an alias. | unalias ll |
| history | Show previously entered commands. | history |
| clear | Clear the terminal screen. | clear |
| reboot | Reboot the system. | reboot |
| shutdown | Power off the system. | shutdown now |
| date | Display or set the system date and time. | date |
| echo | Display a line of text. | echo "Hello, World!" |
| sleep | Delay for a specified amount of time. | sleep 5 |
| time | Measure the duration of command execution. | time ls |
| watch | Execute a program periodically, showing output fullscreen. | watch -n 5 df -h |
Now let’s dive a little deeper into each of these commands and understand them in more detail. We already have a lot of existing articles for each of those individual commands. For your convenience, we’ll add links to all the existing articles, and continue to update the article as new topics are covered.
The ls command in Linux
The ls command is used to list files and directories in the current working directory. This is going to be one of the most frequently used Linux commands you must know of.

As you can see in the above image, using the command by itself without any arguments will give us an output with all the files and directories in the directory. The command offers a lot of flexibility in terms of displaying the data in the output.
Learn more about using the ls command
The pwd command in Linux
The pwd command allows you to print the current working directory on your terminal. It’s a very basic command and solves its purpose very well.

Now, your terminal prompt should usually have the complete directory anyway. But in case it doesn’t, this can be a quick command to see the directory that you’re in. Another application of this command is when creating scripts where this command can allow us to find the directory where the script has been saved.
The cd command in Linux
While working within the terminal, moving around within directories is pretty much a necessity. The cd command is one of the important Linux commands you must know, and it will help you navigate through directories. Just type cd followed by directory, as shown below.
root@ubuntu:~# cd <directory path>
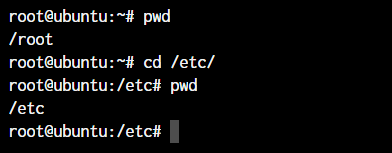
As you can see in the above command, I simply typed cd /etc/ to get into the /etc directory. We used the pwd command to print the current working directory.
The mkdir command in Linux
The mkdir command allows you to create directories from within the terminal.
root@ubuntu:~# mkdir <folder name>
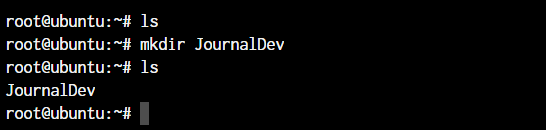
As you can see in the above screenshot, we created the JournalDev directory with just this simple command.
The cp and mv commands
The cp and mv commands are equivalent to the copy-paste and cut-paste commands in Windows. But since Linux doesn’t really have a command for renaming files, we also use the mv command to rename files and folders.
root@ubuntu:~# cp <source> <destination>
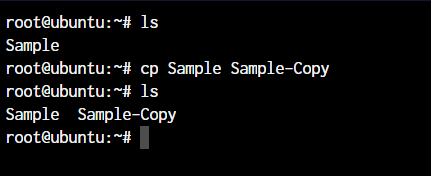
In the above command, we created a copy of the file named Sample. Let’s see how what happens if we use the mv command in the same manner.
root@ubuntu:~# mv <source> <destination
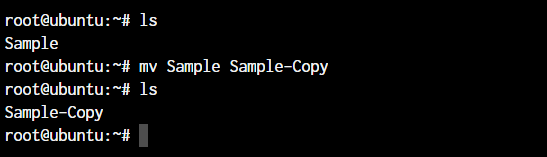
In the above case, since we were moving the file within the same directory, it acted as a rename. The file name is now changed.
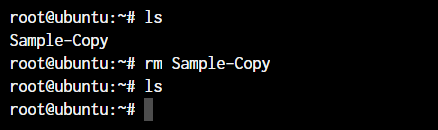
The rm command in Linux
In the previous section, we deleted the Sample-Copy file. The rm command is used to delete files and folders and is one of the important Linux commands you must know.
root@ubuntu:~# rm <file name>
To delete a directory, you must add the -r argument to it. Without the -r argument, the rm command won’t delete directories.
root@ubuntu:~# rm -r <folder/directory name>
The -r flag in the rm command in Linux stands for “recursive”. When used with the rm command, it will remove not only the specified file but also all of its subdirectories and the files within those subdirectories recursively.
Note: It’s important to be careful when using the rm command with the -r flag, as it can quickly and permanently delete a large number of files and directories. It’s a good idea to use the -i flag in conjunction with the -r flag, which will prompt you for confirmation before deleting each file and directory.
For example, to remove the mydir directory and its contents with confirmation, you can use this command:
root@ubuntu:~# rm -ri mydir
This will prompt you for confirmation before deleting each file and directory within the mydir directory.
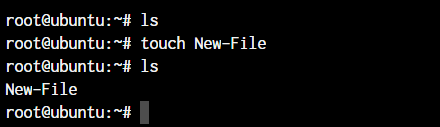
The touch command in Linux
The touch command in Linux creates an empty file or updates the timestamp of an existing file.
root@ubuntu:~# touch <file name>
The ln command in Linux
To create a link to another file, we use the ln command. This is one of the most important Linux commands that you should know if you’re planning to work as a Linux administrator.
root@ubuntu:~# ln -s <source path> <link name>
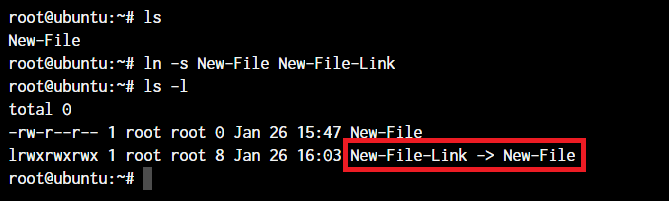
The -s flag creates a symbolic link (also known as a symlink or soft link) to a file or directory. A symbolic link is a special type of file that acts as a shortcut or pointer to another file or directory.
By default, the ln command will make hard links instead of symbolic or soft links.
Note: Say you have a text file. If you make a symbolic link to that file, the link is only a pointer to the original file. If you delete the original file, the link will be broken, as it no longer has anything to point to.
A hard link is a mirror copy of an original file with the exact same contents. Like symbolic links, if you edit the contents of the original file, those changes will be reflected in the hard link. If you delete the original file, though, the hard link will still work, and you can view and edit it as you would a normal copy of the original file.
Learn more about Soft and Hard Links.
The clear command in Linux
The clear command in Linux clears the terminal screen. It removes all the text and output currently displayed on the terminal and gives you a clean slate to work with.
Here is an example of how to use the clear command:
root@ubuntu:~# clear
This will clear the terminal screen and move the cursor to the top-left corner of the screen.
You can also use the clear command in combination with other commands, like this:
root@ubuntu:~# ls -l; clear
This will list the files and directories in the current directory, and then clear the terminal screen.
Note: The clear command does not delete any files or data from your system. It only affects the display of the terminal.
The cat, echo, and less commands
When you want to output the contents of a file or print anything to the terminal output, we use the cat or echo commands. Let’s see their basic usage.
root@ubuntu:~# cat <file name>
root@ubuntu:~# echo <Text to print on terminal>

As you can see in the above example, the cat command, when used on our New-File, prints the contents of the file. At the same time, when we use echo command, it simply prints whatever follows after the command.
The less command is used when the output printed by any command is larger than the screen space and needs scrolling. The less command allows the user to break down the output and scroll through it with the use of the enter or space keys.
The simple way to do this is with the use of the pipe operator (|).
root@ubuntu:~# cat /boot/grub/grub.cfg | less
Note: Use the -S flag with less to enable line wrapping. This will allow you to view long lines of text without scrolling horizontally.
Use the -N flag with less to display line numbers. This can be useful when you need to know the line number of a specific piece of text.
You can use these useful flags in the following way:
root@ubuntu:~# cat /boot/grub/grub.cfg | less -SN
Using less with the pipe operator can be useful in many different situations. Here are a few examples:
- Viewing the output of a long-running command, such as
toporhtop. - Searching for specific text in the output of a command, such as
greporcat.
The man command in Linux
The man command is a very useful Linux command one must know. When working with Linux, the packages that we download can have a lot of functionality. Knowing it all is impossible.
The man command in Linux is used to display the manual page for a specific command. It provides detailed information about the command, including its syntax, options, and examples.
Here’s an example of how to use the man command:
- Open a terminal and type
man lsto display the manual page for thelscommand.
root@ubuntu:~# man ls
This will display a page that looks something like this:
OutputLS(1)                            User Commands                           LS(1)

NAME
ls - list directory contents

SYNOPSIS
ls [OPTION]... [FILE]...

DESCRIPTION
List information about the FILEs (the current directory by default).

Sort entries alphabetically if none of -cftuvSUX nor --sort is specified.

Mandatory arguments to long options are mandatory for short options too.

-a, --all
do not ignore entries starting with .

-A, --almost-all
do not list implied . and ..

-c     with -lt: sort by, and show, ctime (time of last modification
of file status information) with -l: show ctime and sort
by name;
...
The uname and whoami commands
The uname and whoami commands allow you to access some basic information that comes in handy when you work on multiple systems.
The uname command in Linux displays information about the system’s kernel, including the kernel name, hostname, kernel release, kernel version, and machine hardware name.
The whoami command in Linux returns the current user’s username. It stands for “who am I?” and it’s often used to determine the current user’s identity in shell scripts or the terminal.
Let’s see the output of both the commands and the way we can use these.
root@ubuntu:~# uname -a

The parameter -a with uname command stands for “all”. This prints out the complete information. If the parameter is not added, all you will get as the output is “Linux”.
Note: Some important flags you can use with the uname command.
- Use
uname -sto display the kernel name. - Use
uname -nto display the hostname. - Use
uname -rto display the kernel release. - Use
uname -vto display the kernel version. - Use
uname -mto display the machine hardware name.
The tar, zip, and unzip commands
The tar command in Linux is used to create and extract archived files. We can extract multiple different archive files using the tar command.
To create an archive, we use the -c parameter, and to extract an archive, we use the -x parameter. Let’s see how it works.
#Compress
root@ubuntu:~# tar -cvf <archive name> <files separated by space>
#Extract
root@ubuntu:~# tar -xvf <archive name>
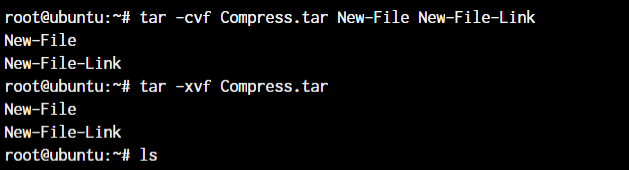
In the first line, we created an archive named Compress.tar with the New-File and New-File-Link. In the next command, we have extracted those files from the archive.
Let’s discuss the zip and unzip commands. Both are very straightforward. You can use them without any parameters, and they’ll work as intended. Let’s see an example below.
root@ubuntu:~# zip <archive name> <file names separated by space>
root@ubuntu:~# unzip <archive name>
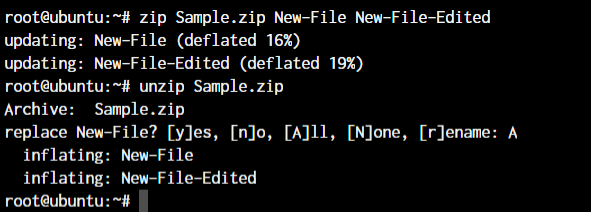
Since we already have those files in the same directory, the unzip command prompts us before overwriting those files.
The grep command in Linux
The grep command is a powerful and versatile text search tool in Linux and Unix-based operating systems. It can search for specific patterns or strings in one or more files and filter the output of other commands.
The grep command stands for “global regular expression print,” which reflects its ability to search for regular expressions across multiple lines and files.
root@ubuntu:~# <Any command with output> | grep "<string to find>"

This was a simple demonstration of the command. Learn more about the grep command.
The head and tail commands
When outputting large files, the head and tail commands come in handy. These commands display the beginning or end of a file, respectively. They are commonly used to quickly view the contents of a file without having to open it in a text editor.
The head and tail commands display the first 10 lines of a file by default. To display a different number of lines, you can use the -n option, followed by the number of lines you want to display.
Here’s an example of using the head and tail commands:
root@ubuntu:~# head <file name>
root@ubuntu:~# tail <file name>
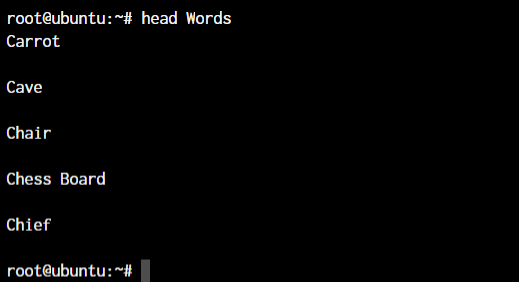
As you can see, the head command showed 10 lines from the top of the file.
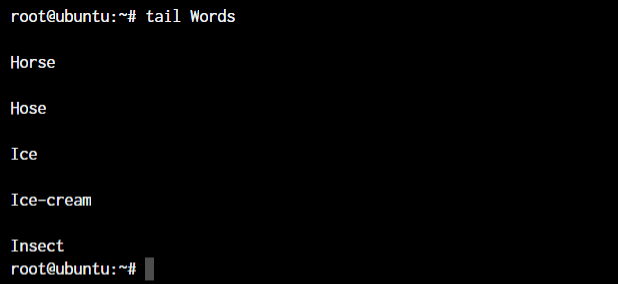
The tail command outputted the bottom 10 lines from the file.
These commands can be used to quickly view a file’s contents, monitor real-time updates for troubleshooting issues, filter output from other commands, and perform log analysis.
The diff, comm, and cmp commands
The diff, comm, and cmp commands are all used to compare files in Linux and Unix-based operating systems. These commands can be used to identify differences between two files, merge changes, and perform other file comparison tasks.
root@ubuntu:~# diff <file 1> <file 2>
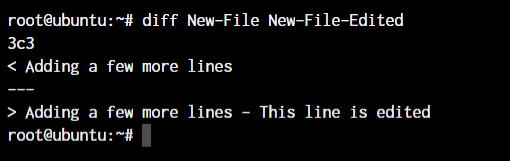
As you can see above, we have added a small piece of text saying, “This line is edited” to the New-File-Edited file.
The cmp command is used to compare two files and display the first byte that is different between them. It can be used to identify differences between binary files or to check for corruption in files.
root@ubuntu:~# cmp <file 1> <file 2>

The cmp command only tells us the line number, which is different. Not the actual text.
The comm command is used to compare two sorted files and display the lines that are unique to each file, as well as the lines that are common to both files.
root@ubuntu:~# comm <file 1> <file2>
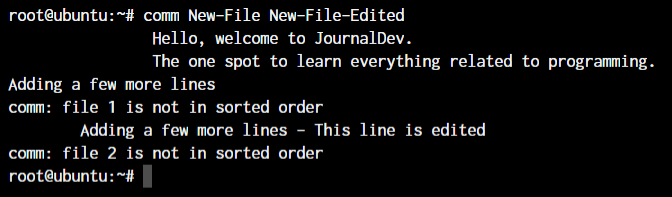
The text that’s aligned to the left is only present in file 1. The centre-aligned text is present only in file 2. And the right-aligned text is present in both files.
By the looks of it, comm command makes the most sense when we’re trying to compare larger files and would like to see everything arranged together.
All three of these commands are essential tools for working with files in Linux and Unix-based operating systems. By understanding how to use the diff, comm, and cmp commands effectively, you can identify differences between files, merge changes, and perform other file comparison tasks.
These commands can help you to identify and resolve issues with files, as well as to track changes and maintain version control. Whether you’re a developer or a system administrator, these commands are an essential part of your toolkit.
The sort command in Linux
The sort command is used to sort lines in a text file or standard input in Linux and Unix-based operating systems. It can be used to sort lines in ascending or descending order and to perform other sorting operations, such as sorting by fields or using a custom sorting order.
The basic syntax of the sort command is:
root@ubuntu:~# sort <filename>
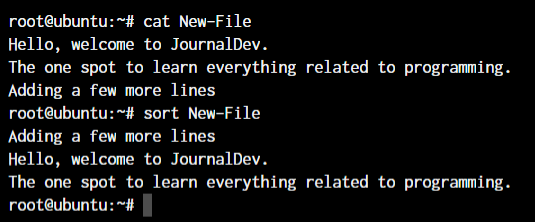
By default, the sort command sorts lines in ASCII collating sequence, which can lead to unexpected results when sorting numbers or special characters. To sort numbers in numerical order, you can use the -n option.
Here’s an example of using the -n option:
root@ubuntu:~# sort -n file.txt
The above command will sort the lines in file.txt in numerical order.
The sort command can also be used to sort lines based on specific fields using the -k option.
Here’s an example of using the -k option:
root@ubuntu:~# sort -k 2 file.txt
This command will sort the lines in file.txt based on the second field.
The sort command is a powerful and flexible tool for working with text files in Linux and Unix-based operating systems. By understanding how to use the sort command effectively, you can sort lines in text files, sort lines based on specific fields, and perform other sorting operations.
These commands can help you organize and analyze data and perform other file manipulation tasks. Whether you’re a developer or a system administrator, the sort command is an essential part of your toolkit.
The export command in Linux
The export command in Linux and Unix-based operating systems is used to set environment variables. Environment variables are used to store information that can be used by processes or commands.
Once an environment variable is set, it can be accessed by any process or command that is running in the same shell.
Environment variables can be used to store a wide range of information, such as configuration settings, user preferences, or system information.
Here’s an example of using the export command:
root@ubuntu:~# export <variable name>=<value>

Learn more about the export command
The ssh command in Linux
The ssh command in Linux and Unix-based operating systems establishes a secure shell connection to a remote server. The command provides a secure encrypted connection between the local and remote servers, allowing users to run commands and transfer files securely.
The basic syntax of the ssh command is:
root@ubuntu:~ ssh username@remote-server
This command establishes an ssh connection to the remote-server using the username account.
The ssh command supports a wide range of options and configurations, including:
- Configuring authentication methods (password, public key, etc.)
- Configuring encryption algorithms
- Configuring compression
- Configuring port forwarding
- Configuring X11 forwarding
- Configuring SSH keys
The service command in Linux
The service command in Linux is used to manage system services, which are long-running processes that are started at boot time and run in the background. These services are responsible for providing various system functionalities, such as networking, database management, and user authentication.
The service command is used to start, stop, restart, and check the status of these services. It is a front-end to the systemctl command, which is used to manage the systemd service manager.
The basic syntax of the command is as below.
root@ubuntu:~ service ssh status
root@ubuntu:~ service ssh stop
root@ubuntu:~ service ssh start
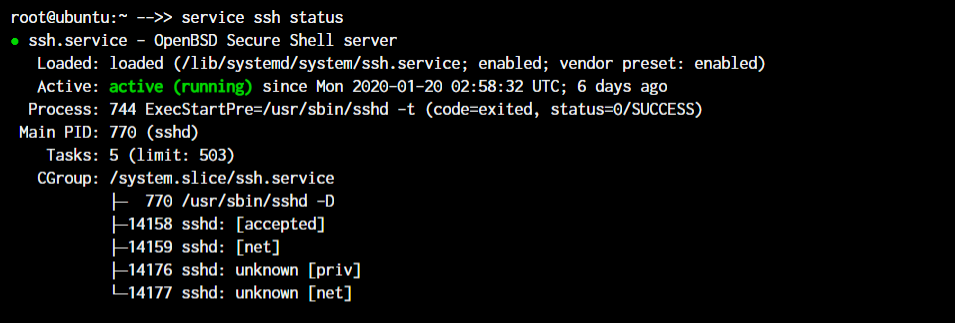
As you can see in the image, the ssh server is running on our system.
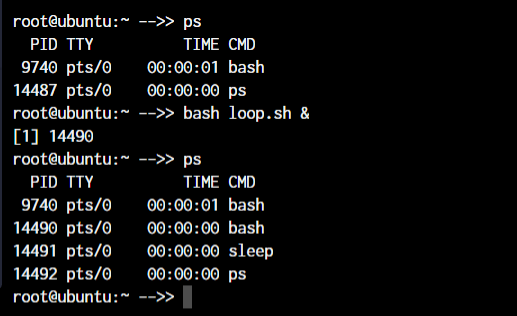
The ps, kill, and killall commands
The ps, kill, and killall commands are all used to manage processes in Linux.
The ps command is used to display information about the current running processes on the system. Here are some examples of using the ps command:
Display a list of all running processes:
root@ubuntu:~ ps -ef
Display a list of all processes for a specific process ID (PID):
root@ubuntu:~ ps -p PID
Let’s see all of this in action:
root@ubuntu:~ ps
root@ubuntu:~ kill <process ID>
root@ubuntu:~ killall <process name>
For demonstration purposes, we will create a shell script with an infinite loop and will run it in the background.
With the use of the & symbol, we can pass a process into the background. As you can see, a new bash process with PID 14490 is created.
Now, to kill a process with the kill command, you can type kill followed by the PID(Process Id) of the process.
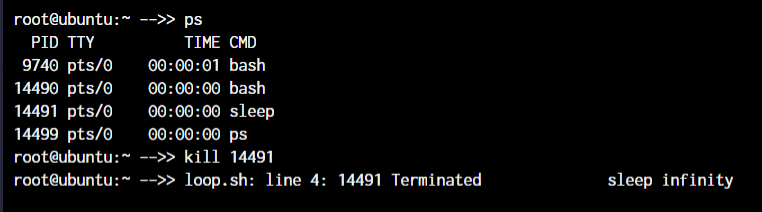
But if you do not know the process ID and just want to kill the process with the name, you can make use of the killall command.
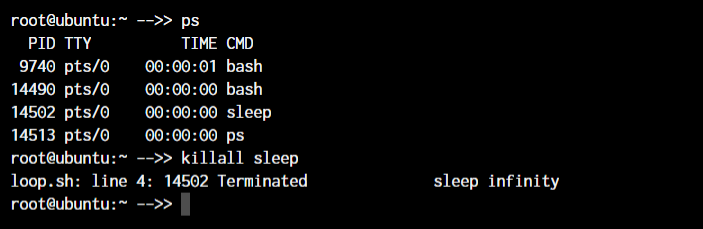
You will notice that PID 14490 stayed active. That is because, both times, we killed the sleep process.
Learn more about the ps command and the kill command.
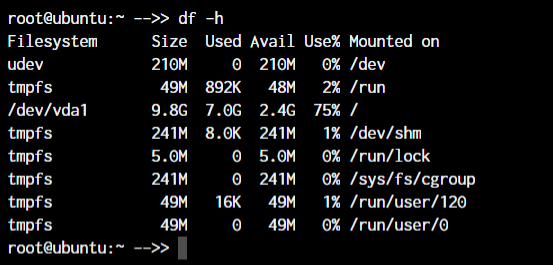
The df and mount commands
When working with Linux, the df and mount commands are very efficient utilities to mount filesystems and get details of the file system.
The df command is used to display the amount of disk space used and available on the file systems, and the mount command is used to mount a file system or device to a specific directory.
When we say mount, it means that we’ll connect the device to a folder so we can access the files from our filesystem. The default syntax to mount a filesystem is below:
root@ubuntu:~ mount /dev/cdrom /mnt
root@ubuntu:~ df -h
In the above case, /dev/cdrom is the device that needs to be mounted. Usually, a mountable device is found inside the /dev folder. mnt is the destination folder to which to mount the device. You can change it to any folder you want, but we have used /mnt as it’s the system’s default folder for mounting devices.
To see the mounted devices and get more information about them, we use the df command. Just typing df will give us the data in bytes, which is not readable. So, we’ll use the -h parameter to make the data human-readable.
The chmod and chown commands
The chmod and chown commands are used to modify file permissions and ownership in Linux.
The chmod command is used to change the permissions of a file or directory, and the chown command is used to change the ownership of a file or directory
The default syntax for both the commands is chmod <parameter> filename and chown <user:group> filename
root@ubuntu:~ chmod +x loop.sh
root@ubuntu:~ chmod root:root loop.sh
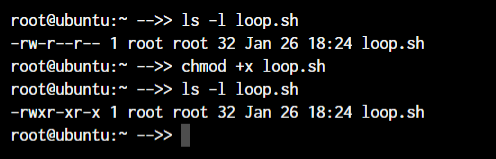
In the above example, we’re adding executable permissions to the loop.sh file with the chmod command. In addition, with the chown command, we’ve made it accessible only to the root user and users within the root group.
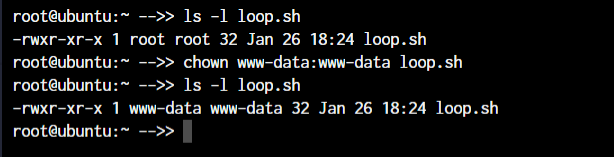
As you will notice, the root root part is now changed to www-data which is the new user who has full file ownership.
Learn more about the Linux file Permissions and using the chmod command.
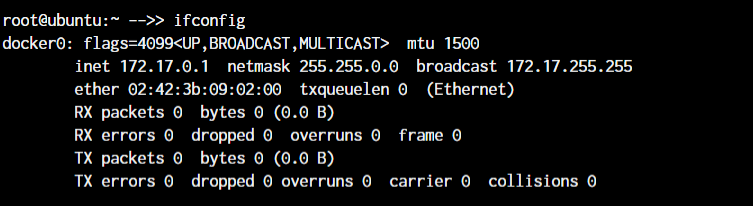
The ifconfig and traceroute commands
The ifconfig and traceroute commands manage network interfaces and trace the route of network packets in Linux.
The ifconfig command will give you the list of all the network interfaces along with the IP addresses, MAC addresses and other information about the interface.
root@ubuntu:~ ifconfig
There are multiple parameters that can be used, but we’ll work with the basic command here.
The traceroute command is used to trace the route of network packets and determine the path they take to reach a specific destination.
When working with traceroute, you can simply specify the IP address, hostname, or domain name of the endpoint.
root@ubuntu:~ traceroute <destination address>

Now, obviously, localhost is just one hop (the network interface itself). You can try this same command with any other domain name or IP address to see all the routers your data packets pass through to reach the destination.
The wget command in Linux
If you want to download a file from within the terminal, the wget command is one of the handiest command-line utilities available. It is one of the important Linux commands you should know when working with source files.
When you specify the link for download, it has to directly be a link to the file. If the file cannot be accessed by the wget command, it will simply download the webpage in HTML format instead of the actual file that you wanted.
Let’s try an example. The basic syntax of the wget command is :
root@ubuntu:~ wget <link to file>
Or,
root@ubuntu:~ wget -c <link to file>
The -c argument allows us to resume an interrupted download.
The ufw and iptables commands
The ufw and iptables commands are used to manage firewalls in Linux.
UFW and IPTables are firewall interfaces for the Linux Kernel’s netfilter firewall. IPTables directly passes firewall rules to Netfilter while UFW configures the rules in IPTables, which then sends those rules to Netfilter.
Why do we need UFW when we have IPTables? Because IPTables is pretty difficult for a newbie. UFW makes things extremely easy. See the below example where we are trying to allow port 80 for our webserver.
root@ubuntu:~# iptables -A INPUT -p tcp -m tcp --dport 80 -j ACCEPT
root@ubuntu:~# ufw allow 80
I’m sure you now know why UFW was created! Look at how easy the syntax becomes. Both these firewalls are very comprehensive and can allow you to create any kind of configuration required for your network. Learn at least the basics of UFW or IPTables firewall, as these are the Linux commands you must know.
Learn more about managing firewall with ufw and managing firewall with iptables.
Package Managers in Linux
Different Linux distributions use different package managers. Since we’re working on a Ubuntu server, we have the apt package manager. But for someone working on a Fedora, Red Hat, Arch, or Centos machine, the package manager will be different.
Below are the commands on how to use these package managers on different Linux distributions.
- Debian and Debian-based distros -
apt install <package name> - Arch and Arch-based distros -
pacman -S <package name> - Red Hat and Red Hat-based distros -
yum install <package name> - Fedora and CentOS -
yum install <package>
Getting yourself well versed with the package manager of your distribution will make things much easier for you in the long run. So even if you have a GUI based package management tool installed, try an make use of the CLI based tool before you move on to the GUI utility. Add these to your list of Linux commands you must know.