Jan 20
Jan 20 What’s the point of RAW Details in Lightroom? Here’s a perfect example.
Over the past few years, Adobe has been adding to the AI processing functionality of Lightroom, with Denoise and Super Resolution. But the OG of these, the one which was the original “Enhance Details” was what is now known as RAW Details. Most people probably only ever use this now in conjunction with the other two, and you may be wondering what is even the point of RAW details on its own. Well, I was recently going through a few photos I shot the other day, and I saw something that demonstrated perfectly how Raw Details can actually work. Allow me to explain….
The idea behind RAW details when it first came out (back when it was “Enhance Details”) was that it would use machine learning to re…
Jan 20
Jan 20 What’s the point of RAW Details in Lightroom? Here’s a perfect example.
Over the past few years, Adobe has been adding to the AI processing functionality of Lightroom, with Denoise and Super Resolution. But the OG of these, the one which was the original “Enhance Details” was what is now known as RAW Details. Most people probably only ever use this now in conjunction with the other two, and you may be wondering what is even the point of RAW details on its own. Well, I was recently going through a few photos I shot the other day, and I saw something that demonstrated perfectly how Raw Details can actually work. Allow me to explain….
The idea behind RAW details when it first came out (back when it was “Enhance Details”) was that it would use machine learning to remove artifacts in the RAW decoding process. Fujifilm shooters are most familiar with this, as it helped address some of the artifacting issues Fujifilm shooters had with the default raw conversion. But what use was it to users of other cameras?
When I first wrote about this many years ago, I got into an argument with someone in the comments over the efficacy of the feature. They argued that it made no difference whatsoever, despite the fact that I posted several examples showing the difference. Anyway, I believe this is relatively forgotten now, as Denoise is probably the primary reason people use this function now. But RAW details can remove artifacts on its own. It’s especially useful for certain types of moiré and aliasing. While you can sort of fix this by brushing on a layer with the de-moire turned up - all this does is blur the chroma channels. With RAW details, it actually fixes it. Here’s the afore mentioned example:
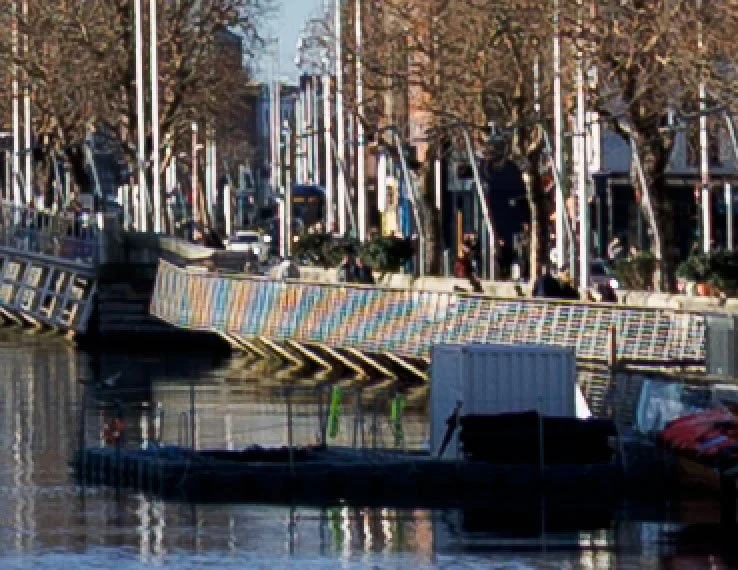
First, here’s the original image, zoomed to 100%. This was taken with the Canon R6 Mark II. You can clearly see the moiré on the railings.
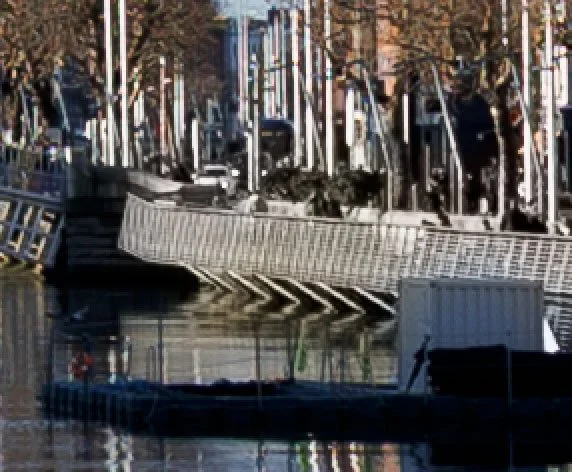
Now here’s the same thing with RAW details (and only Raw Details) turned on. It totally removes the moiré without doing any kind of chroma blurring.
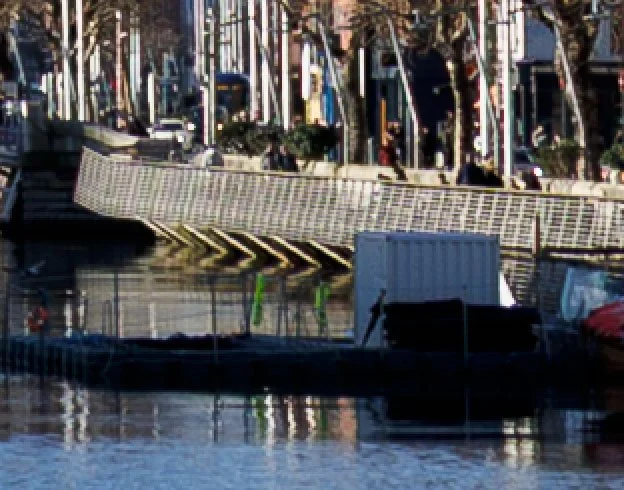
Finally, here’s the traditional method of removing moiré by using a brush and the de moiré function. While this has removed the moiré, it has also removed the colour surrounding it - because it works bye blurring the chroma channels. You could, of course, be more careful with your brushing, but the RAW details method fixes it in a couple of seconds with one click.
Note how this method has affected the colour
Anyway, I just thought this was interesting, as it was such a clear example of the function in effect. While it’s not something you will need to use every day, it’s worth knowing what it does and how it works. So the next time you come across a problem like this, try RAW details first and see if it fixes it.