New
EuroGPT Enterprise is open source, runs in Europe, and keeps your data private. Try it now
All Blog Posts
December 15, 2025 · 12 min read

Benjamin Satzger
Principal Software Engineer
We recently enabled GPU VMs on NVidia’s B200 HGX machines. These are impressive machines, but they are also surprisingly trickier to virtualize than the H100s. So we sifted through NVidia manual pages, Linux forums, hypervisor docs and we made virtualization work. It wasn’t like AWS or Azure was going to share how to do this, so we documented our findings.
This blog post might be interesting if you’d like to learn more about how…
New
EuroGPT Enterprise is open source, runs in Europe, and keeps your data private. Try it now
All Blog Posts
December 15, 2025 · 12 min read
Benjamin Satzger
Principal Software Engineer
We recently enabled GPU VMs on NVidia’s B200 HGX machines. These are impressive machines, but they are also surprisingly trickier to virtualize than the H100s. So we sifted through NVidia manual pages, Linux forums, hypervisor docs and we made virtualization work. It wasn’t like AWS or Azure was going to share how to do this, so we documented our findings.
This blog post might be interesting if you’d like to learn more about how NVidia GPUs are interconnected at the hardware level, the different virtualization models they support, or the software stack from the cards all the way up to the guest OS. If you have a few spare B200 HGX machines lying around, you’ll be able to run GPU VMs on them by the end - all with open source.
HGX B200 Hardware Overview
HGX is NVIDIA’s server-side reference platform for dense GPU compute. Instead of using PCIe cards connected through the host’s PCIe bus, HGX systems use SXM modules - GPUs mounted directly to a shared baseboard. NVidia’s earlier generation GPUs like Hopper came in both SXM and PCIe versions, but the B200 ships only with the SXM version.
Also, even when H100 GPUs use SXM modules, their HGX baseboard layouts look different than the B200s.
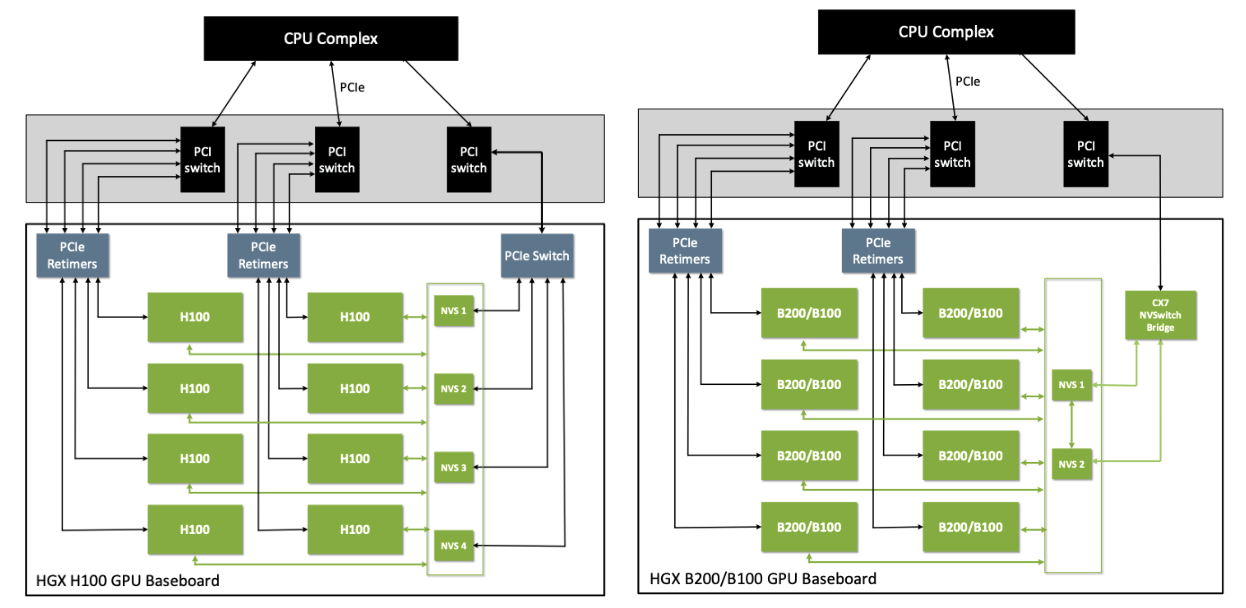
Within an HGX system, GPUs communicate through NVLink, which provides high-bandwidth GPU-to-GPU connectivity. NVSwitch modules merge these connections into a uniform all-to-all fabric, so every GPU can reach every other GPU with consistent bandwidth and latency. This creates a tightly integrated multi-GPU module rather than a collection of independent devices.
In short, the B200 HGX platform’s uniform, high-bandwidth architecture is excellent for performance - but less friendly to virtualization than discrete PCIe GPUs.
Three Virtualization Models
Because the B200’s GPUs operate as a tightly interconnected NVLink/NVSwitch fabric rather than as independent PCIe devices, only certain virtualization models are practical on HGX systems. A key component of this is NVIDIA Fabric Manager, the service responsible for bringing up the NVLink/NVSwitch fabric, programming routing tables, and enforcing isolation when GPUs are partitioned.
Full Passthrough Mode
In Full Passthrough Mode, a VM receives direct access to the GPUs it is assigned. For multi-GPU configurations, the VM also takes ownership of the associated NVSwitch fabric, running both the NVIDIA driver and Fabric Manager inside the guest. On an HGX B200 system, this results in two configurations:
- Single 8-GPU VM: Pass all 8 GPUs plus the NVSwitches to one VM. The guest owns the entire HGX complex and runs Fabric Manager, with full NVLink connectivity between all GPUs.
- Multiple 1-GPU VMs: Disable NVLink for the GPU(s) and pass through a single GPU per VM. Each GPU then appears as an isolated PCIe-like device with no NVSwitch participation and no NVLink peer-to-peer traffic. 
Shared NVSwitch Multitenancy Mode
GPUs are grouped into partitions. A partition acts like an isolated NVSwitch island. Tenants can receive 1, 2, 4, or 8 GPUs. GPUs inside a partition retain full NVLink bandwidth, while GPUs in different partitions cannot exchange traffic. Fabric Manager manages routing and enforces isolation between partitions.
vGPU-based Multitenancy Mode
vGPU uses mediated device slicing to allow multiple VMs to share a single physical GPU. The GPU’s memory and compute resources are partitioned, and NVLink/NVSwitch are not exposed to the guest. This mode is optimized for light compute workloads rather than high-performance inference or training workloads.
Why Ubicloud Uses “Shared NVSwitch Multitenancy”
Full Passthrough Mode is too limiting because it allows only “all 8 GPUs” or “1 GPU” assignments. Meanwhile, vGPU slicing is designed for fractional-GPU workloads and is not the best fit for high-performance ML use cases. Shared NVSwitch Multitenancy Mode provides the flexibility we need: it supports 1-, 2-, 4-, and 8-GPU VMs while preserving full GPU memory capacity and NVLink bandwidth within each VM.
With this context in place, the following sections describe how to run GPU VMs on the B200 using Shared NVSwitch Multitenancy Mode.
Preparing the Host for Passthrough
While the B200 GPUs are SXM modules, the Linux kernel still exposes them as PCIe devices. The procedure for preparing them for passthrough is similar: detach the GPUs from the host’s NVIDIA driver and bind them to the vfio-pci driver so that a hypervisor can assign them to a VM.
You can inspect the B200 GPUs via PCI ID 10de:2901:
lspci -k -d 10de:2901
17:00.0 3D controller: NVIDIA Corporation Device 2901 (rev a1)
DeviceName: #GPU0
Kernel driver in use: nvidia
...
The 10de vendor ID identifies NVIDIA, and 2901 corresponds specifically to the B200. You can consultSupported NVIDIA GPU Products for a comprehensive list of NVIDIA GPUs and their corresponding device IDs.
Switching Drivers On-the-Fly
During development, it’s common to switch between using the GPUs locally on the host and passing them through to a guest. The nvidia driver lets the host OS use the GPU normally, while vfio-pci isolates the GPU so a VM can control it. When a GPU is bound to vfio-pci, host tools like nvidia-smi won’t work. So switching drivers lets you alternate between host-side development and VM passthrough testing.
You can dynamically rebind the GPUs between the nvidia and vfio-pci drivers using their PCI bus addresses:
DEVS="0000:17:00.0 0000:3d:00.0 0000:60:00.0 0000:70:00.0 0000:98:00.0 0000:bb:00.0 0000:dd:00.0 0000:ed:00.0"

# bind to vfio-pci
for d in $DEVS; do
echo "$d" > /sys/bus/pci/drivers/nvidia/unbind
echo vfio-pci > /sys/bus/pci/devices/$d/driver_override
echo "$d" > /sys/bus/pci/drivers_probe
echo > /sys/bus/pci/devices/$d/driver_override
done

# bind back to nvidia
for d in $DEVS; do
echo "$d" > /sys/bus/pci/drivers/vfio-pci/unbind
echo nvidia > /sys/bus/pci/devices/$d/driver_override
echo "$d" > /sys/bus/pci/drivers_probe
echo > /sys/bus/pci/devices/$d/driver_override
done
You can always verify the active driver by running:
lspci -k -d 10de:2901
Permanently Binding B200 GPUs to vfio-pci
For production passthrough scenarios, the GPUs should bind to vfio-pci automatically at boot. That requires configuring IOMMU support, preloading VFIO modules, and preventing the host NVIDIA driver from loading.
1. Configure IOMMU and VFIO PCI IDs in GRUB
Enable the IOMMU in passthrough mode and instruct the kernel to bind 10de:2901 devices to vfio-pci:
# Edit /etc/default/grub to include:
GRUB_CMDLINE_LINUX_DEFAULT="... intel_iommu=on iommu=pt
vfio-pci.ids=10de:2901"
Then apply the changes:
update-grub
2. Preload VFIO Modules
To guarantee the VFIO driver claims the devices before any other driver can attempt to initialize them, we ensure the necessary kernel modules are loaded very early during the boot process.
tee /etc/modules-load.d/vfio.conf <<EOF
vfio
vfio_iommu_type1
vfio_pci
EOF
3. Blacklist Host NVIDIA Drivers
To prevent any potential driver conflicts, we stop the host kernel from loading the standard NVIDIA drivers by blacklisting them. This is essential for maintaining vfio-pci ownership for passthrough.
tee /etc/modprobe.d/blacklist-nvidia.conf <<EOF
blacklist nouveau
options nouveau modeset=0
blacklist nvidia
blacklist nvidia_drm
blacklist nvidiafb
EOF
4. Update Initramfs and Reboot
Finally, apply all the module and driver configuration changes to the kernel’s initial ramdisk environment and reboot the host system for the new configuration to take effect.
update-initramfs -u
reboot
After the reboot, verification is key. Running lspci -k -d 10de:2901should show all 8 GPUs are now correctly bound to the vfio-pci driver, confirming the host is ready for passthrough.All GPUs should show Kernel driver in use: vfio-pci.
Matching Versions Between Host and VM
Once the host’s GPUs are configured for being passed through, the next critical requirement is ensuring that the NVIDIA driver stack on the host and inside each VM are aligned. Unlike full passthrough mode - where each VM initializes its own GPUs and NVSwitch fabric - Shared NVSwitch Multitenancy places Fabric Manager entirely on the host or a separate service vm. The host (or the service vm) is responsible for bringing up the NVSwitch topology, defining GPU partitions, and enforcing isolation between tenants.
Because of this architecture, the VM’s GPU driver must match the host’s Fabric Manager version exactly. Even minor mismatches can result in CUDA initialization failures, missing NVLink connectivity, or cryptic runtime errors.
A second important requirement for the B200 HGX platform is that it only supports the NVIDIA "open" driver variant. The legacy proprietary stack cannot operate the B200. Both host and guest must therefore use the nvidia-open driver family.
Host Configuration
On the host, after enabling theCUDA repository, install the components that bring up and manage the NVSwitch fabric:
apt install nvidia-fabricmanager nvlsm
You can verify the installed Fabric Manager version with:
dpkg -l nvidia-fabricmanager
Name            Version
===============-==================
nvidia-fabricmanager 580.95.05
Boot Image Requirements
Our VM images begin as standard Ubuntu cloud images. We customize them with virt-customize to install the matching nvidia-open driver:
dpkg -l nvidia-open
Name            Version
===============-==================
nvidia-open     580.95.05
To build our fully "batteries-included" AI-ready VM images, we also install and configure additional components such as the NVIDIA Container Toolkit, along with other runtime tooling commonly needed for training and inference workloads.
With driver versions aligned and the necessary tooling in place, each VM can access its assigned GPU partition with full NVLink bandwidth within the NVSwitch island, providing a seamless environment for high-performance ML workloads.
The PCI Topology Trap
Our initial implementation used Cloud Hypervisor, which generally works well for CPU-only VMs and for passthrough of traditional PCIe GPUs. After binding the B200 GPUs to vfio-pci, we launched a VM like this:
cloud-hypervisor \
... # CPU/disk/network parameters omitted
--device path=/sys/bus/pci/devices/0000:17:00.0/
Inside the VM, the driver loaded cleanly and nvidia-smi looked perfectly healthy:
nvidia-smi

+-----------------------------------------------------------------------------------------+
| NVIDIA-SMI 580.95.05              Driver Version: 580.95.05      CUDA Version: 13.0     |
...
|=========================================+========================+======================|
|   0  NVIDIA B200                    On  |   00000000:00:04.0 Off |                    0 |
+-----------------------------------------+------------------------+----------------------+
For a PCIe GPU, this would be the end of the story.
But on the B200, CUDA initialization consistently failed, even though nvidia-smi reported no issues:
python3 - <<'PY'
import ctypes
cuda = ctypes.CDLL('libcuda.so.1')
err = cuda.cuInit(0)
s = ctypes.c_char_p()
cuda.cuGetErrorString(err, ctypes.byref(s))
print("cuInit ->", err, (s.value.decode() if s.value else "<?>"))
PY

cuInit -> 3 initialization error
At this point, it was clear that if CUDA can’t initialize, something fundamental in the virtualized hardware model is wrong. Other users had reported identical symptoms on HGX B200 systems. (e.g. https://forums.developer.nvidia.com/t/vfio-passthrough-for-hgx-b200-system/339906)
The Topology Mismatch
A critical difference emerged when comparing the PCI tree on the host to the PCI tree inside the VM. Inside the VM, the GPU sat directly under the PCI root complex:
lspci -tv -d 10de:2901
-[0000:00]---04.0  NVIDIA Corporation Device 2901
But on the host, the B200 GPU sits several levels deep behind PCIe bridges and root ports:
lspci -tv -d 10de:2901
-[0000:00]-+-[0000:14]---02.0-[15-1a]----00.0-[16-1a]----00.0-[17]----00.0  NVIDIA Corporation Device 2901
The HGX architecture- and specifically CUDA’s initialization logic for B200-class GPUs - expects a multi-level PCIe hierarchy. Presenting a flat topology (GPU directly under the root complex) causes CUDA to abort early, even though the driver probes successfully.
Cloud Hypervisor does not currently provide a way to construct a deeper, host-like PCIe hierarchy. QEMU, however, does.
Switching to QEMU for Custom PCI Layouts
Launching the VM with QEMU using a plain VFIO device still produced the same flat topology:
qemu-system-x86_64 \
... # CPU/disk/network params omitted
-device vfio-pci,host=0000:17:00.0
But QEMU allows you to insert PCIe root ports and attach devices behind them, recreating a realistic hierarchy:
qemu-system-x86_64 \
... # CPU/disk/network params omitted
-device pcie-root-port,id=rp1 \
-device vfio-pci,host=0000:17:00.0,bus=rp1
Inside the VM, the topology now looked like this:
lspci -tv
-[0000:00]-+-04.0-[01]----00.0  NVIDIA Corporation Device 2901
This layout mirrors the host’s structure: the GPU sits behind a root port, not directly under the root complex. With that change in place, CUDA initializes normally:
cuInit -> 0 no error
Now we’re in business!
The Large-BAR Stall Problem
With the PCI topology corrected, GPU passthrough worked reliably once the VM was up. However, a new issue emerged when passing through multiple B200 GPUs - especially 4 or 8 at a time. VM boot would stall for several minutes, and in extreme cases even over an hour before the guest firmware handed off to the operating system.
After investigating, we traced the issue to the enormous PCI Base Address Registers (BARs) on the B200. These BARs expose large portions of the GPU’s memory aperture to the host, and they must be mapped into the guest’s virtual address space during boot.
You can see the BAR sizes with:
lspci -vvv -s 17:00.0 | grep Region
Region 0: Memory at 228000000000 (64-bit, prefetchable) [size=64M]
Region 2: Memory at 220000000000 (64-bit, prefetchable) [size=256G]
Region 4: Memory at 228044000000 (64-bit, prefetchable) [size=32M]
The critical one is Region 2, a 256 GB BAR. QEMU, by default, mmaps the entire BAR into the guest, meaning:
- 1 GPU → ~256 GB of virtual address space
- 8 GPUs → ~2 TB of guest virtual address space
Older QEMU versions (such as 8.2, which ships with Ubuntu 24.04) map these huge BARs extremely slowly, resulting in multi-minute or hour-long stalls during guest initialization.
Solution 1: Upgrade to QEMU 10.1+
QEMU 10.1 includes major optimizations for devices with extremely large BARs. With these improvements, guest boot times return to normal even when passing through all eight GPUs.
Solution 2: Disable BAR mmap (x-no-mmap=true)
If upgrading QEMU or reserving large amounts of memory is not feasible, you can instruct QEMU not to mmap the large BARs directly, dramatically reducing the amount of virtual memory the guest must reserve:
qemu-system-x86_64 \
... # CPU/disk/network parameters omitted
-device pcie-root-port,id=rp1 \
-device vfio-pci,host=0000:17:00.0,bus=rp1,x-no-mmap=true
With x-no-mmap=true, QEMU avoids mapping the BARs into the guest’s virtual address space and instead uses a slower emulated access path. In practice:
- Virtual memory consumption becomes small and constant
- Guest boot times become fast and predictable
- Most real-world AI training and inference workloads show little to no measurable performance impact, since they do not heavily exercise BAR-access paths
Only workloads that directly access the BAR region at high rates may observe reduced performance.
Fabric Manager and Partition Management
With passthrough and PCI topology resolved, the final piece of Shared NVSwitch Multitenancy is partition management. In this mode, the host’s Fabric Manager controls how the eight B200 GPUs are grouped into isolated NVSwitch “islands”, each of which can be assigned to a VM.
Fabric Manager operates according to a mode defined in:
/usr/share/nvidia/nvswitch/fabricmanager.cfg
The key setting is:
# Fabric Manager Operating Mode
# 0 - Bare-metal or full passthrough mode
# 1 - Shared NVSwitch multitenancy
# 2 - vGPU-based multitenancy
FABRIC_MODE=1
After updating the configuration:
systemctl restart nvidia-fabricmanager
With FABRIC_MODE=1, Fabric Manager starts in Shared NVSwitch Multitenancy Mode and exposes an API for activating and deactivating GPU partitions.
Predefined HGX B200 Partitions
For an 8-GPU HGX system, NVIDIA defines a set of non-overlapping partitions that cover all common VM sizes (1, 2, 4, and 8 GPUs). Fabric Manager only allows one active partition per GPU; attempting to activate an overlapping partition will fail.
| Partitions ID | Number of GPUs | GPU ID |
|---|---|---|
| 1 | 8 | 1 to 8 |
| 2 | 4 | 1 to 4 |
| 3 | 4 | 5 to 8 |
| 4 | 2 | 1, 2 |
| 5 | 2 | 3, 4 |
| 6 | 2 | 5, 6 |
| 7 | 2 | 7, 8 |
| 8 | 1 | 1 |
| 9 | 1 | 2 |
| 10 | 1 | 3 |
| 11 | 1 | 4 |
| 12 | 1 | 5 |
| 13 | 1 | 6 |
| 14 | 1 | 7 |
| 15 | 1 | 8 |
Drag table left or right to see remaining content
These predefined layouts ensure that GPU groups always form valid NVSwitch “islands” with uniform bandwidth.
GPU IDs Are Not PCI Bus IDs
A critical detail: GPU IDs used by Fabric Manager do not correspond to PCI addresses, nor to the order that lspci lists devices. Instead, GPU IDs are derived from the “Module Id” field reported by the driver.
You can find each GPU’s Module ID via:
nvidia-smi -q
Example:
GPU 00000000:17:00.0
Product Name                  : NVIDIA B200
...
Platform Info
Peer Type                 : Switch Connected
Module Id                 : 1
This Module ID (1–8) is the index used by partition definitions, activation commands, and NVSwitch routing logic. When passing devices to a VM, you must map Fabric Manager GPU Module IDs → PCI devices, not assume PCI order.
Interacting with the Fabric Manager API
fmpm -l
# lists all partitions, their sizes, status (active/inactive)

fmpm -a 3
# activate partition ID 3

fmpm -d 3
# deactivate partition ID 3
Provisioning Flow
Putting everything together, the high-level flow for provisioning a GPU-enabled VM looks like this:
- A user requests a VM with X GPUs.
- The management system selects a free partition of size X.
- It activates the partition: fmpm -a <Partition ID>.
- Fabric Manager configures NVSwitch routing accordingly.
- The system passes through the GPUs corresponding to the Module Ids of that partition into the VM.
- The VM boots; inside it, nvidia-smi topo -m shows full NVLink connectivity within the partition.
- After VM termination, the system calls fmpm -d <Partition ID> to release the partition.
This workflow gives each tenant access to high-performance GPU clusters with full bandwidth and proper isolation, making the B200 HGX platform viable for multi-tenant AI workloads.
Closing Thoughts: Open-Source GPU Virtualization on HGX B200
Getting NVIDIA’s HGX B200 platform to behave naturally in a virtualized, multi-tenant environment requires careful alignment of many layers: PCI topology, VFIO configuration, driver versioning, NVSwitch partitioning, and hypervisor behavior. When these pieces fit together, the result is a flexible, high-performance setup where tenants receive full-bandwidth NVLink inside their VM while remaining fully isolated from other workloads.
A final note we care about: everything described in this post is implemented in the open. Ubicloud is a fully open-source cloud platform, and the components that manage GPU allocation, activate NVSwitch partitions, configure passthrough, and launch VMs are all public and available for anyone to inspect, adapt, or contribute to.
If you’d like to explore how this works behind the scenes, here are good entry points: