Creating Sleigh Chase: A quick guide to accelerated Mega Drive development with AI
Introduction
Many of us have wanted to create games for the systems we grew up with, but have lacked time, a team, or technical confidence. Today there are excellent options to help us, such as development engines (MD Engine, we are waiting for you) or libraries like SGDK that make the job infinitely easier than it was decades ago, but even so, getting started may not be easy.
This Christmas I created Sleigh Chase, a small Christmas-themed game for the Mega Drive, using AI tools such as OpenAI Codex, Eleven Labs, and Nano Banana. My idea…
Creating Sleigh Chase: A quick guide to accelerated Mega Drive development with AI
Introduction
Many of us have wanted to create games for the systems we grew up with, but have lacked time, a team, or technical confidence. Today there are excellent options to help us, such as development engines (MD Engine, we are waiting for you) or libraries like SGDK that make the job infinitely easier than it was decades ago, but even so, getting started may not be easy.
This Christmas I created Sleigh Chase, a small Christmas-themed game for the Mega Drive, using AI tools such as OpenAI Codex, Eleven Labs, and Nano Banana. My idea here is to offer a quick guide, aimed at people who do not have deep programming knowledge, or developers with very little free time.
As of today (late 2025), it is unrealistic to reach the quality level of an expert developer, but I also do not believe that is necessary. As you can see, it is perfectly feasible to start and finish a game without writing a single line of code.
To some extent we will take on the role of project director, adopting a SCRUM-style philosophy: define what you want, break it into small tasks, prioritize the backlog, and run short iterations that lead to concrete results that can be reverted if any problem arises.
Ethical implications
The use of generative AI has real ethical implications: from its impact on creative jobs to the origin of the data used to train the models. I am aware of this, and I believe the right approach is to be transparent and share the result to add value to the community, without seeking any kind of profit and in the most open way possible.
In my case, all the source code, assets, and original files are open on GitHub. This is my way of giving something back.
If you are an artist and all of this bothers you, and you believe I am harming the industry: I know you may not believe me, but I understand you and I support you. My projects are free, so I do not believe I am taking money away from anyone, and I try to share all my knowledge and give full support to the artists I have worked with or interacted with online. That said, I am also aware that I am giving money and support to multimillion-dollar companies that have no interest in valuing or fostering creative work, so you are free to express your disapproval of this or any other project that uses generative AI, and it will not offend me in the slightest.
It is also true that a huge number of people use generative AI and say nothing about it. Since this project was born with an open and collaborative mindset from minute zero, it made no sense to hide or avoid ticking the “I used AI” box, as the vast majority of developers do.
Prerequisites
Before getting into AI, there is a real foundation that is worth having clear. The more technical mastery we have before starting, the easier, less painful, and higher-quality the result will be.
Also, do not think this is about typing two or three prompts and getting a game out: each tool will give us an element, a mechanic, or a resource, and it will be up to us to turn all that into a game.
GitHub as the project backbone
It is essential to use GitHub as the central repository. The workflow with Codex (both in its web version and integrated into VS Code) relies on it: changes are validated, reverted, and synchronized easily. And if you work from multiple places (home, office, mobile), it can save your life.
Understanding the Mega Drive / Genesis hardware basics
This console has very specific quirks, especially regarding VRAM and palettes. Key things you need to understand (at least at a high level):
8x8 tiles and planes (BG A/B): All 2D rendering is based on 8x8 pixel tiles. Backgrounds are composed on two planes (foreground and background) using tile maps. Each entry in the map points to a tile and defines basic transformations. Internally, backgrounds are divided into 128x128px blocks, so if you have a 640x480 scrolling plane it may be better to expand it to 640x512 to avoid issues.
Limited VRAM (64KB): You cannot fit all the graphics you want at the same time. You must plan which tiles come in and out, and reuse everything possible if you want complex scenes. When SGDK compiles resources with rescomp it optimizes graphics heavily, allowing us to have, for example, a huge 128x128 sprite which it will split into smaller parts, reusing repeated tiles or removing fully transparent ones. Still, keeping this process in mind helps a lot when generating graphics that do not saturate video memory.
Limited palettes (4 palettes × 16 colors): We have 64 total colors available chosen from a pool of 512, divided into 4 palettes of 16 colors each. Color 0 of each palette is used for transparency, except on the background layer where it can be used. If a sprite or background needs more colors, you must simplify or carefully split it across palettes. Codex did a surprisingly good job organizing graphics by palettes (although I had to request some changes), but selecting the actual colors for those four palettes was a manual task that took me quite a while.
Sprites and hardware limits: There is a maximum number of sprites per scanline (typically 20 in PAL, 16 in NTSC) and per frame (~80). If you draw too many, some will disappear. You must control rendering, although SGDK does an excellent job pushing limits when possible (even though flickering can be noticeable on the bottom row when many elements align with the gift counter).
Knowing pixel art and animation
I always generate graphics at a large size and never ask the AI to pixelate them (I know there are specific models for this, but I have not seen any that produce truly usable results). I then adapt them using Aseprite, which is the most versatile tool for this. Animation is the least automatable part: frames must work visually and be coherent.
To make backgrounds fit into VRAM, they often need to be simplified by forcing reusable tiles. This is where manual work really makes the difference.
Music: DefleMask and sequencing
At the moment there is not much real AI help for sequencing music on the Mega Drive. Here I was lucky to work with Haddhar, who did all the work in DefleMask, the standard sequencer for the Mega Drive. There is no AI help here, so either build a team or learn the tool. At worst you can always use sample loops, taking advantage of the fact that cartridge size is no longer as limiting as it once was, but it is not the best idea.
Using a template project as a starting point
Ideally, you should start by importing a project that serves as a template. In my case I used the Christmas greeting I made last year, since The Weave (much more complete) has very customized features for an unusual game style, although I was still able to reuse its typography.
There are more projects that offer their source code, such as L’Abbaye des Morts, and the SDK itself includes examples with code that you can give to Codex as reference so it learns the correct style. The key here is to find a base that makes sense for what you want to do, instead of starting from scratch.
AI models know a lot about C and development from an academic standpoint, but they have little real-world experience with the Mega Drive and other retro systems, so it is essential to give them ALL the possible context: SGDK documentation, real examples, style guides, and reference files.
One trick in my case was generating a text file that compiled all SGDK documentation, which I created for The Weave using a Python script, and which you can download from this project’s documentation folder.
The game: Sleigh Chase

Sleigh Chase is a Christmas-themed mini-game for the Sega Mega Drive / Genesis, designed to be fun and easy to enjoy with the family during the holidays. It is our way of wishing you a Merry Christmas and a Happy New Year 2026.
It consists of three mini-games:
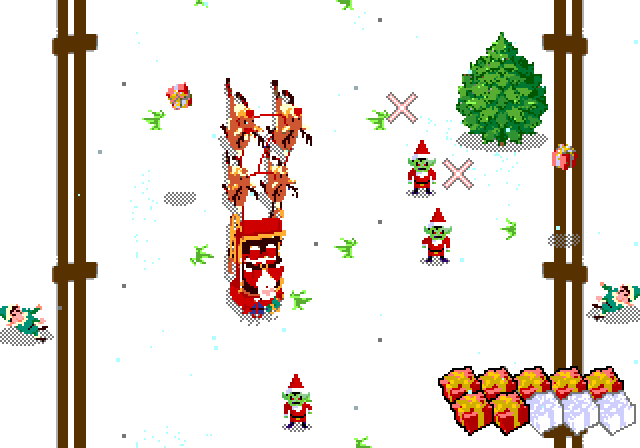
Gift collection: The Grinch’s evil henchmen have stolen the last 10 gifts Santa Claus has left to deliver. Green elves throw them at us from the sides, and we must collect them while avoiding trees and red goblins, who will steal any gifts we have already collected.
City delivery: We fly over the city in our sleigh, looking for ten chimneys to drop gifts into (controller button A). Do not throw them into lit chimneys, and watch out again for the evil goblins who will try to intercept them.
Chimes: After saving Christmas, we ring the twelve bells by throwing confetti at them, forming the New Year greeting message. Do not touch the bombs, or you will have to start over.
Let’s get to it: code generation with Codex
By far the strongest part of the whole process has been code generation. This is where Codex became my main “copilot”, both via the web and inside VS Code.
Strengths (my real experience)
Rapid iteration: I can request very specific changes and get a viable proposal in minutes. I do not need to wait for a developer, and I can iterate in real time.
Remote access: While away from home, I can ask Codex for things (even from my phone), review proposals, and validate them, and then everything is ready to compile when I get home. This massively speeds up the creative process.
Local mode in VS Code: When I am at my desktop, using Codex integrated into the editor allows me to review changes quickly and understand the project context without switching tabs.
Context awareness: With access to the entire repository as context, Codex understands the architecture (Entity, sprites, state machine, etc.) and generates code consistent with the existing style.
Codex via web: GitHub PR workflow
From the web, the workflow is usually:
- Describe the change clearly and in detail. Do not give vague instructions; be specific: “When the player collides with X, do Y”.
- Codex analyzes the repo and proposes modifications.
- Changes are generated with clear diffs. You can see exactly what will change.
- Changes are validated and a pull request (PR) is automatically created.
- I review the PR on GitHub and, if everything looks good, I merge it.
The interesting part is that you can review and approve from anywhere, and then when you get home you just compile and test the result. It is a very practical way of working if you keep your development environment ready to use from any computer (home, office, laptop, etc.).
Important: Compilation is always done locally with SGDK (in my case, with VS Code), because Codex does not have the tools to compile by itself. By using GitHub and web tools, this workflow fits perfectly if your environment is well set up.
Codex in VS Code: local workflow
In VS Code, Codex works directly on local files:
- You describe the task (as if it were a technical assignment).
- The model edits the code where needed and shows you the changes.
- You review (if you want) line by line, adjust details, and confirm.
This workflow is ideal for smaller tasks or when you want very fine-grained control. Since changes are made directly to files, everything is more dynamic and you can have a more fluid conversation with the AI, asking for small tweaks, rolling back steps, and so on.
Alternatives: plugins and models
Another option is to use AI plugins for VS Code. They work well, but token usage is usually much more expensive than a monthly OpenAI subscription. In my case, a single month of OpenAI Plus (23€) was more than enough to complete a project like this.
If you still want to go that route, you have alternatives such as Cline or Roo Code, and you can use Openrouter as an intermediary to access multiple models:
- Claude (very powerful but expensive) for complex tasks.
- Deepseek (free) for simpler tasks that require less reasoning.
Two real examples (copied literally)
Here are two real requests I made to Codex for this game, copied verbatim:
Example 1: Language selector on the title screen
On the title screen, we are going to add an English or Spanish selector
First, load the font in dark mode, the same way the cutscene library does
After the Sleigh Chase scroll, on a line that is approximately at 60% of the screen place "} ENGLISH {" centered, and two lines below "ESPA^OL" also centered
If we press down or up, they switch: "ENGLISH" (without braces) and "} ESPA^OL {" (with braces)
When pressing any button to start, the selected language will be saved in a global variable, which will be the one with the braces
(initial post was written in Spanish)
Result: Codex generated the code to render the selector, handle input, and store the state. Everything worked on the first try.
Here is the pull request associated with this change, with the specific modifications it made.
Example 2: Collision system and physical reaction
In this case, I requested the change from a waiting room in a medical center, using my phone: 
Result: Codex handled everything: music pause, blinking countdown, sprite cleanup, fade-in, and repositioning. The code was coherent with the existing state system.
Here is the generated pull request.
How Codex works internally
Without going too deep into technical details, this is what I observed:
Codex reads the repo, identifies relevant files, and locates the functions, structures, or data it needs to modify.
If necessary, it creates auxiliary scripts (for example in Python) to inspect content or verify data. These appear in the logs and let you understand why certain decisions are made.
It then proposes changes and explains them. You decide whether to accept them or not. In that sense, it is not a complete “black box”: you can follow the trail if you want.
In short, it is like working with an assistant who knows how to search, organize information, and write drafts that you then validate. It also has the ability to create helper scripts for tasks that are difficult to do directly.
In my case, for this project I barely programmed anything: I asked the AI to be very verbose in comments (using Doxygen format) and to make everything parameterized via constants. This allows me to tweak gameplay without having to go back to the AI for every small detail (which can be critical if you do not want to burn through the weekly Codex usage, which is generous but not unlimited).
Practical tips for working with Codex
Store references inside the repo
It is extremely useful to have reference files inside GitHub folders. In my case I have:
A file with the complete SGDK documentation compiled into one (documentos/sgdk-reference-2025-11-15.txt). This allows Codex to understand which functions exist and how they are used.
Other design and specification documents (DESIGN.md, etc.).
And especially documentos/AYUDA_IA.md, which contains a quick guide with project-specific rules.
In that AYUDA_IA.md file I include things such as:
- Do not compile from the AI.
- Keep
README.mdupdated if there are functional changes. - Avoid touching files generated by SGDK.
- Reminders about architecture, phases, and resource handling.
- Memory limitations (64KB RAM, 64KB VRAM, etc.).
- Code patterns (Entity, sprites, state machine).
This helps a lot in getting Codex to respond with coherent and safe changes.
Use custom instructions
Another key trick is setting custom instructions for Codex. I literally use these (copy and paste):
For Megadrive games, never try to compile the result, as this must be done outside your environment. Consult the SGDK documentation to see the syntax of the functions you can use.

Always keep the repository context in mind: review globals.h, module headers, and the existing structure before proposing changes.

Changes must be minimal and surgical: do not rewrite working code, only modify what is requested.

Always use Doxygen comments /** */ to document public functions.

Constants must be in UPPERCASE. Variables and functions in snake_case.

Do not use dynamic memory or large arrays on the stack. Remember the limits: 64KB total RAM.

If you change something in a .c file, make sure the corresponding .h file is up to date.
It looks simple, but it makes a difference. Codex generates much more coherent and safe code when it has clear rules.
Small, focused iteration
Instead of saying “Implement a collision system”, it is better to say something like:
Add a function that detects whether sprite A touches sprite B based on their collision boxes. Then implement a two-state state machine: NORMAL and HURT, which transitions on collision. Finally, when in HURT, do a 0.5 second fade-out and reset the sprite to the initial position.
You can do it as a single request, or even better split it into three small ones.
Always review changes before compiling
This is obvious, but crucial: review the diffs in GitHub before merging. This is where having a solid foundation in C and Mega Drive hardware really helps.
Compile locally and test. If something fails, roll back quickly (that is what git is for), and go back to the AI with more context: “This failed because X. Here is the compilation error: [paste the error].” If you are working locally with VS Code, as long as you stay in the same conversation it will have all the context needed to fix it.
Generate logs and pass them back
If something fails, you can always say something like “Add multiple logs to the tree collision function using kprintf”. Then run the game, copy everything that appears in the console, and pass it back to the AI. Once completed, tell it to remove all the debug code.
Generating the remaining assets
Audio: Eleven Labs (quick and useful samples)
For sound effects, I used Eleven Labs. The website is straightforward: describe what you want and choose the version you like most from the four provided. Since SGDK handles sample quality conversion when compiling resources, you can feed it the raw WAV directly.
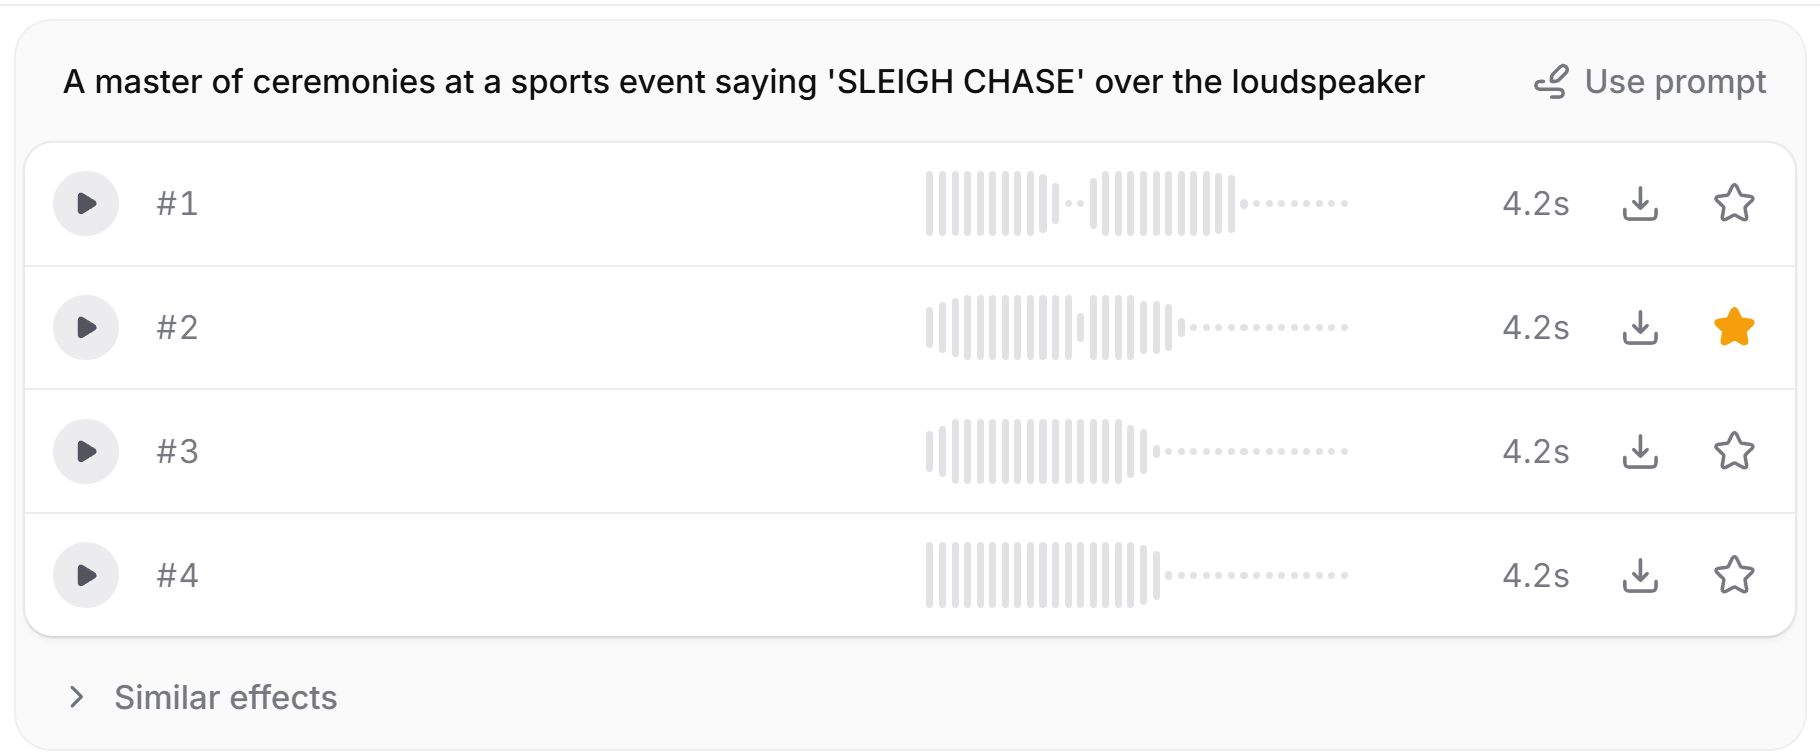 (creating the title voice-over — it took 3 or 4 attempts to find the right prompt)
Graphics: Nano Banana + Aseprite
I generated the graphics using Nano Banana through Perplexity, and then refined them in Aseprite to match the Mega Drive style. This combination works very well:
- Nano Banana: Provides quick ideas, coherent silhouettes, and visual concepts.
- Aseprite: Lets you clean up, recolor, adapt to limited palettes, animate, and reuse tiles.
On the Mega Drive, you often need to compress graphics to fit into VRAM, so Aseprite is indispensable here.
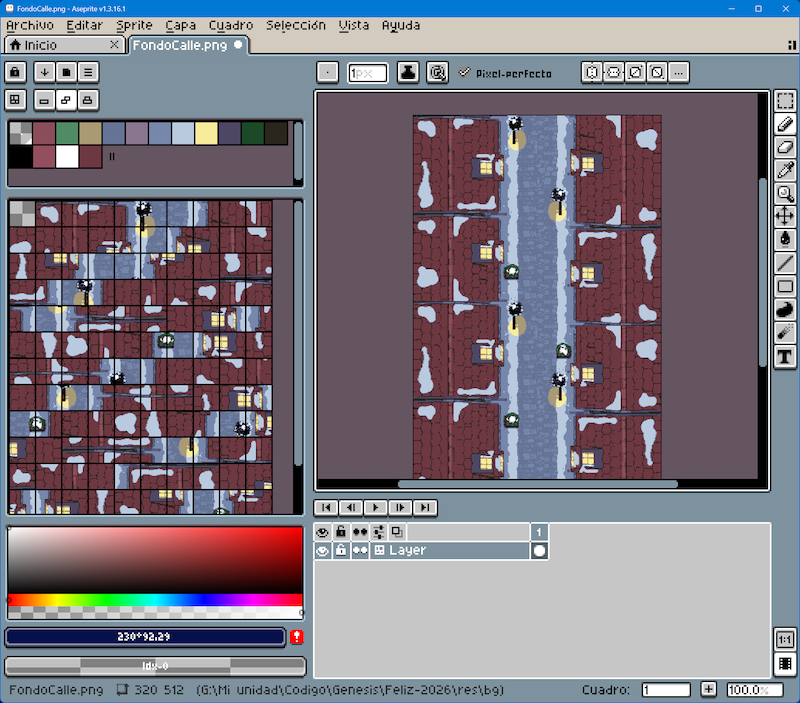 (one of the backgrounds, with the generated tiles on the left to reuse as much as possible)
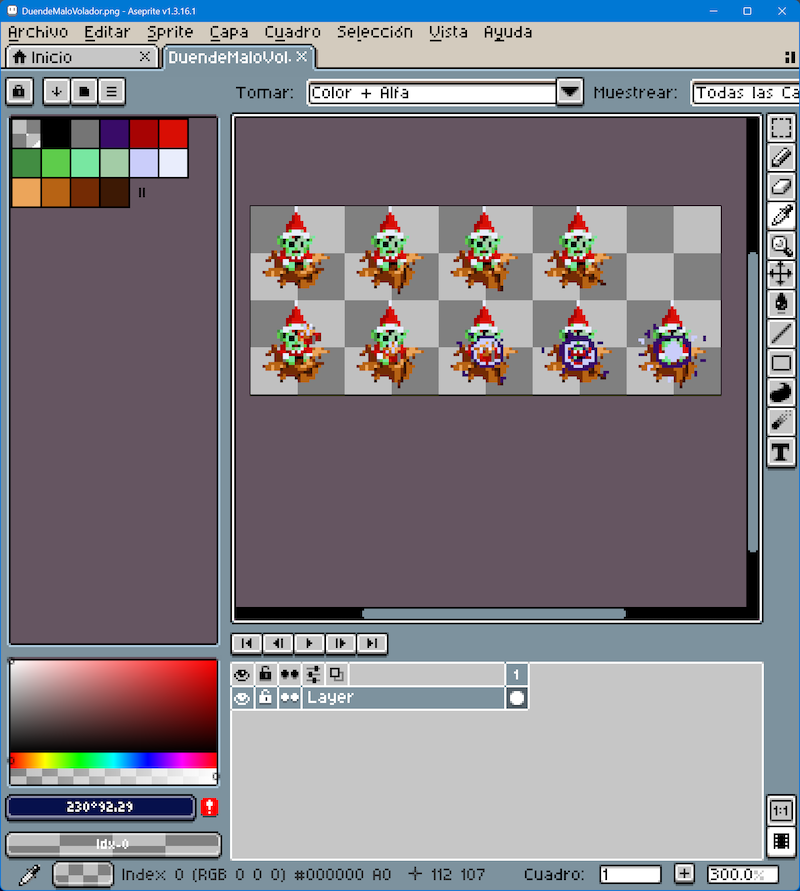 (editing animations based on one of the AI-generated frames)
Summary: subscriptions and tools I used
ChatGPT Plus / Codex (23€/month): With a one-month subscription you can access Codex. You can burn through weekly tokens and have to wait for the refresh, but for a project like this, a single month is more than enough to start and finish.
Perplexity Pro: An interesting complement. It gives away a year of Pro if you have certain linked services. Specifically, until the end of 2025 it can be claimed if you have a PayPal account created long ago.
Nano Banana (via Perplexity, although there is a free version with more usage limits): For graphic generation. If you decide to pay for one month of Codex, as recommended, you can also use the ChatGPT image engine, which is included.
Aseprite (17€): Pixel art and animation tool. Essential for the Mega Drive.
Eleven Labs (free account): For sound effects.
DefleMask (17€): Mega Drive sequencer. Requires learning, but it is the standard tool. A good open-source alternative is Furnace.
Visual Studio Code: You can work with any IDE, or even without one by letting Codex’s web interface do everything, but VS Code is free and cross-platform, lets you integrate everything into a single environment, and makes life easier.
You do not need to spend a fortune: with a minimal setup, you already have a powerful foundation to create.
Farewell and closing
Creating a retro game sounds big (and it is), and ideally you work in a team that covers all required areas. If you do not have that luck, having the right tools and a practical approach always helps. Codex allowed me to work faster, experiment without fear, and focus more on game design and less on writing code.
Of course, if low-level coding is your thing, you can ignore all of this: AI will take all the fun away, and do it worse than you.
And if you want to explore all the material, source code, and assets of Sleigh Chase, they are open on GitHub. I would love for this project to serve as a starting point or inspiration, and I encourage you to share everything you make publicly and without fear: you are not going to become a millionaire with a small game, and the best thing about the retro world is the community that has grown around it. Let’s take care of it.