A Combat System is not just about combat
When making a game, conflict is absolutely necessary. Someone or something must have a goal that conflicts with the player’s goal. This will help us design challenges that the player must overcome.
So if you’re looking for ways to add more challenges to your game, by the end of this post I’m going to show you how you can create Hazards that will enrich your world building while also adding more opportunities for challenging your players.
Why Hazards Matter in Game Design
Some people don’t want to make violence the main tool for resolving a conflict in their games. Games like Undertale even reward players for not engaging in violent conflict resolution.
Every game still needs a combat system.
Hazards are non-intentional entities in a …
A Combat System is not just about combat
When making a game, conflict is absolutely necessary. Someone or something must have a goal that conflicts with the player’s goal. This will help us design challenges that the player must overcome.
So if you’re looking for ways to add more challenges to your game, by the end of this post I’m going to show you how you can create Hazards that will enrich your world building while also adding more opportunities for challenging your players.
Why Hazards Matter in Game Design
Some people don’t want to make violence the main tool for resolving a conflict in their games. Games like Undertale even reward players for not engaging in violent conflict resolution.
Every game still needs a combat system.
Hazards are non-intentional entities in a game that perform a behavior that can hurt the player’s avatar.
Hazards in Action: A Real-World Example
I’m creating a top-down space shooter game, Milkyway Mailing Inc., and since the game is all about the space, I’m playing a lot with the Hazard recipe to create space-themed hazards, like this Pulsar (a star that emits beams of electromagnetic radiation):
Video 1 - Milkyway Mailing Inc. hazards
As you can see from the footage, there are other hazards as well like the black hole and the nebule.
So in games where you want to test the player’s ability to survive while also avoiding violence, you can use hazards.
Hazards are nothing but an object with the ability to hurt the player but doesn’t necessarily has the will or drive to do so. Typically they are just "minding their own business". They are different from an enemy. Enemies typically has the deliberate goal of hurting the player.
As Scott Rogers says in this book Level Up!
Hazards are the mechanic’s nasty little brother […] They look like mechanics they often act like mechanics, but they will kill a player just for snoring too loud.
Hazards may also resemble enemies, but the key difference is intelligence and/or mobility. All hazards have predictable patterns and limited movement.
— Scott Rogers
Building a Bomb Hazard in Godot 4
So, let’s create little bomb that explodes once the player gets close. For the visual feedback, we are going to use PixelFrog’s Kings & Pigs asset pack:
Interactive Image 1 - Click to access PixelFrog’s Kings and Pigs asset pack
Setting Up the Scene
Let’s start by creating a new scene and adding a Node2D as root node, then:
- Rename the root node as Bomb2D.
- Add an AnimatedSprite2D as its child. Recommended reading: AnimatedSprite2D.
- In the Sprite Frames property, create a new SpriteFrame resource. Recommended reading: SpriteFrame.
- Create all the necessary animations according to the available sprites. PixelFrog states that the animations were done using 10 fps, so keep that in mind.
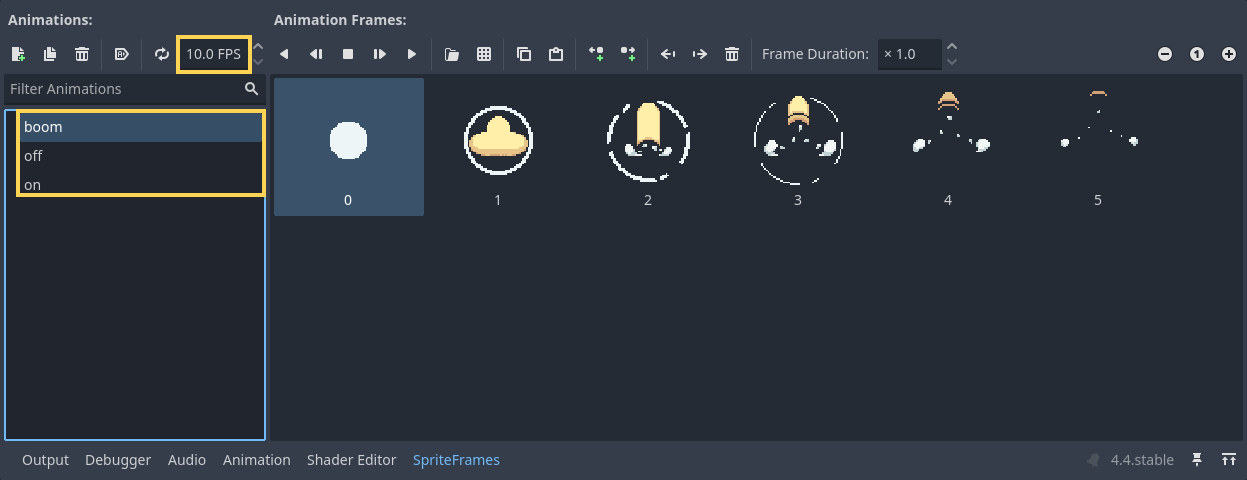 Figure 1 - The Bomb Sprite Frames with the boom, off, and on animations at 10 fps*
Set the "on" animation to be a loop, this is what will be playing while the bomb gets activated.
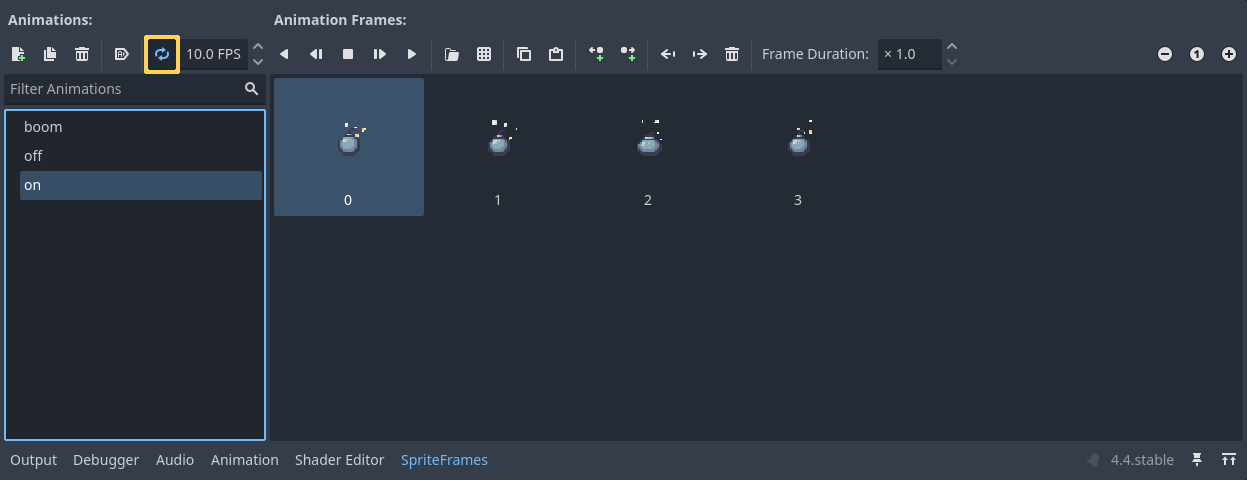
Figure 2 - The “Loop” option from the “on” animation toggled on
This is how the animations should look like:
Video 2 - The Bomb boom, on, and off animations playing
Adding Hit Detection
Add a new HitArea2D from the Hazard recipe and set its Team property to "Neutral" so the bomb also deals damage on enemies. 1.
Set the Damage property to whatever amount of damage better fits your intent, in this case, I’m going to leave it at 1.
1.
Add a CollisionShape2D and use a Circle2D for its Shape property. 1.
Increase the Circle2D/Radius property to match the Bomb’s explosion size.
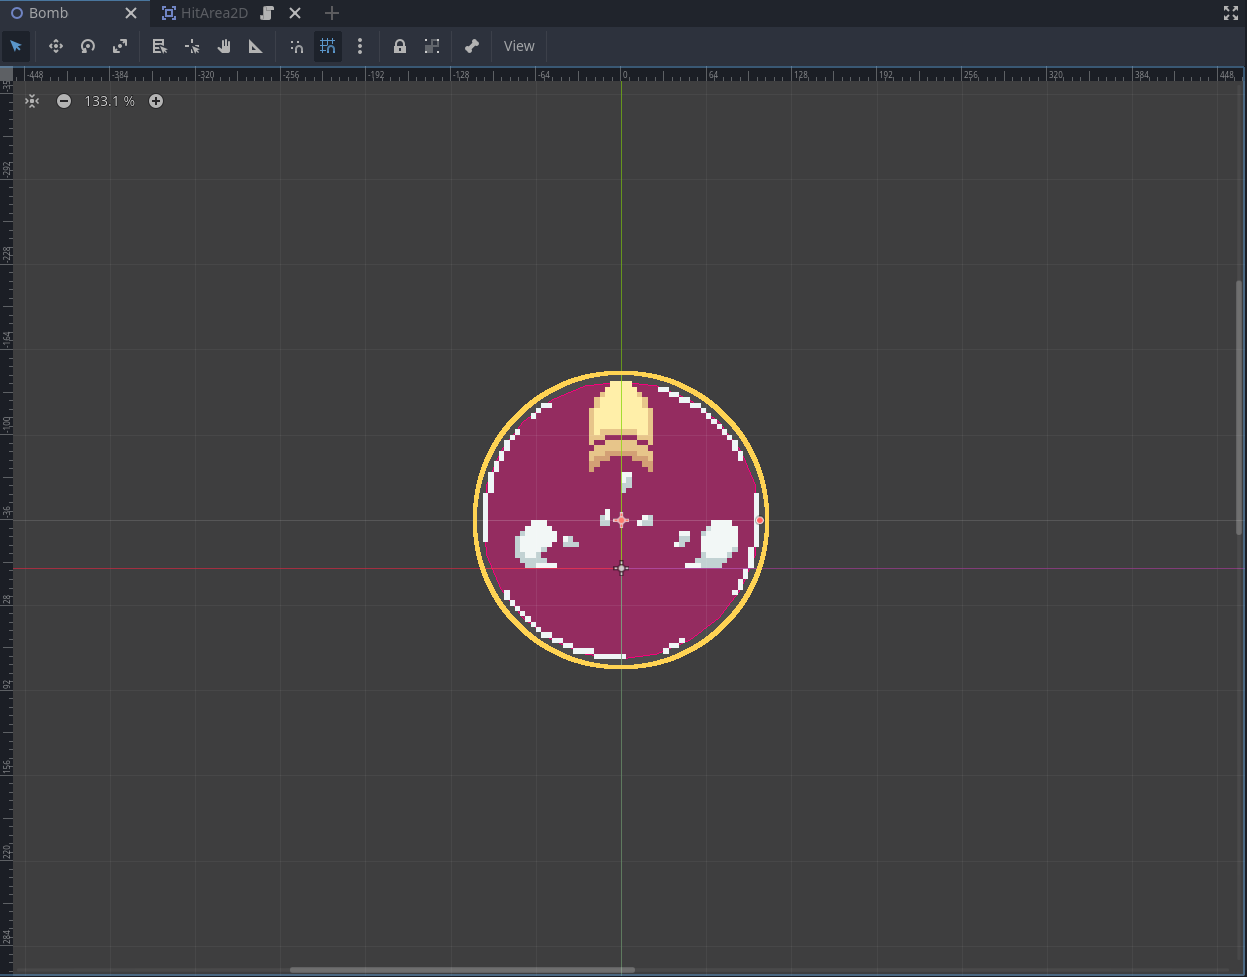
*Figure 3 - The HitArea2D’s CollisionShape matching the Bomb’s explosion area * 1.
Toggle on the CollisionShape2D/Disabled property so the Bomb doesn’t hit the player immediately.
Setting Up Player Detection
Add an InteractiveArea2D as a child of the Bomb node. We are going to use it to detect when the player is nearby. 1.
Add another CollisionShape2D and use a Shape2D matching the area you want to trigger the Bomb’s behavior. In my case, I used a RectangleShape2D like so:
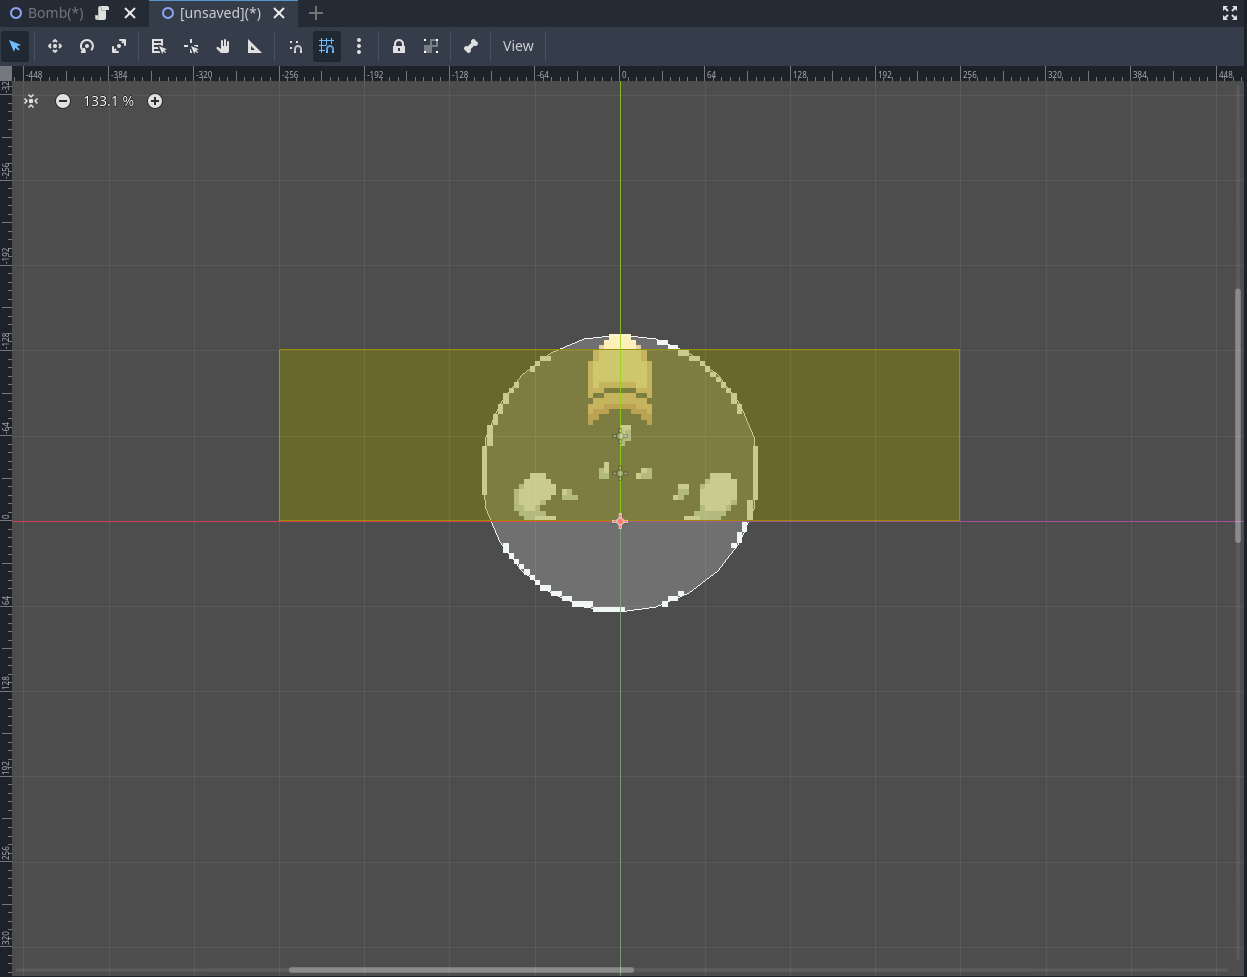
*Figure 4 - The InteractiveArea2D CollisionShape matching the Bomb’s trigger area *
Creating the Bomb Behavior with AnimationPlayer
Add an AnimationPlayer, we are going to use it to create the Bomb’s behavior. 1.
Create a new animation called "off". 1.
Set a key for the the AnimatedSprite2D/Animation property set to "off" and another one for the AnimatedSprite2D/Frame set to 0.
1.
Set a key for the HitArea2D/CollisionShape2D/Disabled set to true and the InteractiveArea2D/CollisionShape2D/Disabled set to false.
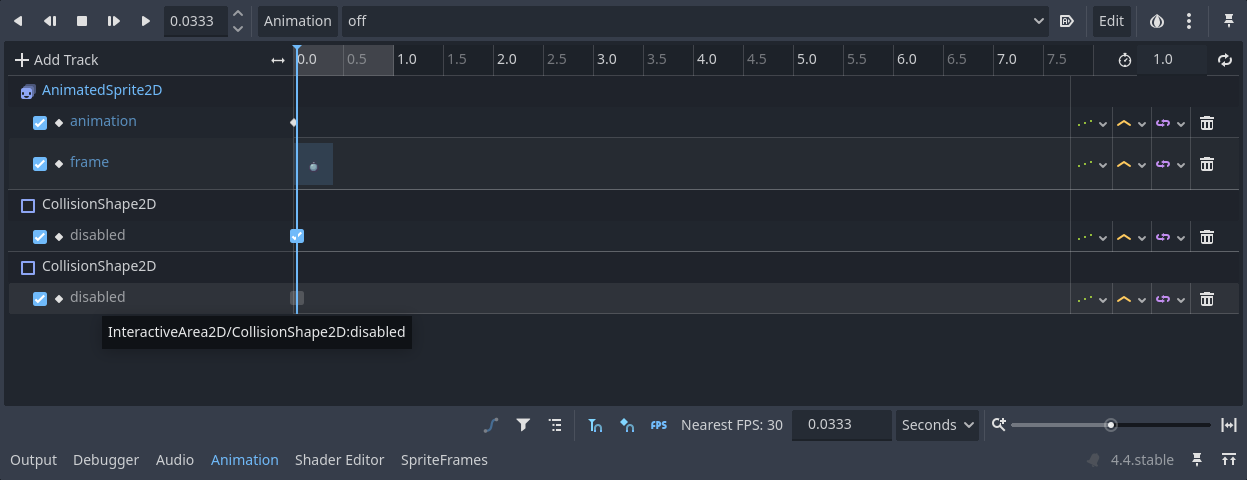
*Figure 5 - The “off” animation keys * 1.
Now, create a new animation called "on". 1.
Add a Call Method Track and create a key calling the AnimatedSprite2D.play() method passing the "on" argument so it starts playing the "on" animation.
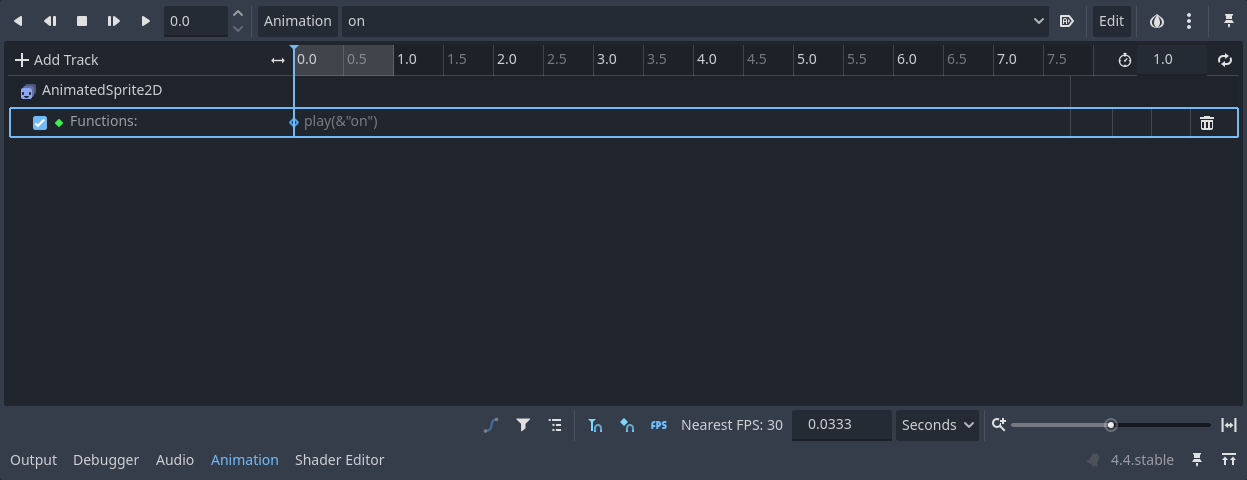
*Figure 6 - The “on” animation AnimatedSprite2D method track * 1.
Add another key toggling on the InteractiveArea2D/CollisionShape2D/Disabled property so the Bomb doesn’t trigger again if the player re-enters its InteractiveArea2D. 1.
You can increase this animation’s length for how long you want your Bomb to be on before exploding. In our case, we are going to leave it at 1.0 so it takes one second to explode.
1.
Create a new animation called "boom". 1.
Set a key for the the AnimatedSprite2D/Animation property set to "boom" 1.
Change the time settings from "Seconds" to "Frames" and set the frame rate to 10.
1.
Set the animation length to 6.
1.
Create a new key another for each frame of the "boom" animation using the AnimatedSprite2D/Frame property.
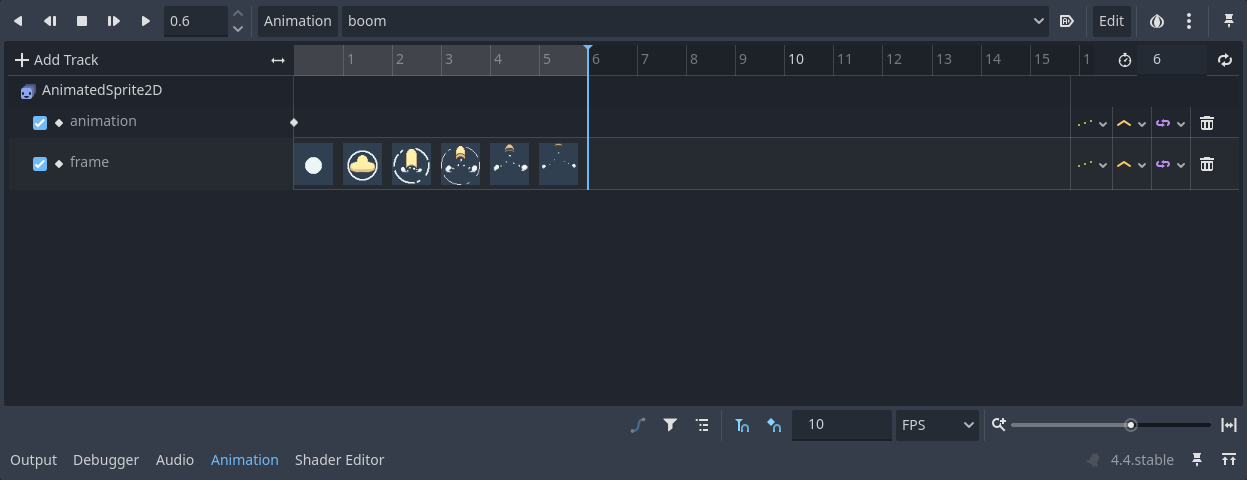
*Figure 7 - The “boom” animation frames * 1.
Set a new key toggling on the AnimatedSprite2D/Visibility property at frame 0 and another key toggling it off at frame 6.
1.
Set a new key toggling off the HitArea2D/CollisionShape2D/Disabled property right when the Bomb reaches its explosion frame and toggle it off when the explosion settles.

Figure 8 - The “boom” animation frames 1.
Finally, add a new Call Method Track calling the Bomb2D.queue_free() method at the end of the animation.
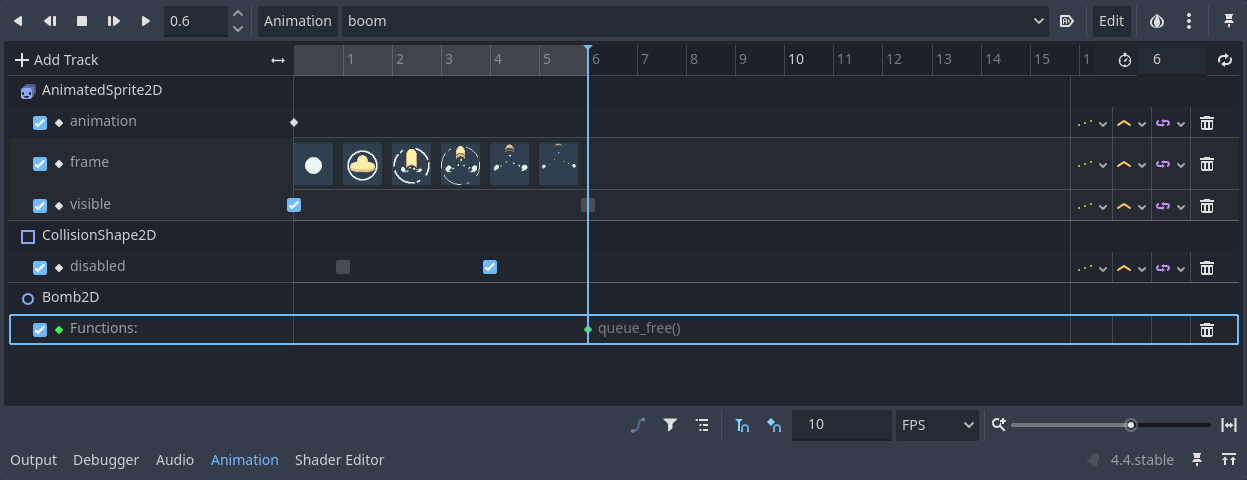
Figure 9 - The “boom” animation frames
Setting Up the Animation State Machine
Now, add a new AnimationTree as a child of the Bomb2D. 1.
Set the AnimationTree/Advance Expression Base Node to be the Bomb2D. 1.
Set the AnimationTree/Anim Player to be the AnimationPlayer. 1.
In the AnimationTree/Tree Root property, create a new AnimationNodeStateMachine.
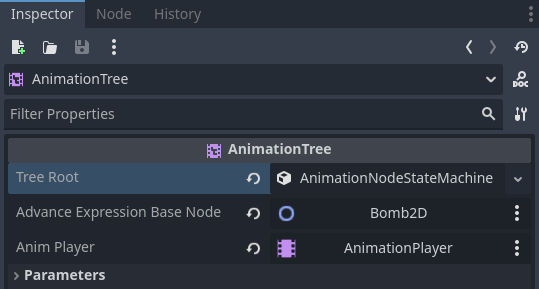
*Figure 10 - The AnimationTree property settings * 1.
Create one AnimationNodeAnimation block for each animation, including the RESET animation.
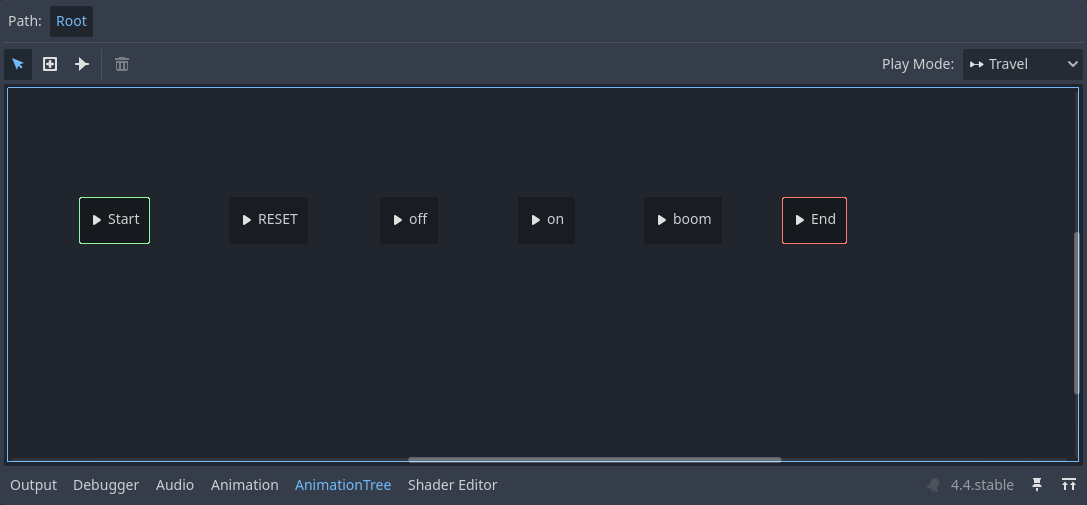
*Figure 11 - The AnimationTree State Machine animation nodes * 1.
Connect each node accordingly:
- Start → RESET
- RESET → off
- off → on
- on → boom
- boom → End
Set all transitions Switch Mode to "At End" (except the the off → on and the Start → RESET).
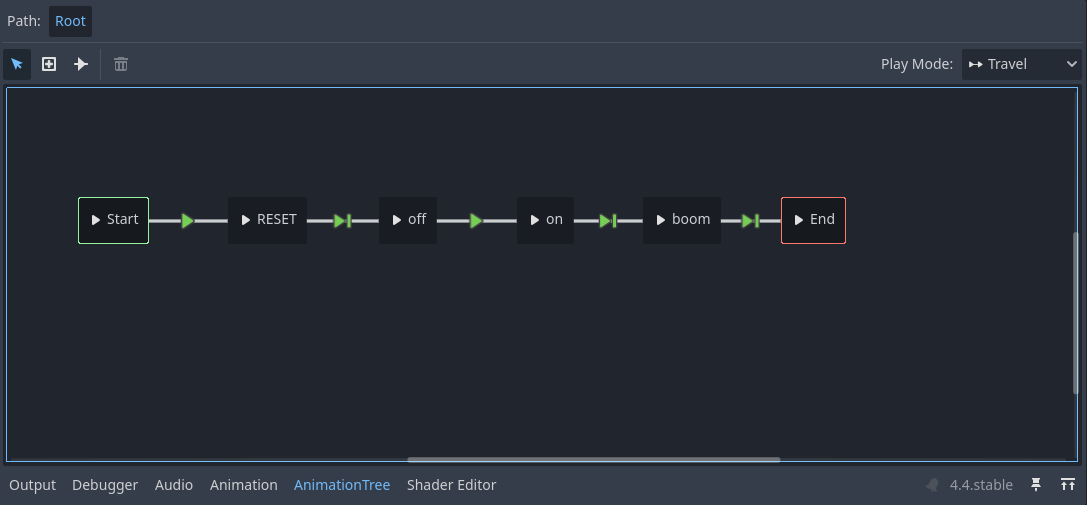
*Figure 12 - The AnimationTree State Machine animation nodes’ transitions * 1.
Set the off → on transition’s Advance Expression to get_node("InteractiveArea2D").get_overlapping_areas().size() > 0. This will make it so that the Bomb will automatically transition from the off animation to the on animation as soon as it detects the player within its InteractiveArea2D.
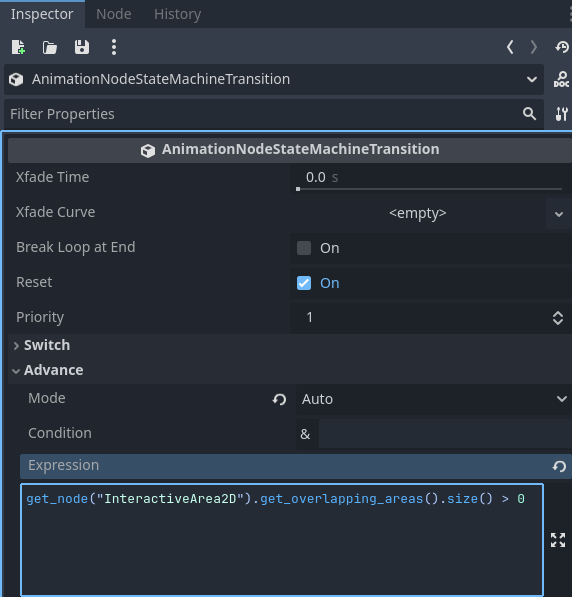
*Figure 13 - The off → on AnimationNodeStateMachineTransition’s Advance Expression *
Testing the Bomb
And we are done! Now if we test it with a player that has an InteractionArea2D, everything should work. You can also use a HurtArea2D on the player to trigger a "hurt" animation.
Video 3 - Testing out the Bomb with a playable character
Why the Platformer Essentials Cookbook Makes This Easy
With the Platformer Essentials Cookbook recipes you can focus on the fun part! As you can see, all the systems necessary to handle player detection and damage dealing were already on place so we could just focus on bringing the bomb to live by adding smart behaviors to otherwise behaviorless visual assets.
That’s what the Cookbook is meant for: mixing and matching basic building blocks to create complex mechanics in our games without wasting time reinventing the wheel. You get closer to becoming a Godot game factory upon finishing each chapter.
Get Started Making Your Platformer Today
Get access to the Platformer Essentials Cookbook and make a platformer game within a weekend!
And if you already have one, what about adding some adventure elements like quests and dialogues to level it up and engage your players in a vivid world? That’s what the Godot Adventure Essentials is all about: within 5 days you’ll make your first adventure game in Godot Engine with interactive objects, events to make a responsive world where player’s actions actually have an impact, dialogues with support for animated portraits and voice to bring life to your characters, quests to create a thrilling journey for your players, and a saving files so players can leave and come back knowing their progress in your adventure won’t be lost. Click below to get access to the Godot Adventure Essentials course:
Keep Learning and Building
Don’t forget to follow me up to get more game design and development content and if you want to know how to make a complete playable level using the Platformer Essentials Cookbook, read the Making a Playable Level with Godot’s Platformer Essentials post where I show you how to connect everything in the book together in a single bite-sized experience that you can extrapolate to a complete game.
Video 4 - A complete playable level using the Platformer Essentials Cookbook features
That’s it, thank you for your reading. Keep developing and until the next time!
— Henrique Campos
Get Godot Platformer Essentials Cookbook
Godot Platformer Essentials Cookbook
Step-by-step tutorials with essential features to create platformer games
| Status | Released |
| Category | Book |
| Author | Ludonauta |
| Genre | Educational, Platformer |
| Tags | 2D, Asset Pack, Boss battle, Godot, Immersive, Non violent, Open Source, Tutorial |
| Languages | English |
| Accessibility | Color-blind friendly, High-contrast |
More posts
3 days ago
17 days ago
20 days ago
20 days ago
23 days ago
39 days ago
42 days ago
44 days ago
54 days ago