Are you an image vendor or a hobbyist looking to distribute your own custom Raspberry Pi OS image through Raspberry Pi Imager? If yes, then this guide is for you. In this post, we’ll take a deep, technical look at how Raspberry Pi Imager discovers and lists operating system images, and how the repository JSON format works under the hood.
With the release of Raspberry Pi Imager 2.0, a number of improvements have been made to the user interface, the imaging process, and internal configuration handling (for more details, see the Raspberry Pi Imager 2.0 announcement post). One of the more …
Are you an image vendor or a hobbyist looking to distribute your own custom Raspberry Pi OS image through Raspberry Pi Imager? If yes, then this guide is for you. In this post, we’ll take a deep, technical look at how Raspberry Pi Imager discovers and lists operating system images, and how the repository JSON format works under the hood.
With the release of Raspberry Pi Imager 2.0, a number of improvements have been made to the user interface, the imaging process, and internal configuration handling (for more details, see the Raspberry Pi Imager 2.0 announcement post). One of the more interesting changes is the updated JSON schema used to define available OS images. This update is particularly relevant to the introduction of cloud-init support in Raspberry Pi OS, including a new cc_raspberry_pi module that enables configuration features like enabling SPI automatically.
How Imager knows about images
Raspberry Pi Imager and Raspberry Pi OS are not released on the same schedule. The operating system might receive several updates before a new version of Imager is published. Releasing a new Imager build for every OS update would be inefficient — not to mention inconvenient for users.
To solve this, Raspberry Pi Imager doesn’t ship with a fixed list of operating system images. Instead, it fetches this information dynamically from a remote JSON file, known as the ‘repository JSON’. This allows us to update the list of supported devices and available operating system images separately to Imager releases. Users get the latest options automatically, without needing to reinstall or update the application.
The current version of this format — used by Imager 2.0 and beyond — is formally encoded as Repository JSON V4.
Why keep the repository separate?
Hosting the image metadata externally opens up some powerful possibilities. For example, you can maintain multiple repositories — one for official stable releases, another for nightly builds or testing images, or even a private repository for internal deployments or classroom environments.
To make this more accessible, Imager 2.0 introduces a new option in the app settings, allowing you to switch between the official repository and a custom JSON file, which can be loaded from either a local file or a URL.
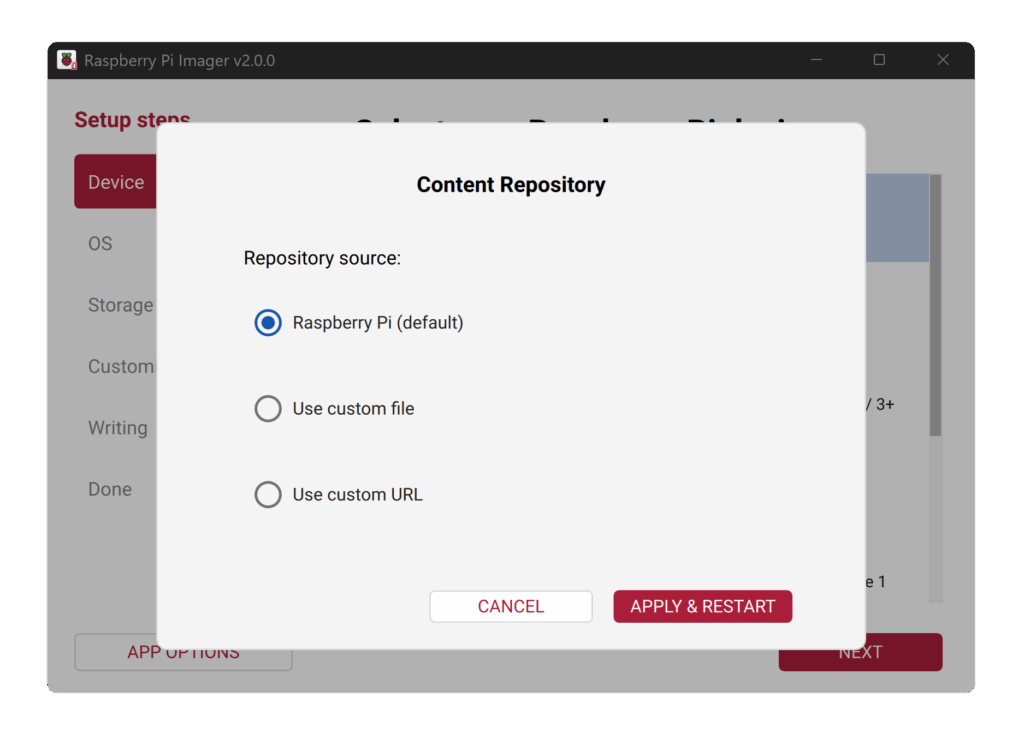
When you change this setting, Imager resets the current session and reloads the interface using the contents of the selected repository JSON. This feature is intended for advanced users and maintainers — typical users will never need to change this.
For power users or automation scenarios, the classic method still exists: you can pass a custom repository using the --repo command-line option. This can point to either a URL or a local JSON file, making it ideal for scripted workflows or provisioning setups.
Understanding the repository JSON structure
A Raspberry Pi Imager repository file follows a predictable structure, and is built around four main configuration elements:
- The latest Imager version
- A URL where users can download updates
- A list of supported device profiles
- A list of available operating system entries
Here’s the basic structure:
{
"imager": {
"latest_version": "2.0.0",
"url": "https://www.raspberrypi.com/software/",
"devices": [
/* Device objects go here */
]
},
"os_list": [
/* OS objects go here */
]
}
imager.latest_version and url
The latest_version field is used by Imager to determine whether a newer version is available. When a user launches the application, it compares its own version against this field. If the repository indicates a newer version, Imager displays an update prompt and links to the URL provided in the url field.
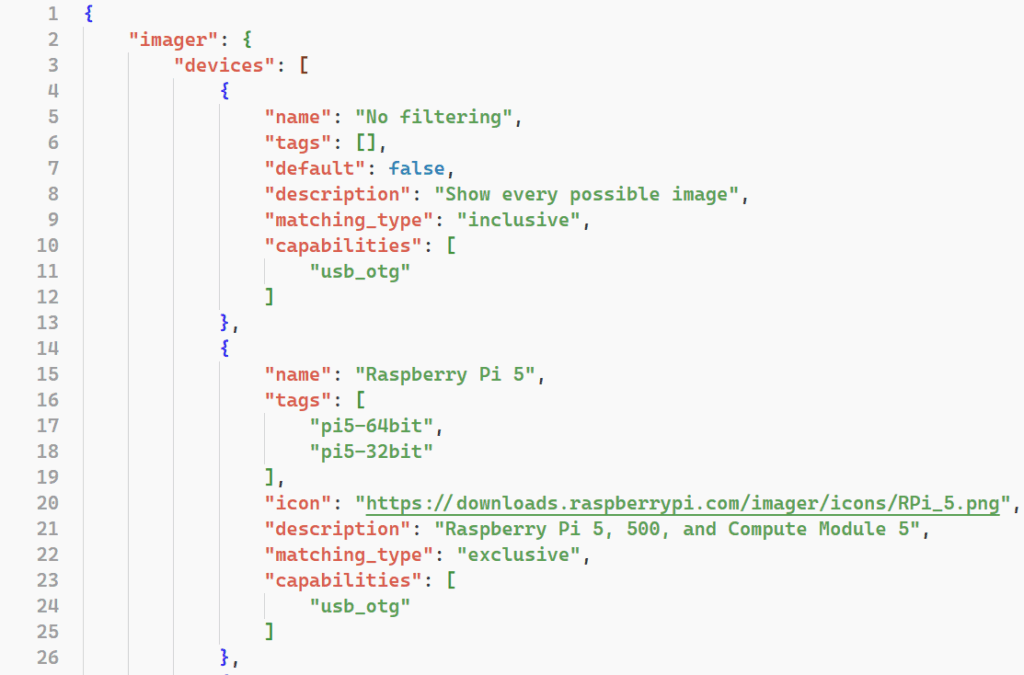
The devices list
The devices array contains a list of supported hardware profiles. These profiles allow Imager to filter OS entries based on the selected Raspberry Pi model. For example, an image may be restricted to Raspberry Pi 5 only, or marked as compatible with all boards.
You’ll also see a special entry called ‘No filtering’. When this option is selected, all OS images are displayed without applying any device compatibility filters. This mode is often used for testing or when working with generic images. It behaves like a virtual device profile that supports every feature. That means all configuration options are available, even when no specific Raspberry Pi model is selected.
The os_list
This is where the real action happens. The os_list contains all operating system entries that Imager displays to the user. Each entry can represent a full OS, a subgroup with multiple variants, or even reference nested JSON files for modular repositories.
If you’re building your own custom repository, this is typically the only section you’ll edit. The top-level imager block — which includes device metadata and update information — is managed by Raspberry Pi and tightly integrated with how the official application works.
A JSON device object — defining hardware profiles
Before Raspberry Pi Imager can decide which operating systems to show for which device, it needs a way to understand the identity and capabilities of each Raspberry Pi model. That’s where the device object comes in.
Each entry in the devices array represents a device profile — not necessarily a single board, but often a group of compatible models. For example, there may be a single profile representing ‘Raspberry Pi 4 / 400’, rather than separate entries for every board variant.
Here’s what a device object can contain:
| Key | Type | Description |
name | string | Display name shown in Imager (e.g. ‘Raspberry Pi 5’) |
tags | string[] | A list of identifiers that OS objects can reference to declare compatibility |
default | boolean (default: true) | Only one device should have this set; Imager will auto-select it when no manual filter is applied |
icon | string (URL) | A small PNG icon displayed next to the name in the device selection dialogue |
description | string | Optional text listing supported models or giving extra context |
matching_type | "inclusive" | "exclusive" | Defines how OS entries that do not declare device tags should behave: • inclusive → show them anyway • exclusive → hide them, unless explicitly tagged for this device |
capabilities (new in Imager 2.0) | string[] (e.g. “usb_otg“) | Acts as feature flags — used to hide or enable UI options depending on whether the selected device supports them |
Device capabilities are especially useful because they allow Imager to only surface configuration options that make sense. For example, the USB gadget mode toggle will only be shown if both the selected device and the selected OS list usb_otg in their capabilities. This avoids confusing users with options that won’t work on their hardware.
Objects inside os_list: categories vs. operating systems
The os_list section can contain two different types of objects, each serving a different purpose:
1. Category object
A category is a container used to organise multiple OS entries or even subcategories. It cannot be selected for download and does not contain a url or image metadata.
A category object supports only the following keys:
| Key | Type | Description |
|---|---|---|
name | string | The category title shown in the UI |
description | string | Optional text shown under the name |
icon | string (URL) | Icon displayed next to the category name |
random | boolean (optional) | If true, randomises the order of the entries inside subitems |
subitems | array | Contains operating system objects and/or nested category objects |
Think of a category as a folder in the UI — you click it to reveal what’s inside.
2. Operating system object
An operating system object defines a selectable image. These are the entries that are installable. They do not contain random or subitems.
The supported keys for an operating system entry are:
| Key | Type | Description |
name | string | Display name of the OS |
description | string | Short explanation or variant info |
icon | string (URL) | Icon to display next to the entry |
url | string (URL) | Direct link to the compressed image file (.img.xz, .img.zip, etc.) |
extract_size | int | Uncompressed image size (used for UI space estimation) |
extract_sha256 | string | SHA256 hash of the extracted image |
image_download_size | int | Size of the compressed download |
image_download_sha256 | string | SHA256 hash of the compressed file |
release_date | string (date) | Displayed date for version/build identification |
init_format | "none" | "systemd" | "cloudinit" | "cloudinit-rpi" | Declares what kind of customisation Imager can offer; cloudinit-rpi enables the Raspberry Pi–specific cc_raspberry_pi module |
devices | string[] | A list of device tags (from device objects) that this OS supports |
capabilities | string[] | Indicates which features this OS image supports (e.g. usb_otg or rpi_connect) |
Tip: For development or internal testing, you can omit the checksum and size fields. However, for public repositories, providing them helps Imager give accurate progress information and allows for checksum validation.
Rule of thumb:
- If it contains other items → it’s a category object
- If it downloads something → it’s an operating system object
Capabilities — feature matching
Here’s a clearer explanation of capabilities that applies to both device and OS objects:
| Value | Applies to | Meaning |
|---|---|---|
usb_otg | Device and OS | Only shown if the selected device and OS both support USB gadget functionality (requires rpi-usb-gadget in the OS and OTG-capable hardware) |
rpi_connect | OS image only | Indicates support for Raspberry Pi Connect connectivity features in the UI |
Image requirements
If you want your image to offer customisation options in Raspberry Pi Imager, especially with the new cloud-init integration, there are a few technical requirements your image must meet.
Supporting cloud-init customisation
To enable cloud-init–based configuration (like setting your hostname, Wi-Fi credentials, or SSH keys during first boot), your image must:
- Support cloud-init’s Network Config Version 2 — typically implemented through Netplan with the correct network renderer
- Include cloud-init with support for the NoCloud data source via the
bootfspartition (Imager writes configuration files intobootfs, and the OS must detect them on first boot)
cloudinit-rpi — advanced Raspberry Pi integration
If you declare init_format: "cloudinit-rpi" in your OS entry, Imager will also expose Raspberry Pi–specific options, such as enabling SPI or I2C automatically. To support this mode, your image must:
- Have the
cc_raspberry_picloud-init module enabled - Include the
raspi-config-vendorpackage (modified for your distro), which provides integration hooks for the cloud-init module during first boot
More details, including a template setup, can be found here.
Other init modes
init_format value | Imager behavior |
|---|---|
"none" | No customisation is offered to the user — simple download and flash workflow |
"systemd" | Enables the legacy bootfs-based firstrun.sh customisation mechanism |
"cloud-init" | Enables standard cloud-init (NoCloud) with generic options |
"cloud-init-rpi" | Enables extended, Raspberry Pi–specific options through cc_raspberry_pi |
If your image does not support any customisation mechanism, use
init_format: "none"to explicitly disable the customisation step in the UI.
Getting included in the official Raspberry Pi Imager repository
If you’re maintaining a high-quality image and would like it to appear alongside official images in Raspberry Pi Imager (under one of the community categories), you can submit it for review by filling out the following application form.
Our team will review your submission, verify its compatibility, and get in touch if any adjustments are needed. Once approved, your image can be distributed to thousands of Raspberry Pi Imager users worldwide through our main repository infrastructure.