I saw a video a while ago from someone who was talking about using a cheap plastic compact film camera as an everyday carry to record just general snapshots. While most of us use our phones for that, it is undoubtedly nice to have a more film like aesthetic. Unfortunately, both the cost of buying film and the cost of developing film has skyrocketed recently. So while this is a nice idea, it’s not really practical. I’ve spent the last while exploring alternatives, and trying various ways of getting his look without it being a huge effort. Recently I’ve been trying DXO film pack, because in the just announced version 8, you can now open Apple PRO Raw files, and this actually…
I saw a video a while ago from someone who was talking about using a cheap plastic compact film camera as an everyday carry to record just general snapshots. While most of us use our phones for that, it is undoubtedly nice to have a more film like aesthetic. Unfortunately, both the cost of buying film and the cost of developing film has skyrocketed recently. So while this is a nice idea, it’s not really practical. I’ve spent the last while exploring alternatives, and trying various ways of getting his look without it being a huge effort. Recently I’ve been trying DXO film pack, because in the just announced version 8, you can now open Apple PRO Raw files, and this actually makes a big difference.
Why Film Pack?
Well….Why not? Actually, I’ve been trying lots of different options, including VSCO and Lightroom, and I’ll report on my techniques with them if there’s interest. I’ve been using Film Pack for a while, and it has a few advantages over the alternatives. Most notably it does better grain than a lot of other solutions. For example the grain in colour film is actually colour. In the past I’ve used it in conjunction with Lightroom to add better grain, but you can also use it as a standalone application, and load files directly.
When I was trying out Film Pack 8 I loaded an iPhone ProRAW file by mistake and to my surprise it could read it. This isn’t really marketed as a feature, but it seems to work. (It could be that I have DXO Photo Lab installed also, but I don’t think so)
Getting the iPhone ProRAW files into Film Pack
The easiest way to get files into film pack is to export them from Photos if you’re using a Mac. You could of course Air Drop them too, but if you’re using photos, you can just export them to a folder. It’s important to note that you shouldn’t try to use the “edit in” functionality of Apple Photos because this will only send a flattened file - usually a Tiff. This will strip the extra latitude and other information from the ProRAW files.
Instead, select your images in Photos, and from the menu choose: File > Export > Export Unmodified Original for X Files. (With X being the number of files you have selected.). Put these in a folder somewhere on your drive.
Now open up the standalone version of Film Pack and you should have a file browser. From here you can navigate to the folder you just selected and then select the image you want to work with.
Before and After Screenshot
Working with ProRAW files in FilmPACK
Once you load your image into Film Pack, the rest is fairly straightforward. Basically, the normal workflow would be:
- Load your image
- Select a preset or use the Time Machine feature to select a preset
- Make adjustments
- Export the image
Wile this is pretty much the same when working with Apple ProRAW files, there are a couple of things you need to be aware of.
Firstly, you may find that exposure can be a bit all over the place. This happens occasionally when the ProRAW file stores HDR information and it is converting it back to SDR. It depends on the iPhone you’ve shot with, but this can result in photos coming in looking very underexposed.
Here you can see the issue with some ProRAW files coming in underexposed
After correcting Exposure
Secondly, the way Film Pack reads the ProRAW files, it doesn’t seem to have a good base colour profile, so when you apply presets, everything can look a little flat compared to how the presets would normally look. This is easily fixed by cranking up the saturation a little in the “Customise” tab.
Some tips for getting the “compact camera” look
If you want to make your images look like a cheap compact camera, then the best place to start is with a negative film, or use Time Machine to get one of the era specific looks. One of my favourites is “Berlin”. This gives you a gritty, slightly expired film kind of look. Some of the Kodak stocks are also good. The only thing thats missing is something like Kodak Gold 200 which is generally what I shoot if I’m actually shooting film and I don’t really care. Some of the Agfa stocks are good too as they’re more of a heavy grade, but it really depends on what look you’re going for.
Once you choose your preset, head over to the customisation tab and start editing. Most of the edits are fairly self explanatory but there’s a few things you can do to make it more like something you’d get from a cheap compact camera. There’s one trick in particular that will really sell the film look, and its something I’m surprised is not on by default.
If you scroll to the bottom of the adjustments you’ll see a section for blur. There are two options here: Soft Focus and Vignette. Vignette blurs the edge of the frame but what you really want is the soft focus option.
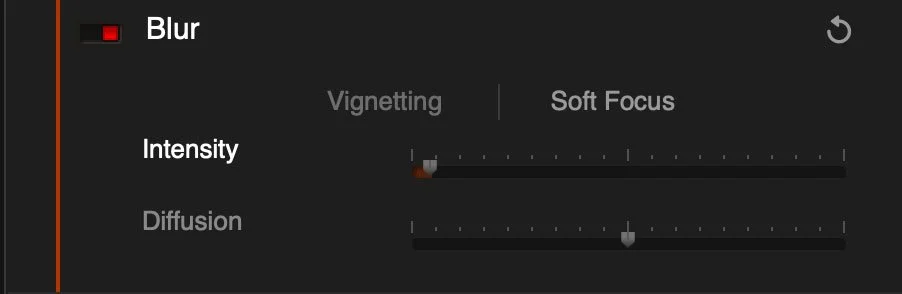
Soft Focus Blur Settings
Under this set the amount to a very low number: something between 2 and 4, and leave the diffusion at 50. The amount here depends on the resolution of your image. If you’re using one of the 48mp cameras on the iPhone then 3 to 4 usually works, but it depends on your taste. Around 2 works better for 12 or even the 24mp cameras. It’s best to zoom into 1:1 when adjusting this. You can leave the diffusion set to 50. If you lower this it will dial in more of the blur, and raising it fades the blur out.
What the soft focus blur does is take the harsh digital edge off the image and makes it look much more analogue. You only need a tiny amount, but combined with some grain, this immediately makes the image look more film like in my opinion. Especially with phone images. Even though the iPhone photos are better in ProRAW there’s still a bunch of processing going on and they still look overly digital. Adding a very small amount of soft focus blur with this tool fixes it.
Light Leaks and Frames
Film Pack also has some more creative options for adding things like texture, light leaks and frames. I generally tend to stay clear of most of these, however for the compact camera look, especially if you’re trying to emulate something like a disposable camera or one of the newer cheap plastic ones, a little bit of light leak can work wonders. I usually use the second or fourth one in the list, but dialled right down. It’s a subtle effect and you might barely notice it but it just adds some more analogue flair to the image. I wish they gave you the option to randomly select a light leak image, or even randomise the position, especially if you’re batch processing.
Speaking of texture, in the Texture section, there are some papers and things in here, but I don’t use it as I think it’s just too much. If you really want to “damage” the image then this might work, but it’s not the look I’m going for here.
For the frames option, I generally don’t use this feature, but not he occasions that I do, I’ll just use the plain white border option. If you do use this make sure to set the option to put the frame outside the image and not inside (which I think is the default)
Saving your image and saving a preset
Once you’re finished and happy, you need to save your image. If you haven’t used Film Pack before, especially stand alone, be aware that it is fully destructive. You need to save your image as a Jpeg. It’s not like Lightroom or Camera RAW where it saves the settings as a sidecar file. You need to save the results out as either a JPEG or a Tiff.
To keep the edits you used should you want to go back and tweak things at a later date, the best option is save a preset. This means you can just reload the image and then select the preset you just saved. It also means you can create custom presets to use on future images. And, you can also batch process images with Film Pack.
(Above) A few quick samples put together with this technique. These are just a handful of snapshots from my library, and are not perfect by any means. Taken with iPhone 15 Pro Max
Batch Processing
Once you have honed in on your settings, you can actually batch process your images within Film Pack. The interface for this is a little clunky, I have to say, but it does the job, and its actually surprisingly fast.
To use the batch processing feature, go to the menu and choose File > Batch Processing. This will bring up the window. To add images to the queue, click on the + button and select your images. Unfortunately, you don’t seem to be able to select folders, so you’ll have to shift select images in the open and save dialog to add multiple images at once.
Then all you need to do is select the preset, and set your format options and click Process. One minor annoyance that I notices when doing this is that it seems to strip the rotation information from the images so vertical images may come out on the side, and you’ll need to fix them later.
The only issue with batch processing these is the afore mentioned problem with ProRAW files and the way they sometimes have underexposure issues because of the way they store HDR information. This does make it somewhat troublesome for batch processing a lot of iPhone images.
Conclusion
This has really just been a quick overview of the process I’ve been using on this. There are of course lots of other ways to create a film look too including my own Lightroom presets. You should give Film Pack a try though. They have a trial version available and it can give you some nice results if you play around with the settings. If you do want to buy it, you can use my code: ThomasFitzgerald15 to get 15% off (new customers only). You can actually use this on any DXO product.
(Note - this isn’t a sponsored blog, but I am on the affiliate programme, so any purchases made through the links above result in a small commission. But I was not paid to write this blog - it was entirely my own decision and idea)