Jul. 25, 2025
For those who still listen to local music files, choosing an audio format is an important decision. While lossless formats offer the best quality, they can be demanding on storage space and data usage. For mobile listening, converting your music to a lossy format is often the more practical choice.
So, which format should you choose?
Those who lived through the iPod era might remember Apple’s “iTunes Plus AAC.” This format was originally introduced for the iTunes Store in 2007, described in the press release as “high quality 256 k…
Jul. 25, 2025
For those who still listen to local music files, choosing an audio format is an important decision. While lossless formats offer the best quality, they can be demanding on storage space and data usage. For mobile listening, converting your music to a lossy format is often the more practical choice.
So, which format should you choose?
Those who lived through the iPod era might remember Apple’s “iTunes Plus AAC.” This format was originally introduced for the iTunes Store in 2007, described in the press release as “high quality 256 kbps AAC encoding for audio quality virtually indistinguishable from the original recordings.” “iTunes Plus” also became a transcoding option in iTunes later and can still be found in the Music app on macOS today, referring to “128 kbps (mono)/256 kbps (stereo), 44.100 kHz, VBR.”
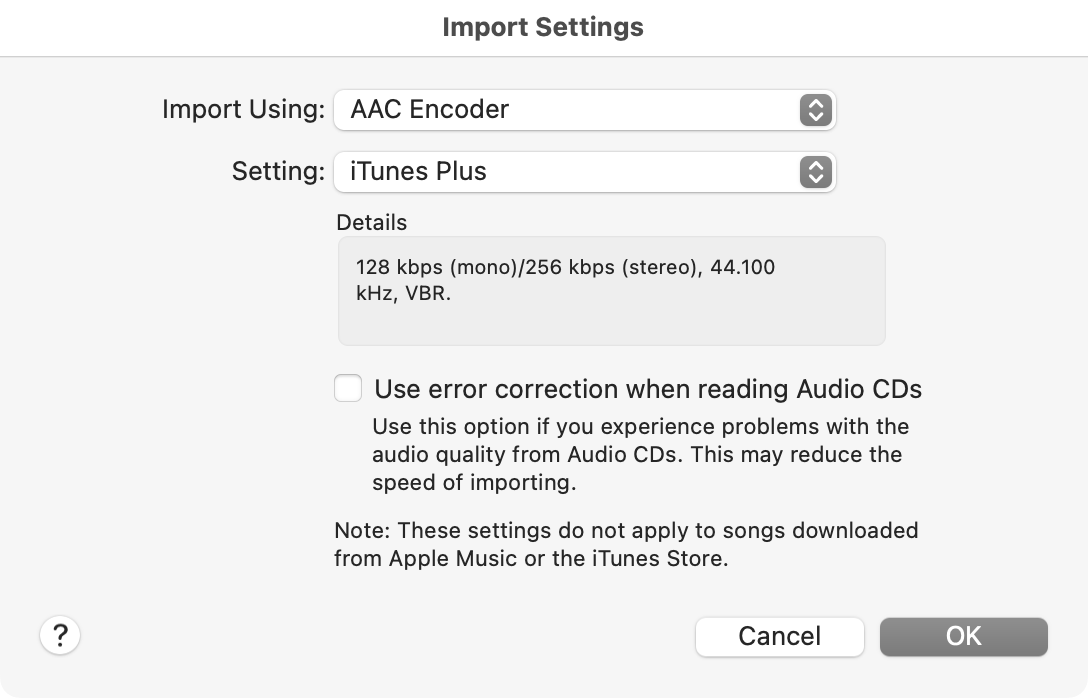 Reference to iTunes Plus in the Music app
The iTunes Plus AAC format is highly regarded online. Besides the usual benefits of AAC encoding — small file size and high quality — it has also been shown to outperform other AAC encoders in some blind tests. This is in part thanks to its use of a Constrained Variable Bitrate (CVBR) strategy. CVBR aims for an average bitrate (256 kbps here) but allows the rate to fluctuate (sometimes aggressively) to better balance file size and audio quality. Combined with excellent support on Apple devices, iTunes Plus stands out as an ideal lossy format.
However, it would be inconvenient to rely on iTunes or its successor, the Music app, for every conversion. Apple also has no support for lossless formats beyond WAV and their proprietary ALAC.
Indeed, the transcoding feature in iTunes and the Music app is just a front-end for the capabilities provided by Apple’s Audio Toolbox framework. Other software can also tap into this framework:
- On macOS, the built-in command-line tool
afconvert(1)is a wrapper for Audio Toolbox’s transcoder and is the recommended tool in the technology brief for Apple Digital Masters. - On Windows, the open-source command-line tool
qaaccan call the Audio Toolbox libraries extracted from an iTunes installation to provide conversions equivalent to iTunes. By using these in scripts or with other automation tool, we can easily convert music in batch into the iTunes Plus AAC format. This guide will show you how.
Disclaimers:
- The term “iTunes Plus AAC” in this article refers to AAC files created using Apple’s recommended encoder and settings. They are not identical in quality to the files sold on the iTunes Store, which are mastered from source tapes and undergo optimizations like loudness normalization.
- The following steps assume a basic understanding of terminal and command-line operations.
- My knowledge of audio formats and encoding is limited and there may be errors or deviations from best practices in this guide. Corrections are welcome.
macOS
On macOS, you can create iTunes Plus AAC files using the built-in afconvert(1) utility. According to the technology brief for Apple Digital Masters [PDF], the following settings should be used:
afconvert input.wav \
-d aac \
-f m4af \
-u pgcm 2 \
-b 256000 \
-q 127 \
-s 2 \
output.m4a
p. 7.
In the command above:
-d aacsets the encoding format to AAC.-f m4afsets the file format to Apple MPEG-4 Audio.-u pgcm 2set an undocumented Audio Converter property, possibly related to the encoder’s behavior.-b 256000sets the bitrate to 256 Kbps.-q 127sets the quality to the maximum (0-127).-s 2sets the bitrate strategy to CVBR (discussed above). Note: The technology brief actually describes a two-step process: first converting to a CAF file with a loudness check, then generating a loudness-normalized AAC file, pp. 5, 7, which is intended for mastering from source tapes. Since most lossless files obtained for personal use have already been processed, this extra step offers little benefit here and has been omitted.
However, afconvert only supports WAV, ALAC, or AIFF inputs. Since FLAC is a more common lossless format, a preprocessing step with ffmpeg is required:
ffmpeg -i input.flac -ac 2 -ar 44100 temp.wav && \
afconvert -f m4af -d aac -u pgcm 2 -b 256000 -q 127 -s 2 temp.wav output.m4a && \
rm temp.wav
This command first uses ffmpeg to convert the source file into a two-channel, 44.1kHz temporary WAV file, which would then be passed to afconvert and removed upon the creation of the final AAC output.
Note: Although ffmpeg can theoretically call Audio Toolbox directly using the -c:a aac_at option to create an iTunes Plus AAC file in one step, my tests show that the quality of the resulting file is significantly different from one produced by afconvert. Therefore, this guide sticks with using afconvert for the final AAC output.
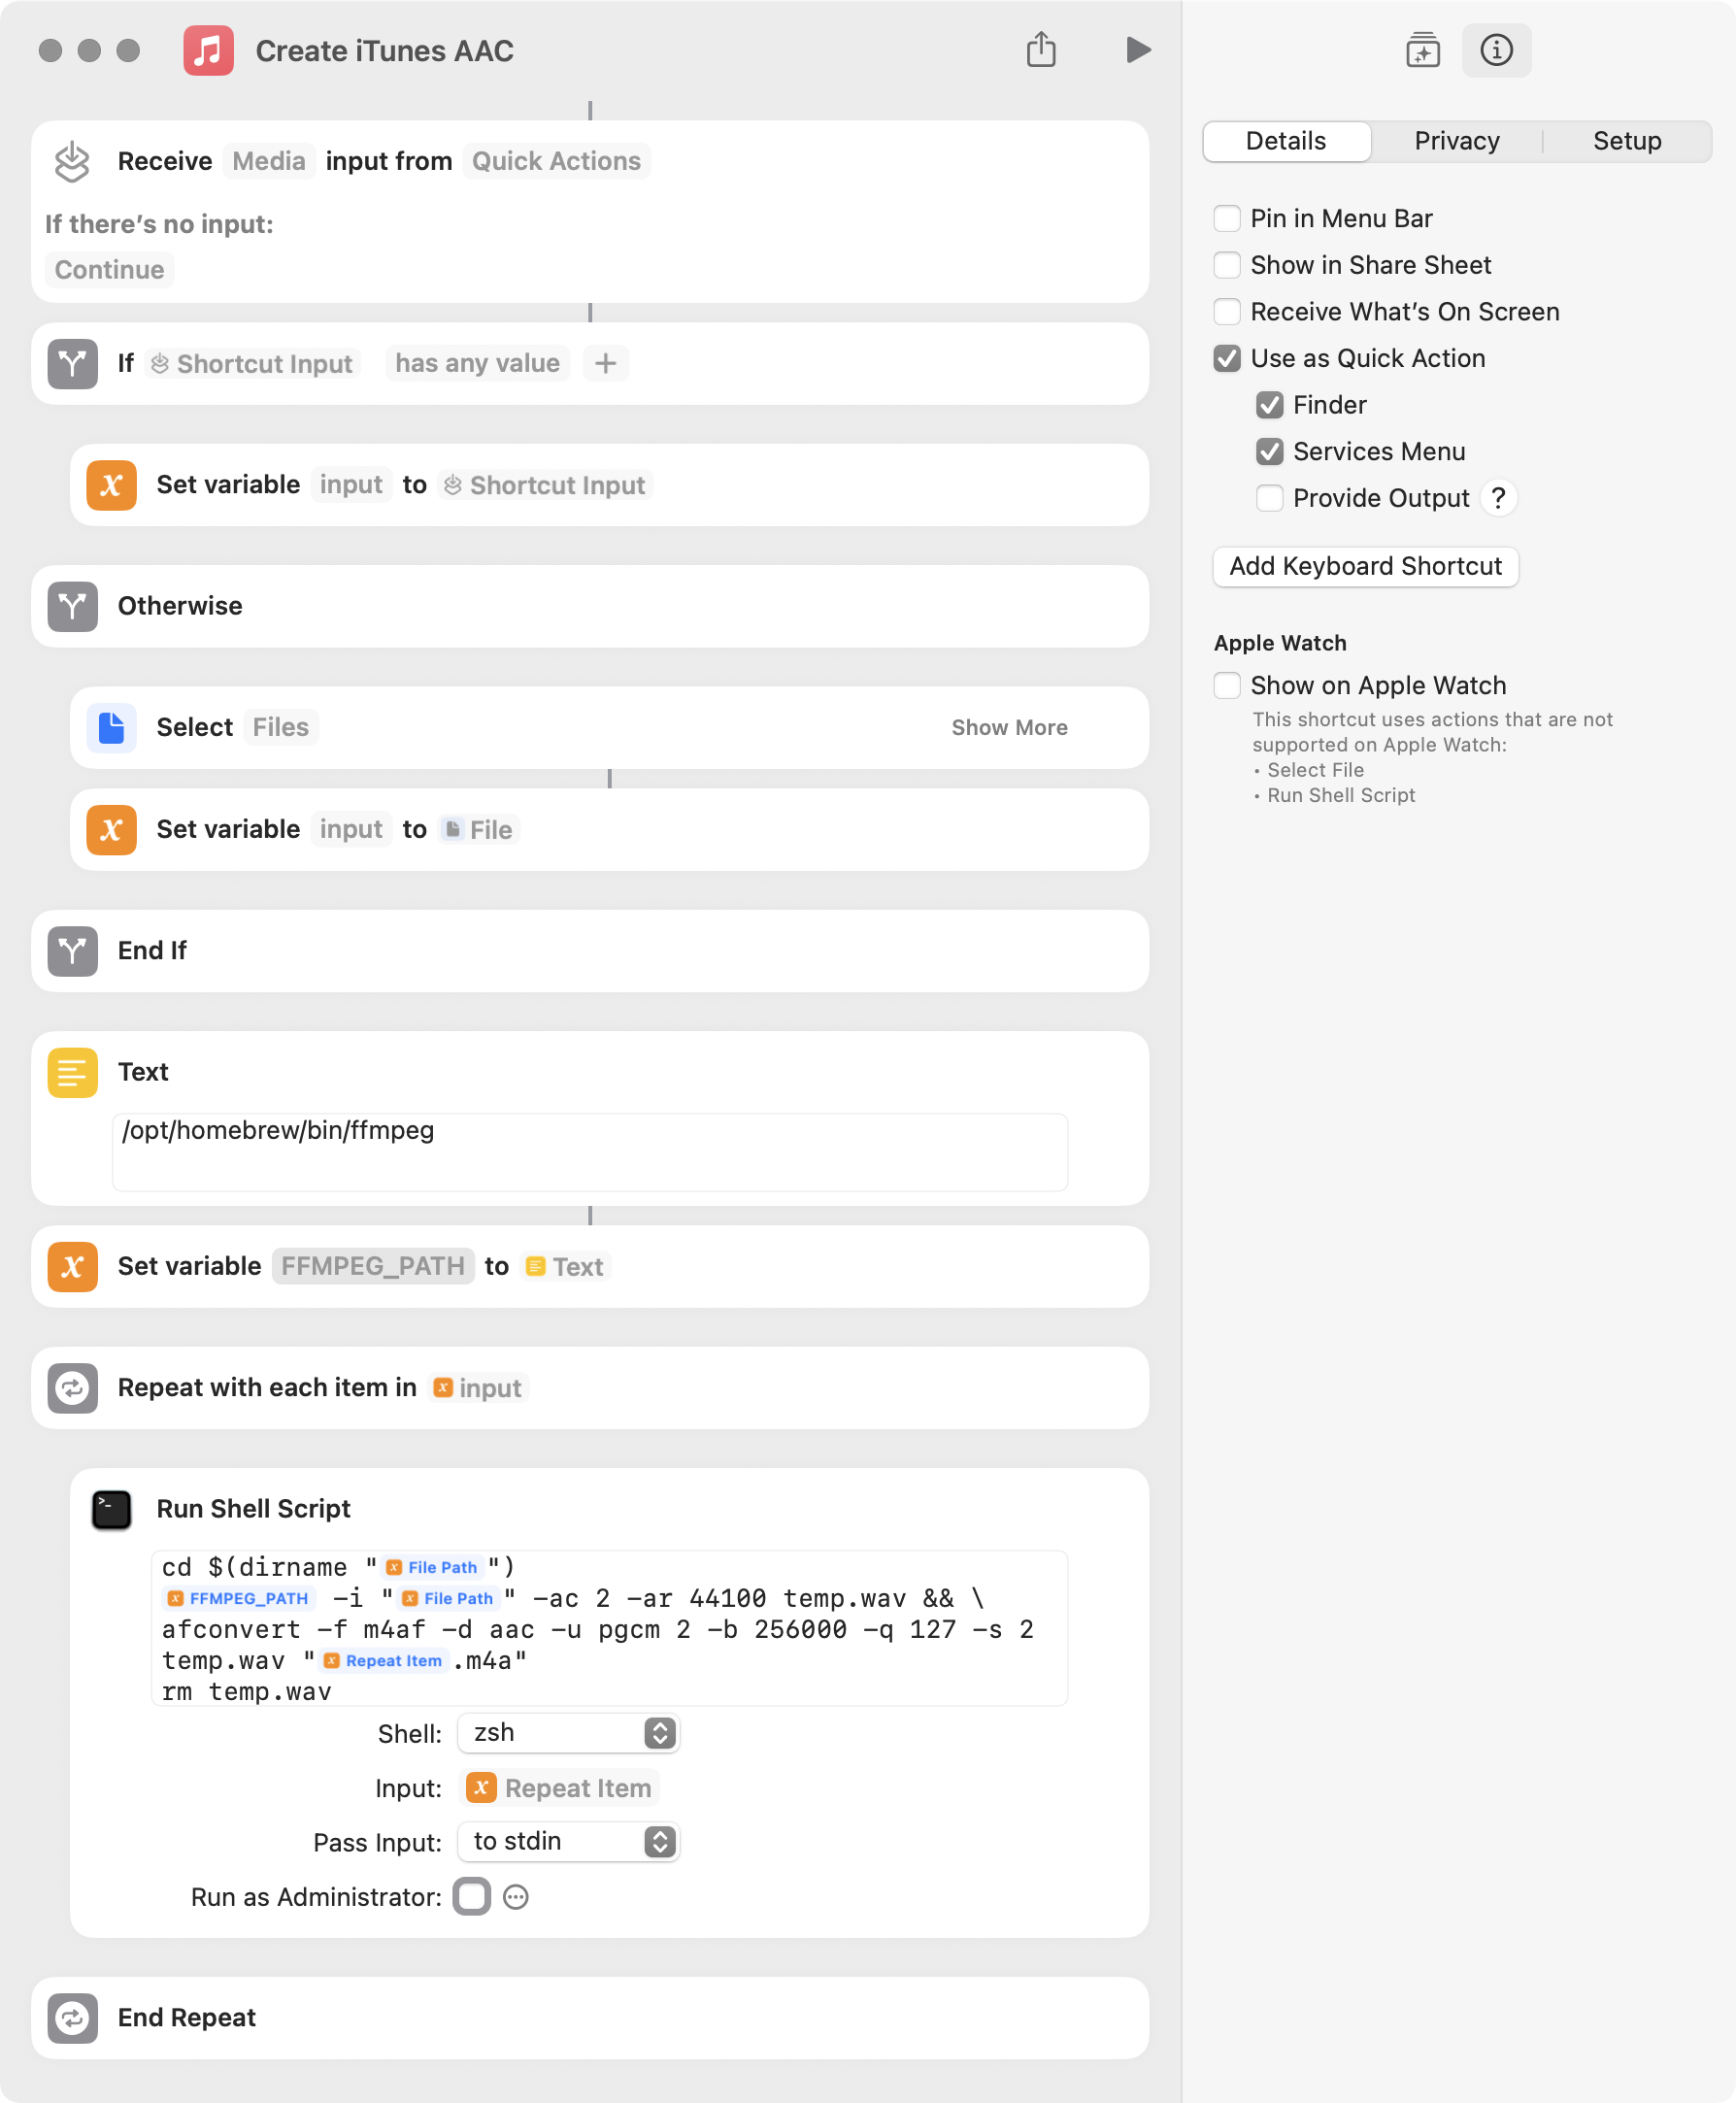
You can automate this process using a macOS Shortcut (Download).
 Before using the Shortcut, you need to:
- Enter the correct installation path for
ffmpegin the text box above theFFMPEG_PATHvariable. The pre-filled path is the Homebrew default for Apple Silicon Macs. You can find your path by runningwhich ffmpegin the Terminal. - In System Settings > Privacy & Security, grant “Full Disk Access” to
/System/Library/CoreServices/Finder.app. After setup, you can run the shortcut and select your input files, or right-click files in Finder and choose Quick Actions > Create iTunes AAC to quickly generate the AAC versions.

Windows
On Windows, you can use qaac to transcode to iTunes Plus AAC, provided that Apple’s AAC encoder has been installed. Typically, this is only available by installing iTunes or iCloud (standalone versions only). For a “portable” approach that avoids installing these bloatware, you can extract the necessary support files from the iTunes installer.
Here are the steps:
- Download the latest version of the iTunes installer (
iTunes64Setup.exe) from Apple’s website; - Download the extraction script,
makeportable2.cmd, provided by theqaacauthor, and place it in the same directory asiTunes64Setup.exe. Run the script (you can ignore any security warnings). This will create aQTfiles64folder containing the necessary Apple encoder support libraries (DLLs); - Download the latest version of
qaacfrom its release page and unzip it. It contains bothx86andx64subdirectories. As it’s now 2025, we will only consider the x64 version; - Move the
QTfiles64folder created in step 2 into thex64directory, so it is in the same location asqaac64.exe. - For handling FLAC input, download the latest release of FLAC (
flac-x.y.z-win.zip) and place the extractedlibFLAC.dllin the samex64directory withqaac64.exe. After these steps, the directory whereqaac64.exeis should look like this:
.
├── libFLAC.dll
├── libsoxconvolver64.dll
├── libsoxr64.dll
├── qaac64.exe
├── QTfiles64
│   ├── ...
│   ├── ASL.dll
│   ├── concrt140.dll
│   ├── CoreAudioToolbox.dll
│   ├── CoreFoundation.dll
│   ├── icudt62.dll
│   └── ...
└── refalac64.exe
According to the qaac documentation, the following command produces an output equivalent to iTunes Plus (256k):
qaac -v256 input.flac
We can create a batch script to automate the process:
@echo off
setlocal

set “QAAC_OPTIONS=-v256″
set “QAAC_PATH=%ProgramFiles%\qaac\qaac64.exe”

if not exist ”%QAAC_PATH%” (
echo ERROR: Could not find qaac64.exe at the specified path.
l

set "QAAC_OPTIONS=-v256"
set "QAAC_PATH=%ProgramFiles%\qaac\qaac64.exe"

if not exist "%QAAC_PATH%" (
echo ERROR: Could not find qaac64.exe at the specified path.
goto :end
)

if "%~1"=="" (
echo No files were provided.
goto :end
)

for %%F in (%*) do (
echo Processing: "%%~nxF"
"%QAAC_PATH%" %QAAC_OPTIONS% -o "%%~dpnF.m4a" "%%~F"
echo.
)

echo All done.

:end
echo.
echo Press any key to exit...
pause >nul
上述脚本假定你将之前步骤整理好的 qaac 安装文件放在系统盘的 Program Files\qaac 文件夹下,你也可以将 QAAC_PATH 变量修改为你实际使用的其他安装路径。
将以上代码保存为 makeitunesaac.bat。此后,将要处理的文件拖至该脚本图标上,即可在同目录下获取转码好的 AAC 版本。

效果检查
我们可以使用 MediaInfo 检查通过 afconvert 和 qaac 生成的 AAC 文件与 iTunes(或 Music app)生成的版本是否一致:
mediainfo output_itunes.m4a output_afconvert.m4a output_qaac.m4a
对于我所用的测试音乐,三者的输出完全一致:
...
Format                                   : AAC LC
Format/Info                              : Advanced Audio Codec Low Complexity
Codec ID                                 : mp4a-40-2
Duration                                 : 4 min 1 s
Bit rate mode                            : Variable
Bit rate                                 : 256 kb/s
Maximum bit rate                         : 341 kb/s
Channel(s)                               : 2 channels
Channel layout                           : L R
Sampling rate                            : 44.1 kHz
Frame rate                               : 43.066 FPS (1024 SPF)
Compression mode                         : Lossy
Stream size                              : 7.68 MiB (99%)
...
这表明 afconvert 和 qaac 确实能获得 iTunes(或 Music app)基本等效的输出。还能看到,尽管整体比特率维持在 256 kbps,但峰值比特率达到了 341 kbps,表明 CVBR 在发挥作用。
再观察频谱,afconvert 和 qaac 输出的版本相比于 320Kbps MP3(LIME 编码)保留了更多无损版本的细节,并且体积小了约 20%,应当说是比较理想的。
