In over a decade of designing products, I have learned two important things about ideas:
- Ideas have no value when they’re locked inside your head.
- Ideas travel farther & faster the more visual they are.
It’s not surprising that vibe coding has picked up as a behavior in product builders. Designers, product managers and engineers are all vibe coding because it is the easiest way to share your ideas with peers. Not only that, the process of vibe coding is also quite joyful – I genuinely look forward to thinking of more things to prototype just so I can vibe code more.
Story of a billion tokens
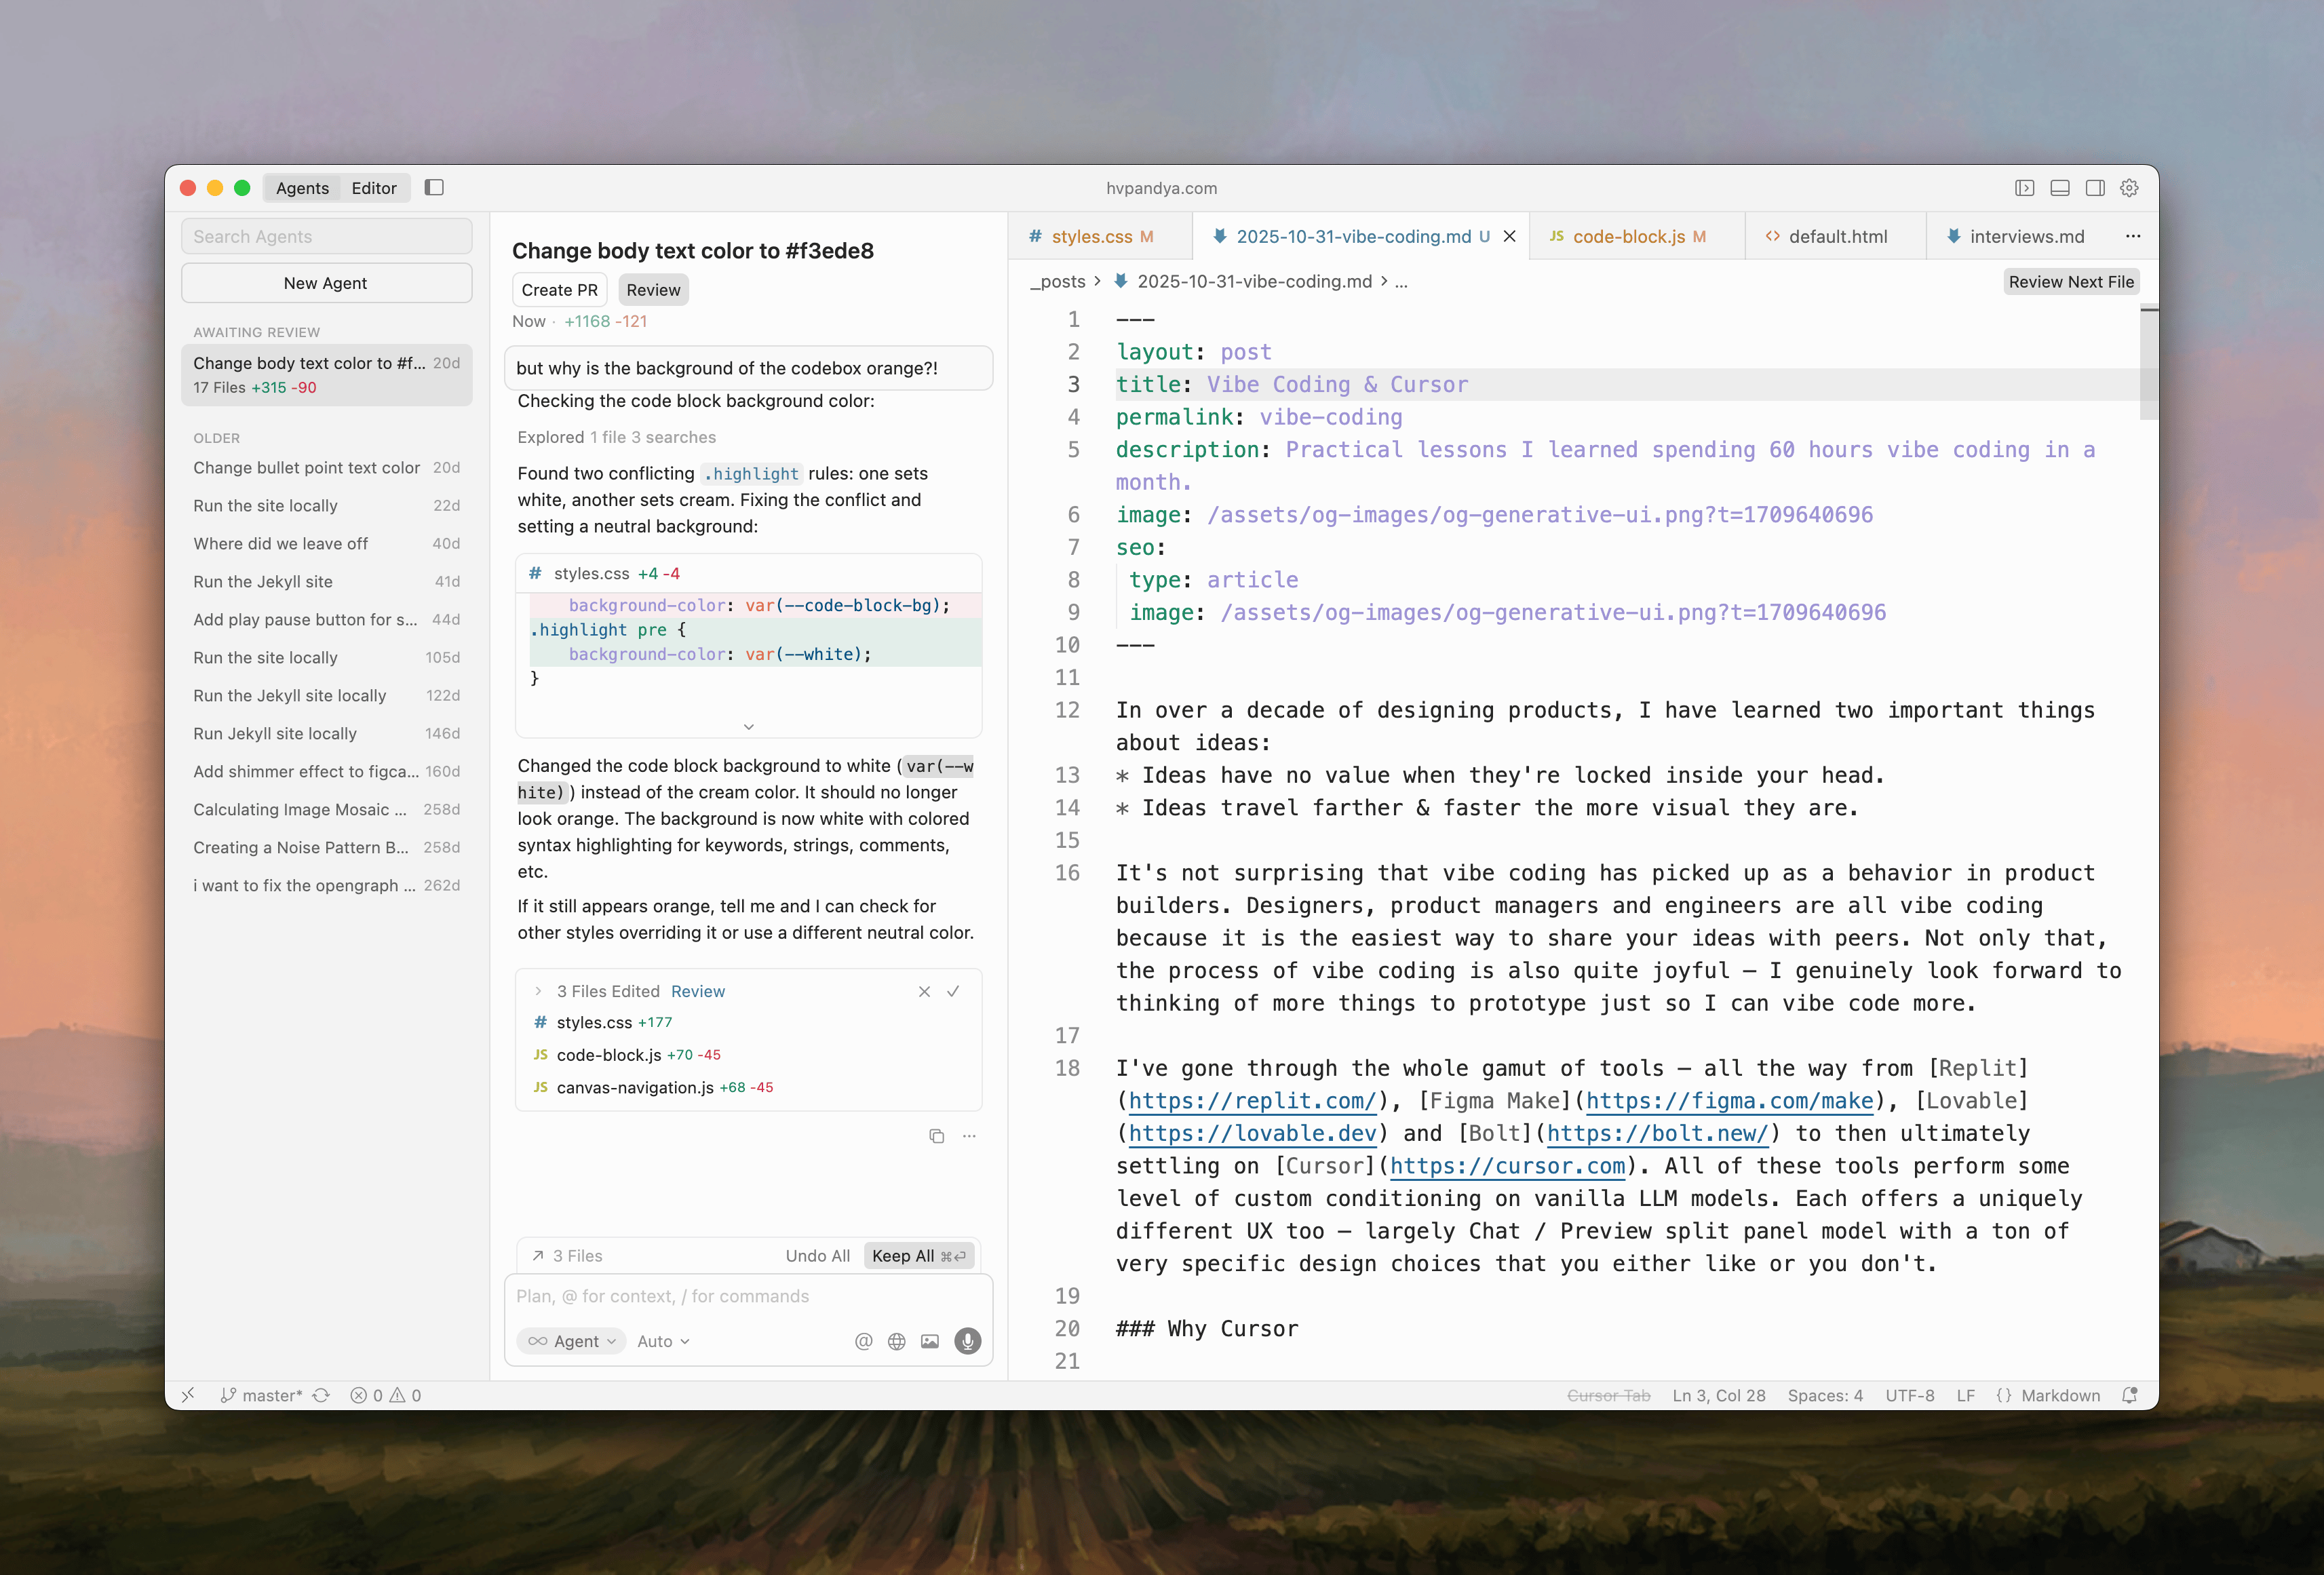
At Atlassian, I recently spent 60+ hours over last month vibe coding a very elaborate product experience. End-to-end with data visualization, multi-modality (voice & text), multi-d…
In over a decade of designing products, I have learned two important things about ideas:
- Ideas have no value when they’re locked inside your head.
- Ideas travel farther & faster the more visual they are.
It’s not surprising that vibe coding has picked up as a behavior in product builders. Designers, product managers and engineers are all vibe coding because it is the easiest way to share your ideas with peers. Not only that, the process of vibe coding is also quite joyful – I genuinely look forward to thinking of more things to prototype just so I can vibe code more.
Story of a billion tokens
At Atlassian, I recently spent 60+ hours over last month vibe coding a very elaborate product experience. End-to-end with data visualization, multi-modality (voice & text), multi-device flows, motion, interactivity and so on. I ended up spending about 1.5 billion tokens, no joke. I won’t deny that a lot of those 60 hours were frustrating and tiring. Things would break often, LLM would drift and hallucinate and at times the linting errors would just not go away. But I’d be lying if I told you the end result wasn’t satisfying and a joy to show around. Absolutely worth it. And I didn’t open Figma even once through the entire bit.
 🤯 Spent 1.5bn tokens on a single prototype
Over the last few months, I have gone through the whole gamut of vibe coding tools – all the way from Replit, Figma Make, Lovable and Bolt and then have settled ultimately on Cursor. All these tools have some level of custom conditioning on the vanilla models. Every tool has a uniquely different UX too – still largely Chat + Preview split panels, but so many little design choices that make you either love them or grow out of them quickly.
Why Cursor
I’ve coded nearly all my life, including this website and many other projects, so Cursor felt like a natural choice.
There are a few distinct design choices in Cursor that I personally love, and they make the tool extremely versatile for building anything.
Specifically:
- You can choose the model you like (very important)
- You get direct access to source code when you need it (you’ll need it a lot)
- The inference feels faster than any other app (you feel it when you use it)
- It’s a software that learns so you get increasingly more productive the more you use it
Yet when I ask PMs and Designers what tool they use for vibe coding, surprisingly Cursor doesn’t come up a lot. The barrier to entry with its developer-friendly positioning can feel high, but once you try it out you realize how much of a joy it is to use. The recent releases also suggest that they are quite serious about being more and more hospitable towards non-developers to be able to build with it.
Essential practices for vibe coding
I wanted to document the learnings, things that frustrated me and the workarounds I figured out that I think would be of great help to anyone who wants to build interactive prototypes with code.
There’s a million different tips and tricks out there, but I’ve focused on the ones that meaningfully make your vibe coding experience better and take a bit of the pain away.
It’s a bit of a long list, but if you vibe code at all, this will be well worth the read.
AI’s memory is not deterministic. Always be Git-ing.
In Figma, Sketch, or any design tool you use, every change is automatically saved with version history. You can always go back to a previous state. When vibe coding with AI, the model does not reliably remember previous working states. This happens because large language models are non-deterministic systems, meaning the same request can produce slightly different outputs each time. Without version control, you risk losing working code or spending hours trying to get the AI to “remember” what worked before.
Use Git, just like you duplicate frames in Figma before experimenting. Think of Git commits as snapshots of your working code. Every time your prototype runs successfully or you complete a meaningful feature, save that state. For designers and product managers new to Git, this might feel intimidating, but Cursor makes it simple.
When you commit code in Cursor, it automatically writes descriptive commit messages for you. You do not need to learn Git commit message conventions. Simply use:
<!-- no-header -->
git add .
git commit
Cursor generates contextual messages automatically. Contextual commit messages ensure you can roll back to relevant changes by searching for them if you need to.
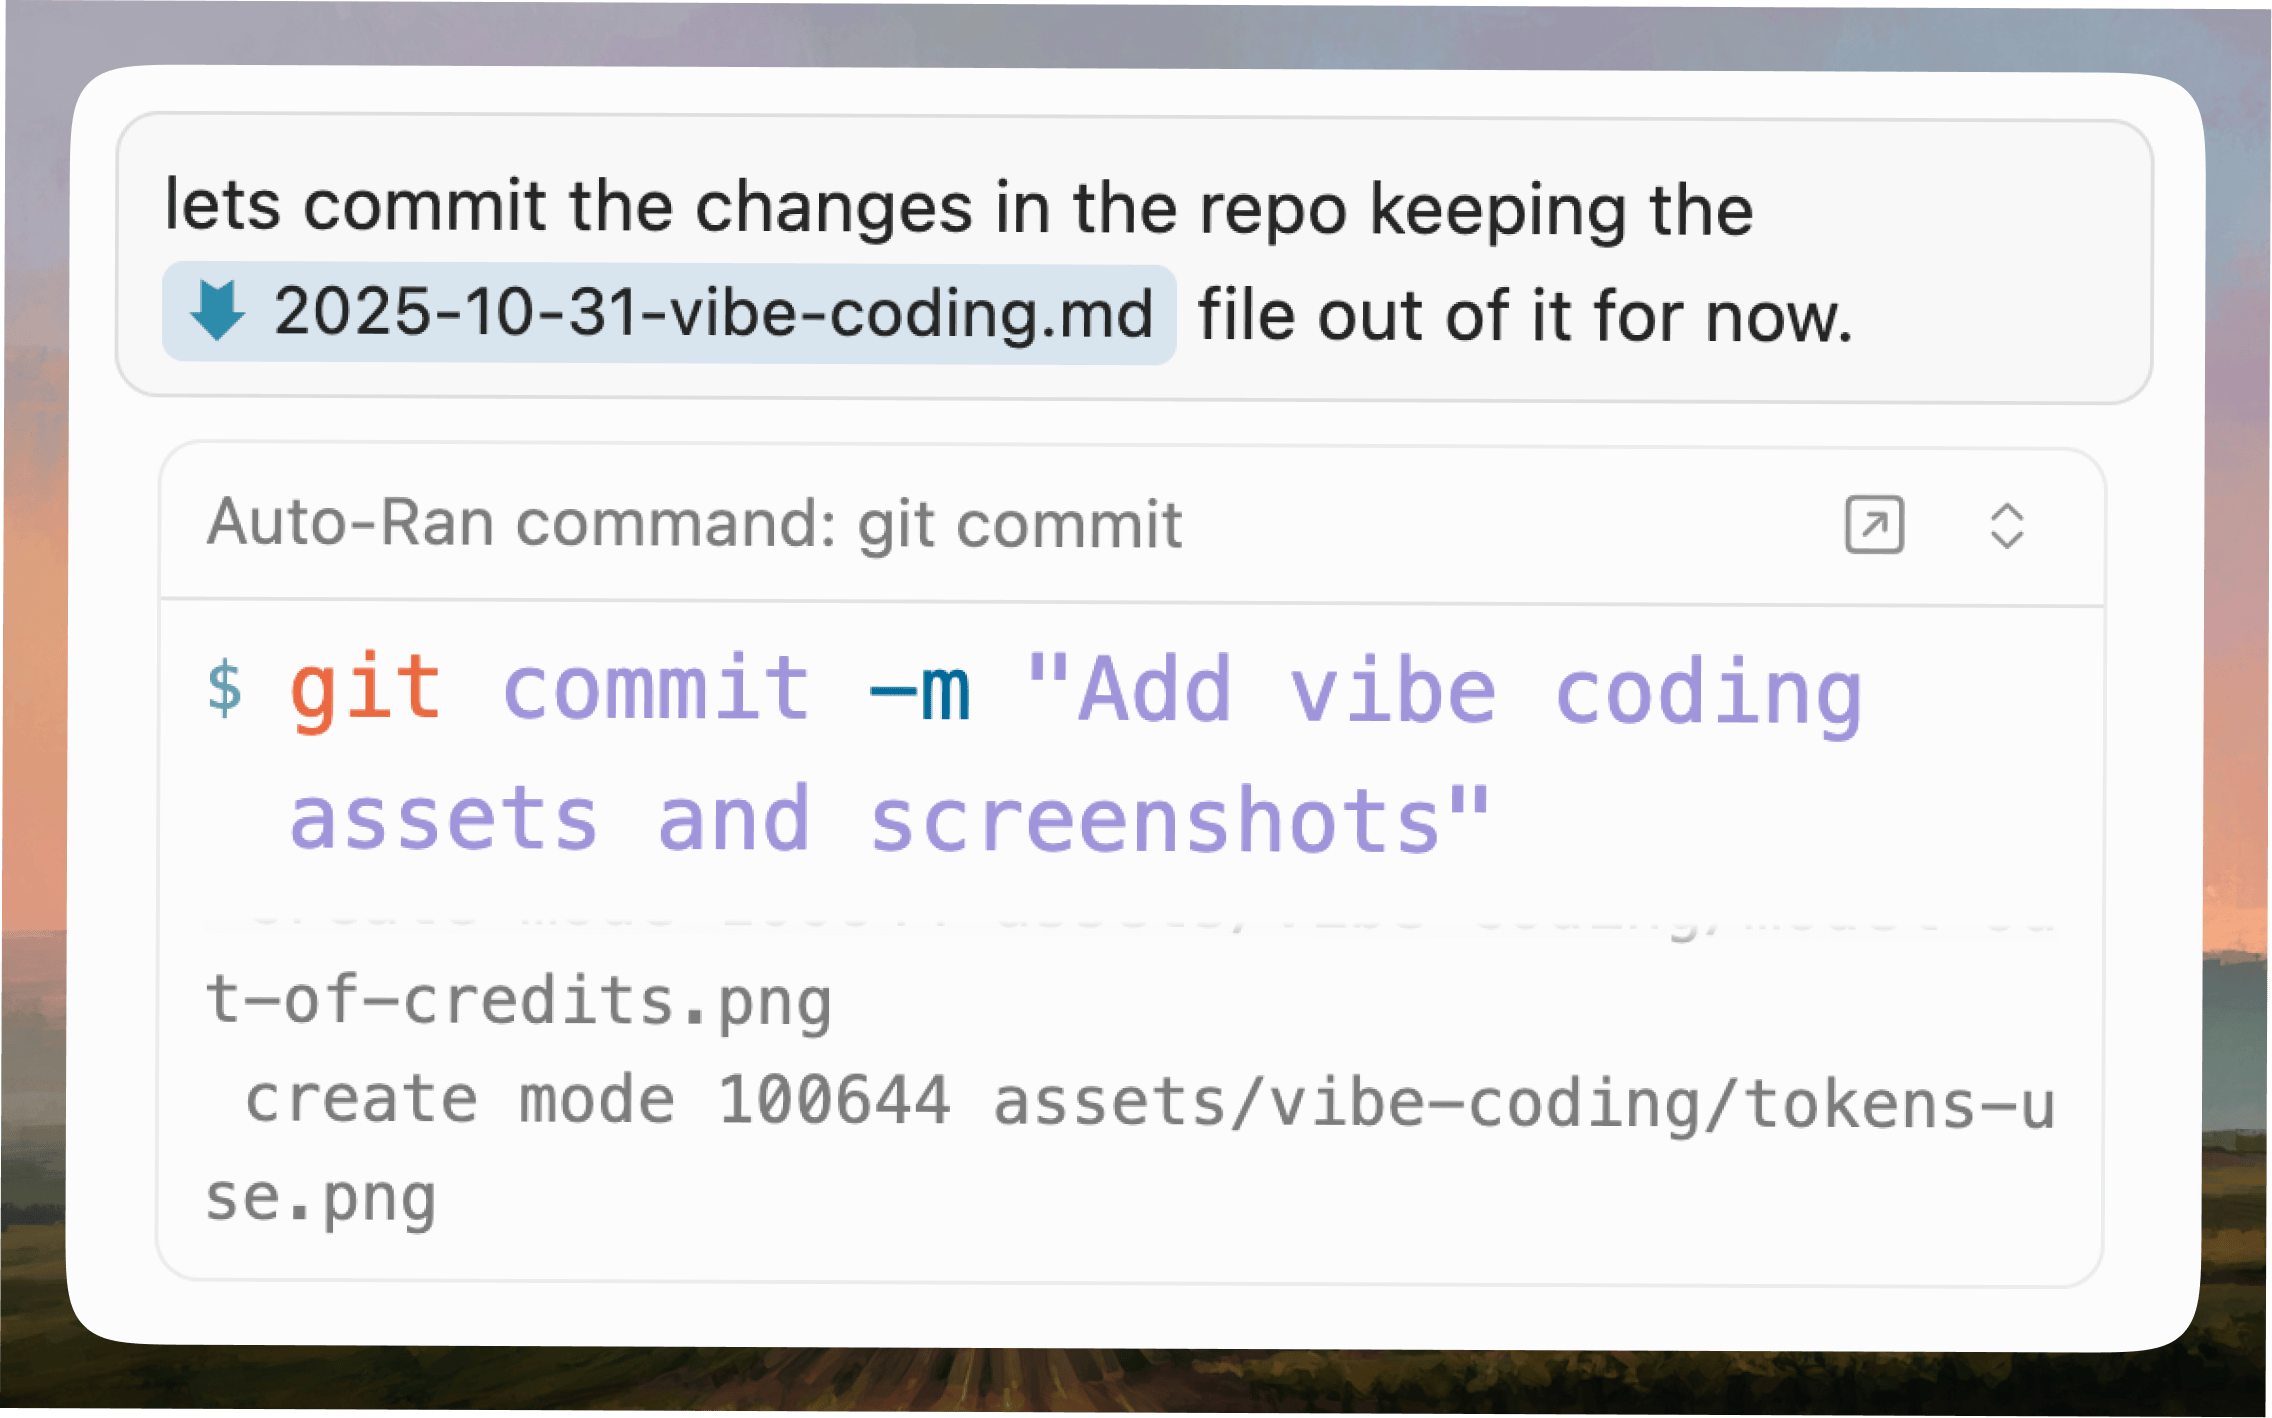 🎩 Cursor auto-generates commit messages
Additionally, Cursor’s Allowlist feature can automate these commands (coming to that in a bit), so you can say “Commit current changes” and it all happens in an instant.
Another tip is to tag your commits for major milestones, similar to how you might save design versions as “v1.0_final” or “v2.0_with_animations”. Use:
<!-- no-header -->
git tag v1.0
git push origin v1.0
You can even record what each tag represents in your project log. In that sense building with code allows you to become your own Product Manager – maintaining version history and feature ‘launch list’ and all. When an experiment breaks your prototype, you can instantly return to any tagged version. This transforms risky exploration into safe iteration, pretty much like duplicating a frame in Figma before trying a radical design direction.
Define project taxonomy early or every prompt becomes harder.
Let’s say you’re building a food ordering app. You have restaurants, menus, menu items, a cart, and orders. In Figma, your component names are fixed and visible, you see them right there. In code with AI, the AI doesn’t see your design system. It interprets what you say each time, leaving room for variation.
Without explicit taxonomy, you’ll spend more time aligning on naming conventions than building. The issue isn’t that AI is dumb, it’s that fixed things need to be deterministic, not interpretive. You might call something MenuItem in one prompt and menu item in another when building your food app. The AI might infer they’re the same, but it also might generate slightly different code structures, imports, or connections. As you iterate, these small variations compound into inconsistencies that break your architecture. One prompt wires the cart to menu items one way, the next uses a different pattern, and suddenly you’re spending more time fixing inconsistencies than making progress.
The fix is simple but important: Define your taxonomy explicitly: component names, module structure, and relationships, just like you’d define your design system. Spend 10 minutes upfront making these decisions fixed and documented, and every subsequent prompt has less room for misinterpretation.
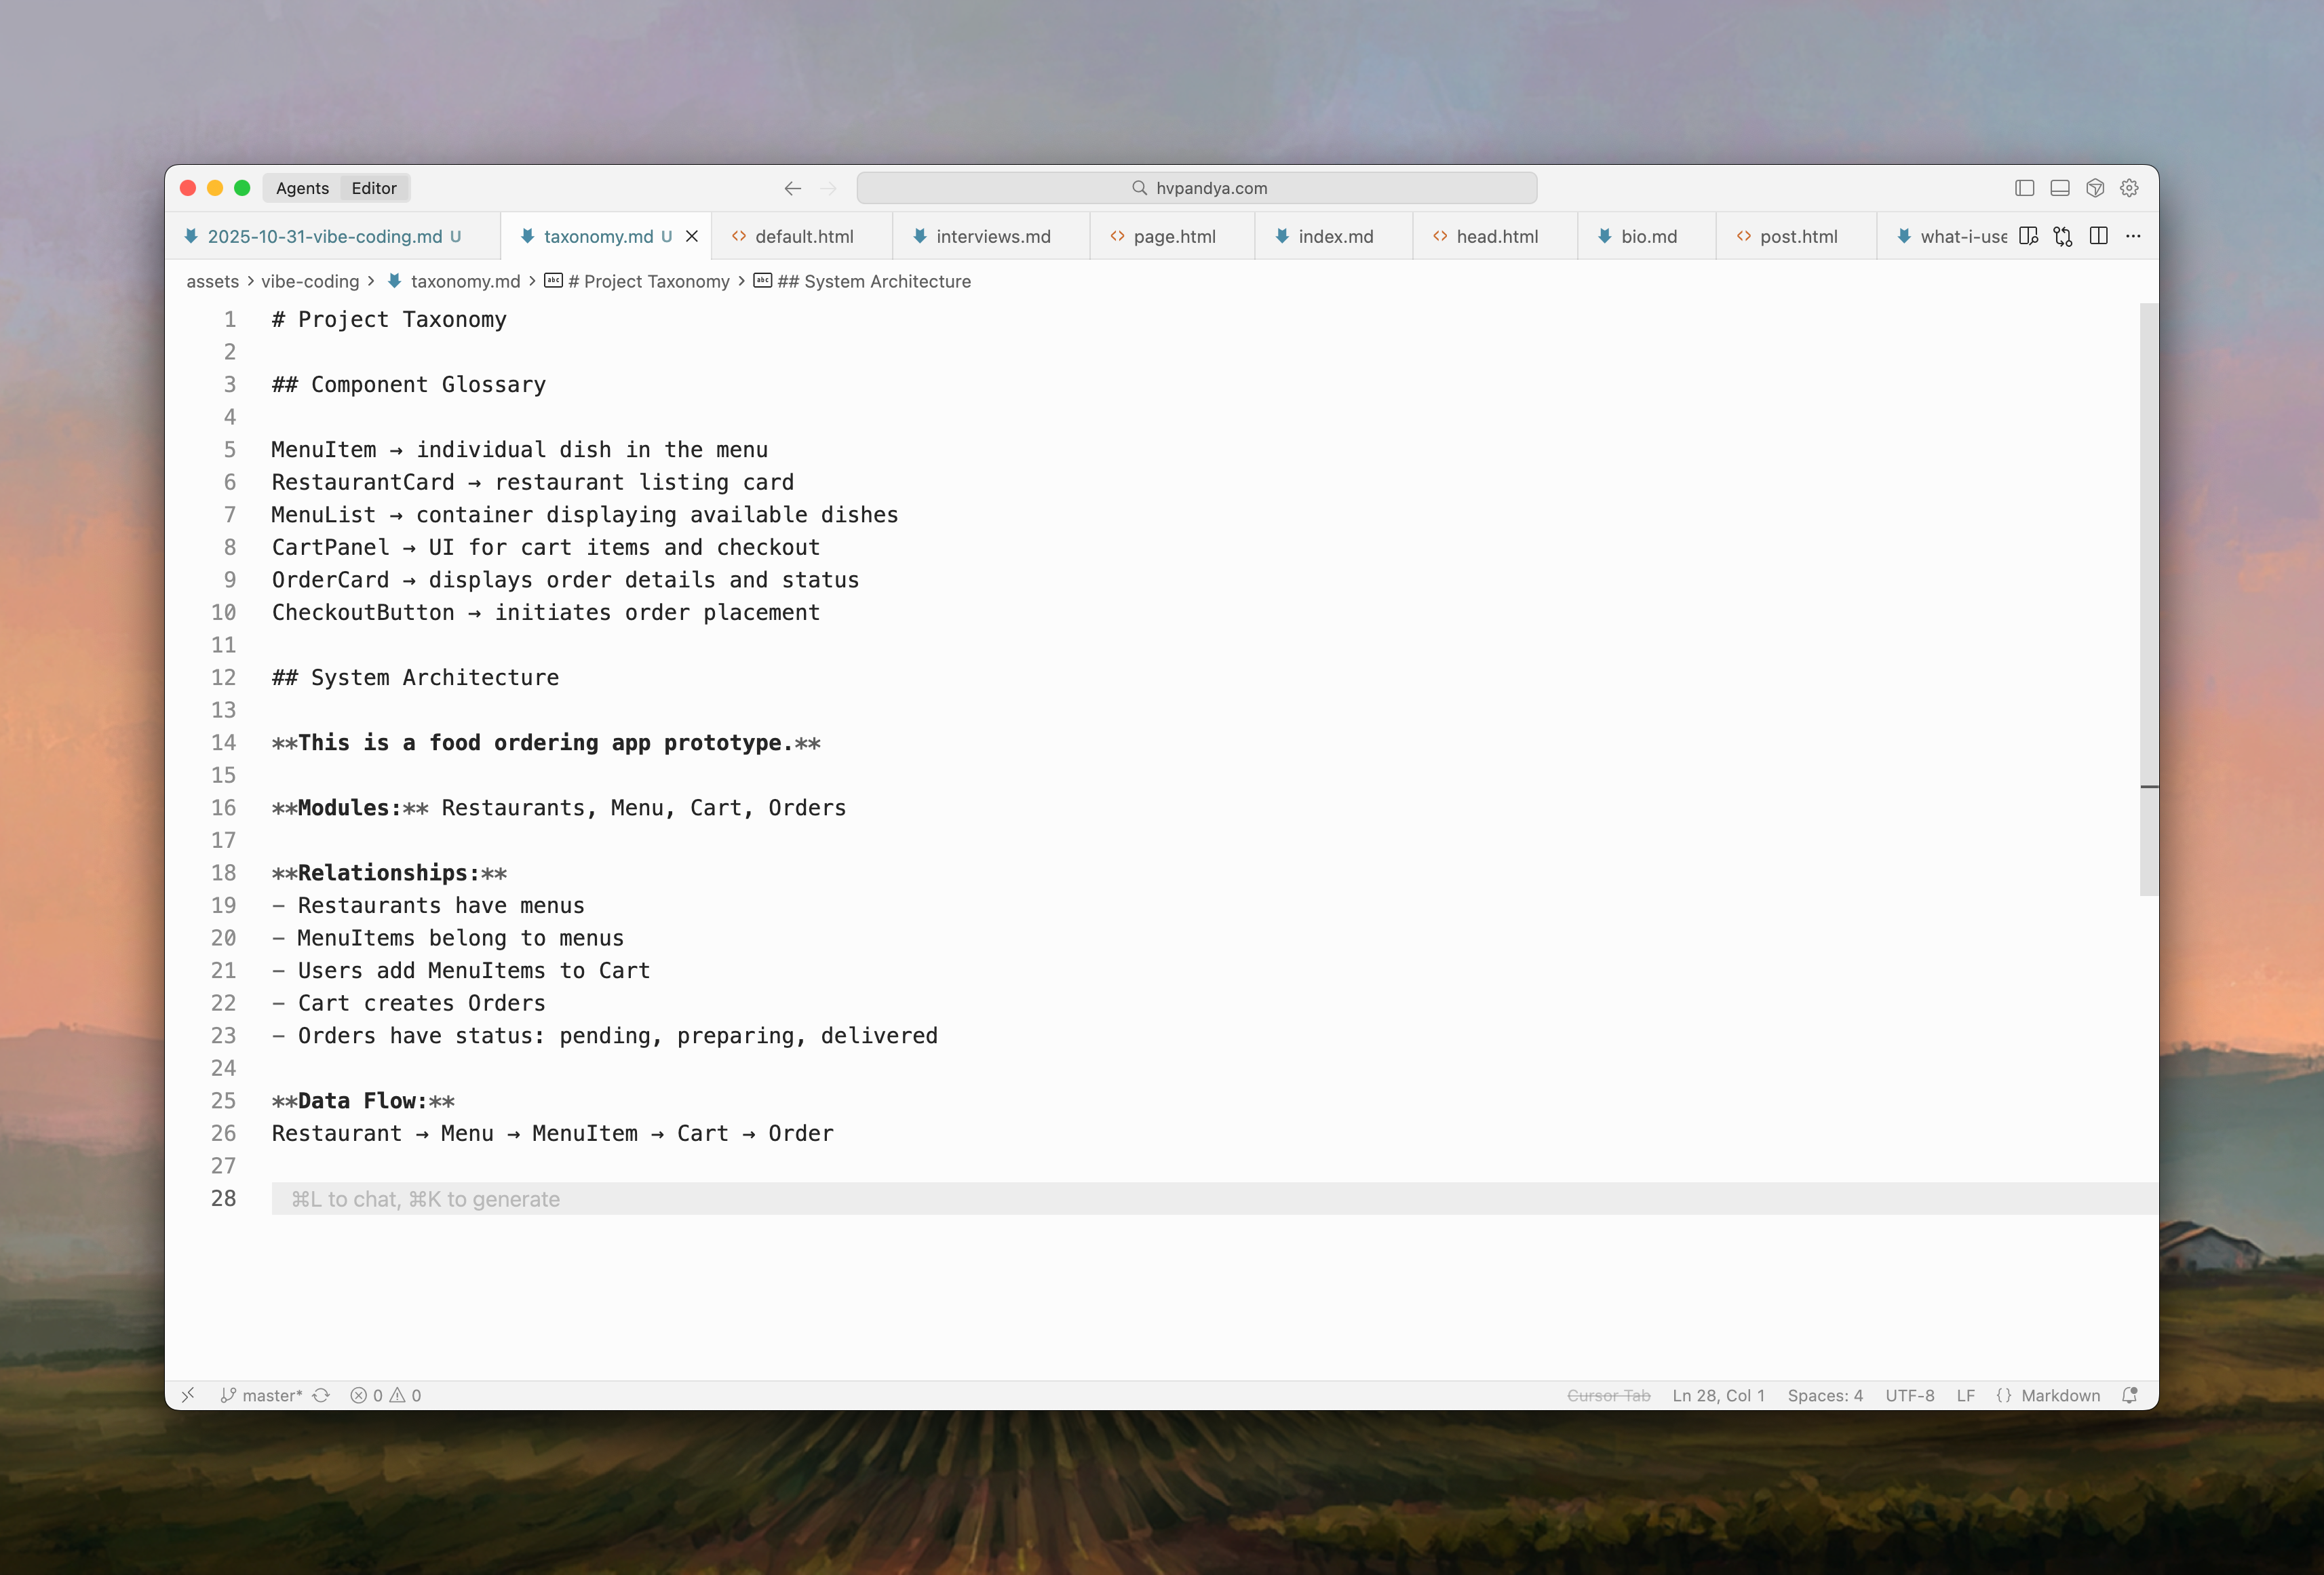 Taxonomy file with component glossary
Create two things: a glossary file that defines component names, and an architecture map that defines relationships. Start with the glossary:
<!-- no-header -->
MenuItem → individual dish in the menu
RestaurantCard → restaurant listing card
MenuList → container displaying available dishes
CartPanel → UI for cart items and checkout
Then map your system architecture:
<!-- no-header -->
**This is a food ordering app prototype.**
Modules: Restaurants, Menu, Cart, Orders.
Restaurants have menus. MenuItems belong to menus.
Users add MenuItems to Cart. Cart creates Orders.
Orders have status: pending, preparing, delivered.
Turn this into a taxonomy.md file with Cursor and it will remember all of it henceforth. Now when you say “add MenuItem to Cart,” it knows exactly what those are and how they connect. Your prompts become shorter, more accurate, deterministic and the AI generates code that actually works together.
Tag deterministic targets with @ in prompts for fast and accurate edits.
While prompting when you say “update the menu component” or “add this to the cart file,” you’re leaving room for interpretation. Which menu component? Which cart file? The AI might modify the wrong file, create duplicates, misunderstand your intent, or at the very least it will be slow in executing the prompt because it first has to infer the right file.
Be explicit and use Cursor’s @ feature to tag files directly in your prompts that you want to modify. Instead of saying “update the menu component,” say @MenuList.tsx update the menu component. Instead of “add this function to the cart,” say @CartPanel.tsx add this function. When you reference files deterministically, Cursor knows exactly what you mean and generates code in the right place.
When creating new files, it helps tremendously to specify the exact path: “Create a new file at modules/menu/MenuFilter.tsx” rather than “create a filter component in the menu folder.” The more specific you are, the less time the model takes to get the work done.
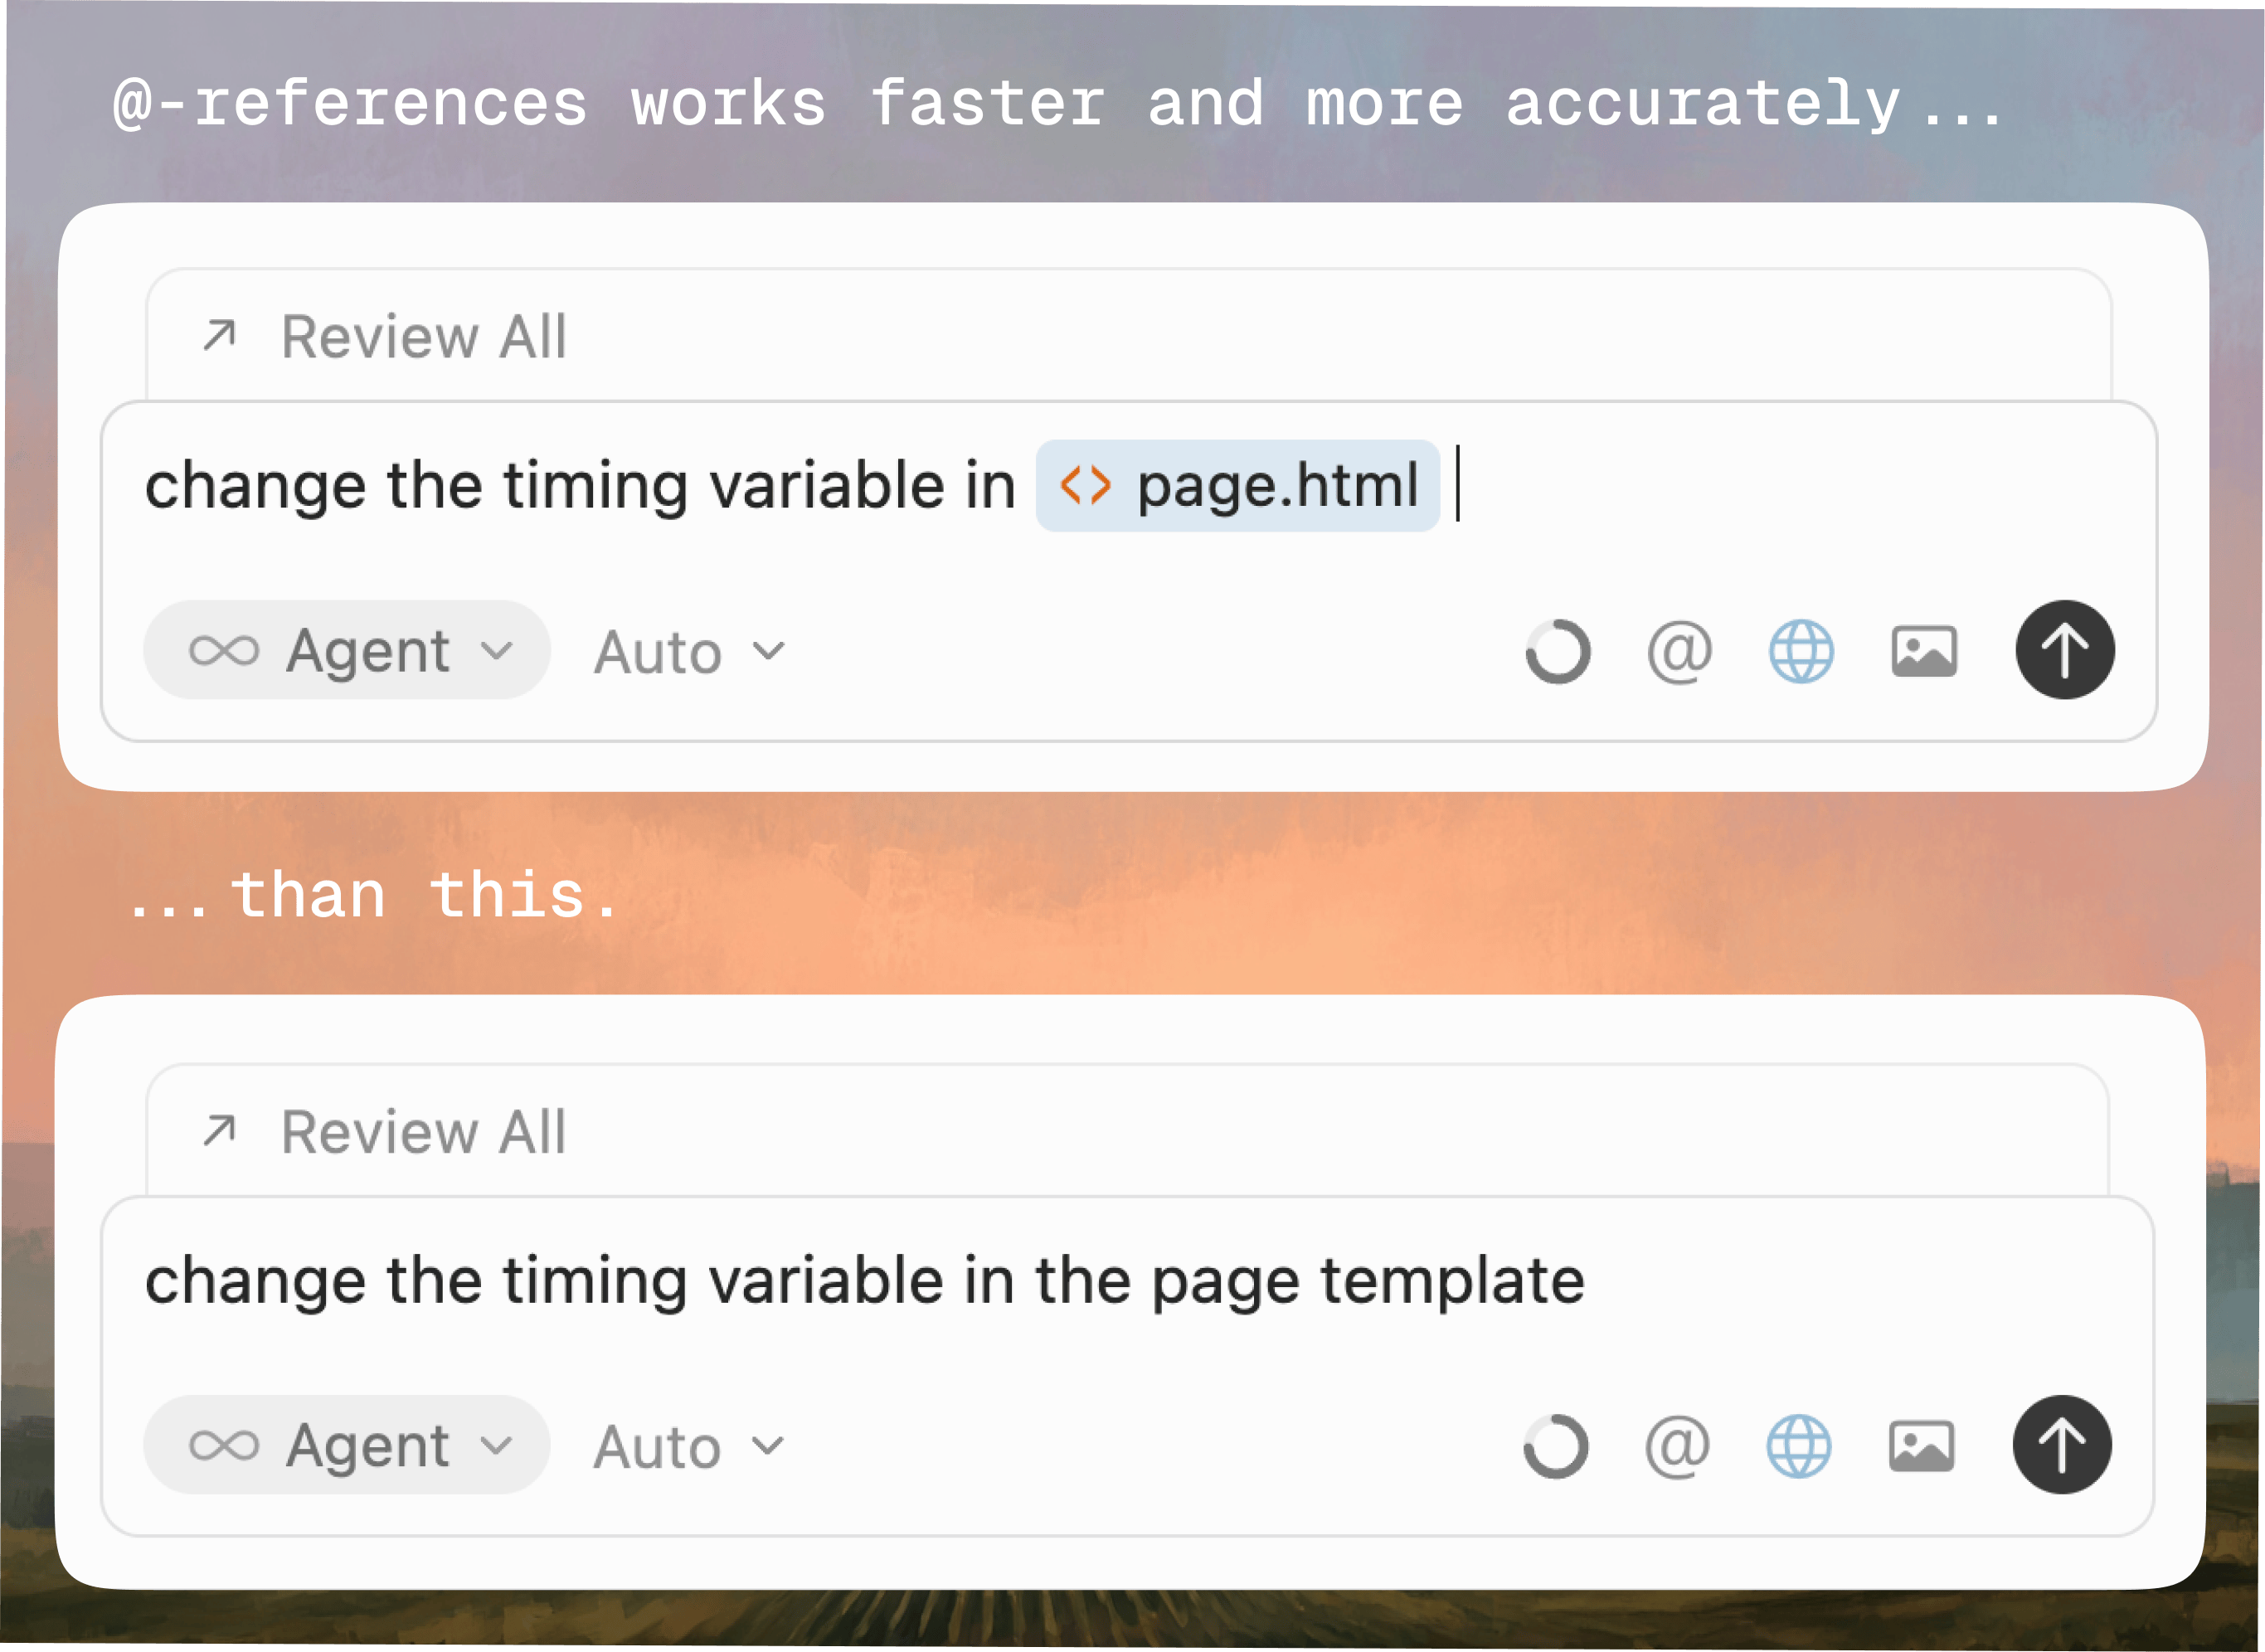 Using @ to tag files in prompts
Long chats make AI dumber. Create new chats a lot.
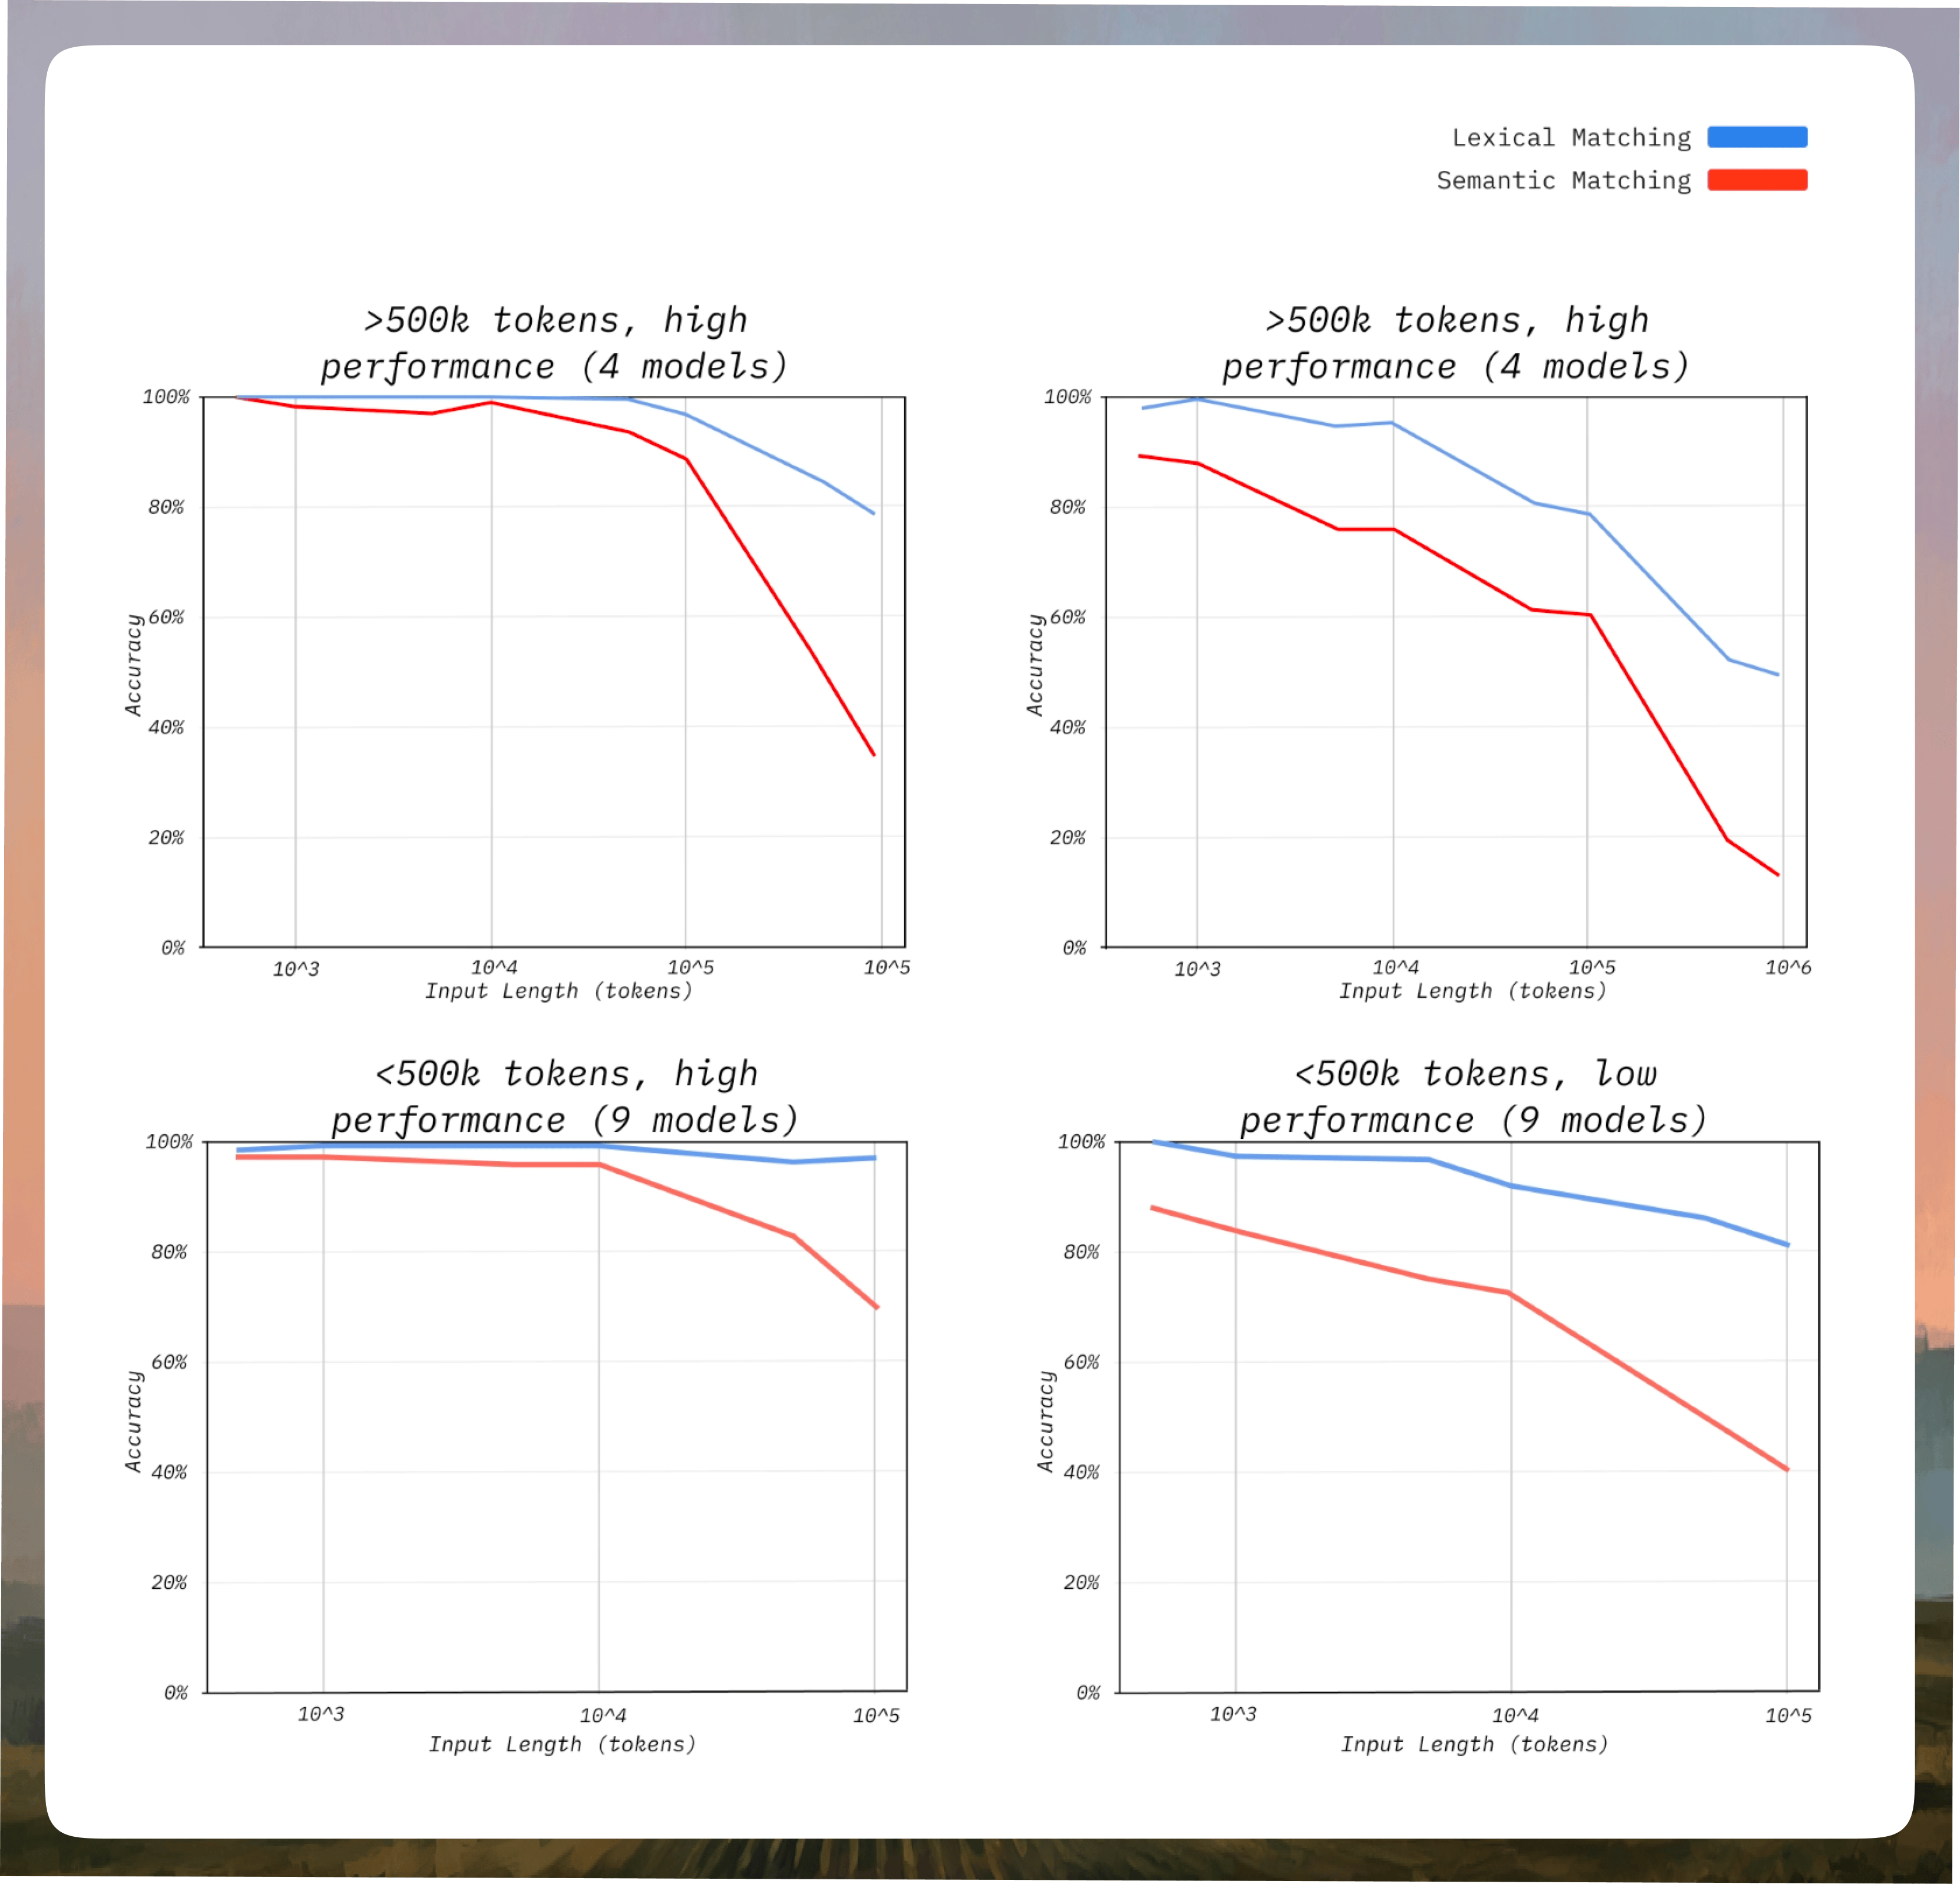
LLMs have a fixed working memory called the context window. As you add more messages and code, the window fills up. When it reaches capacity, the model compresses older information to make room for new input. This compression isn’t perfect, it prioritizes recent information while losing precision in older details. As context windows fill beyond 70% capacity, model accuracy decreases by 15-30%.
There’s a great YouTube video on this if you want to understand context rot better.
 Context rot visualization
You’ll notice context rot in subtle ways. The model’s suggestions become less aligned with your established patterns. Responses become slower, less precise, and more generic. What used to be targeted code suggestions become boilerplate-heavy responses that don’t fit your use cases. This is entirely expected though.
The solution is simple: Create new chat a lot, every time you reach around 70% of context usage in the current chat.
Before closing your current chat, ask Cursor to create a comprehensive summary of your project state, then copy that summary and paste it as the first message in a fresh chat to transfer all essential context cleanly.
Use this prompt to generate the summary:
<!-- no-header -->
Create a comprehensive summary of our current project state. Include: active modules and their purpose, major architectural decisions we made, current component names and structure, any bugs we fixed and how, our naming conventions, dependencies we're using, and what we're working on next. Format this as a clear, structured markdown document I can paste into a new chat.
 Chat summary made by Cursor
Bring real data, people’s names & avatars, dynamism with Cursor.
Good prototypes feel real because they’re powered by real data. Cursor has access to a vast universe of open source repositories, APIs, and libraries, and can research and integrate them instantly without you switching to a browser or manually exploring options.
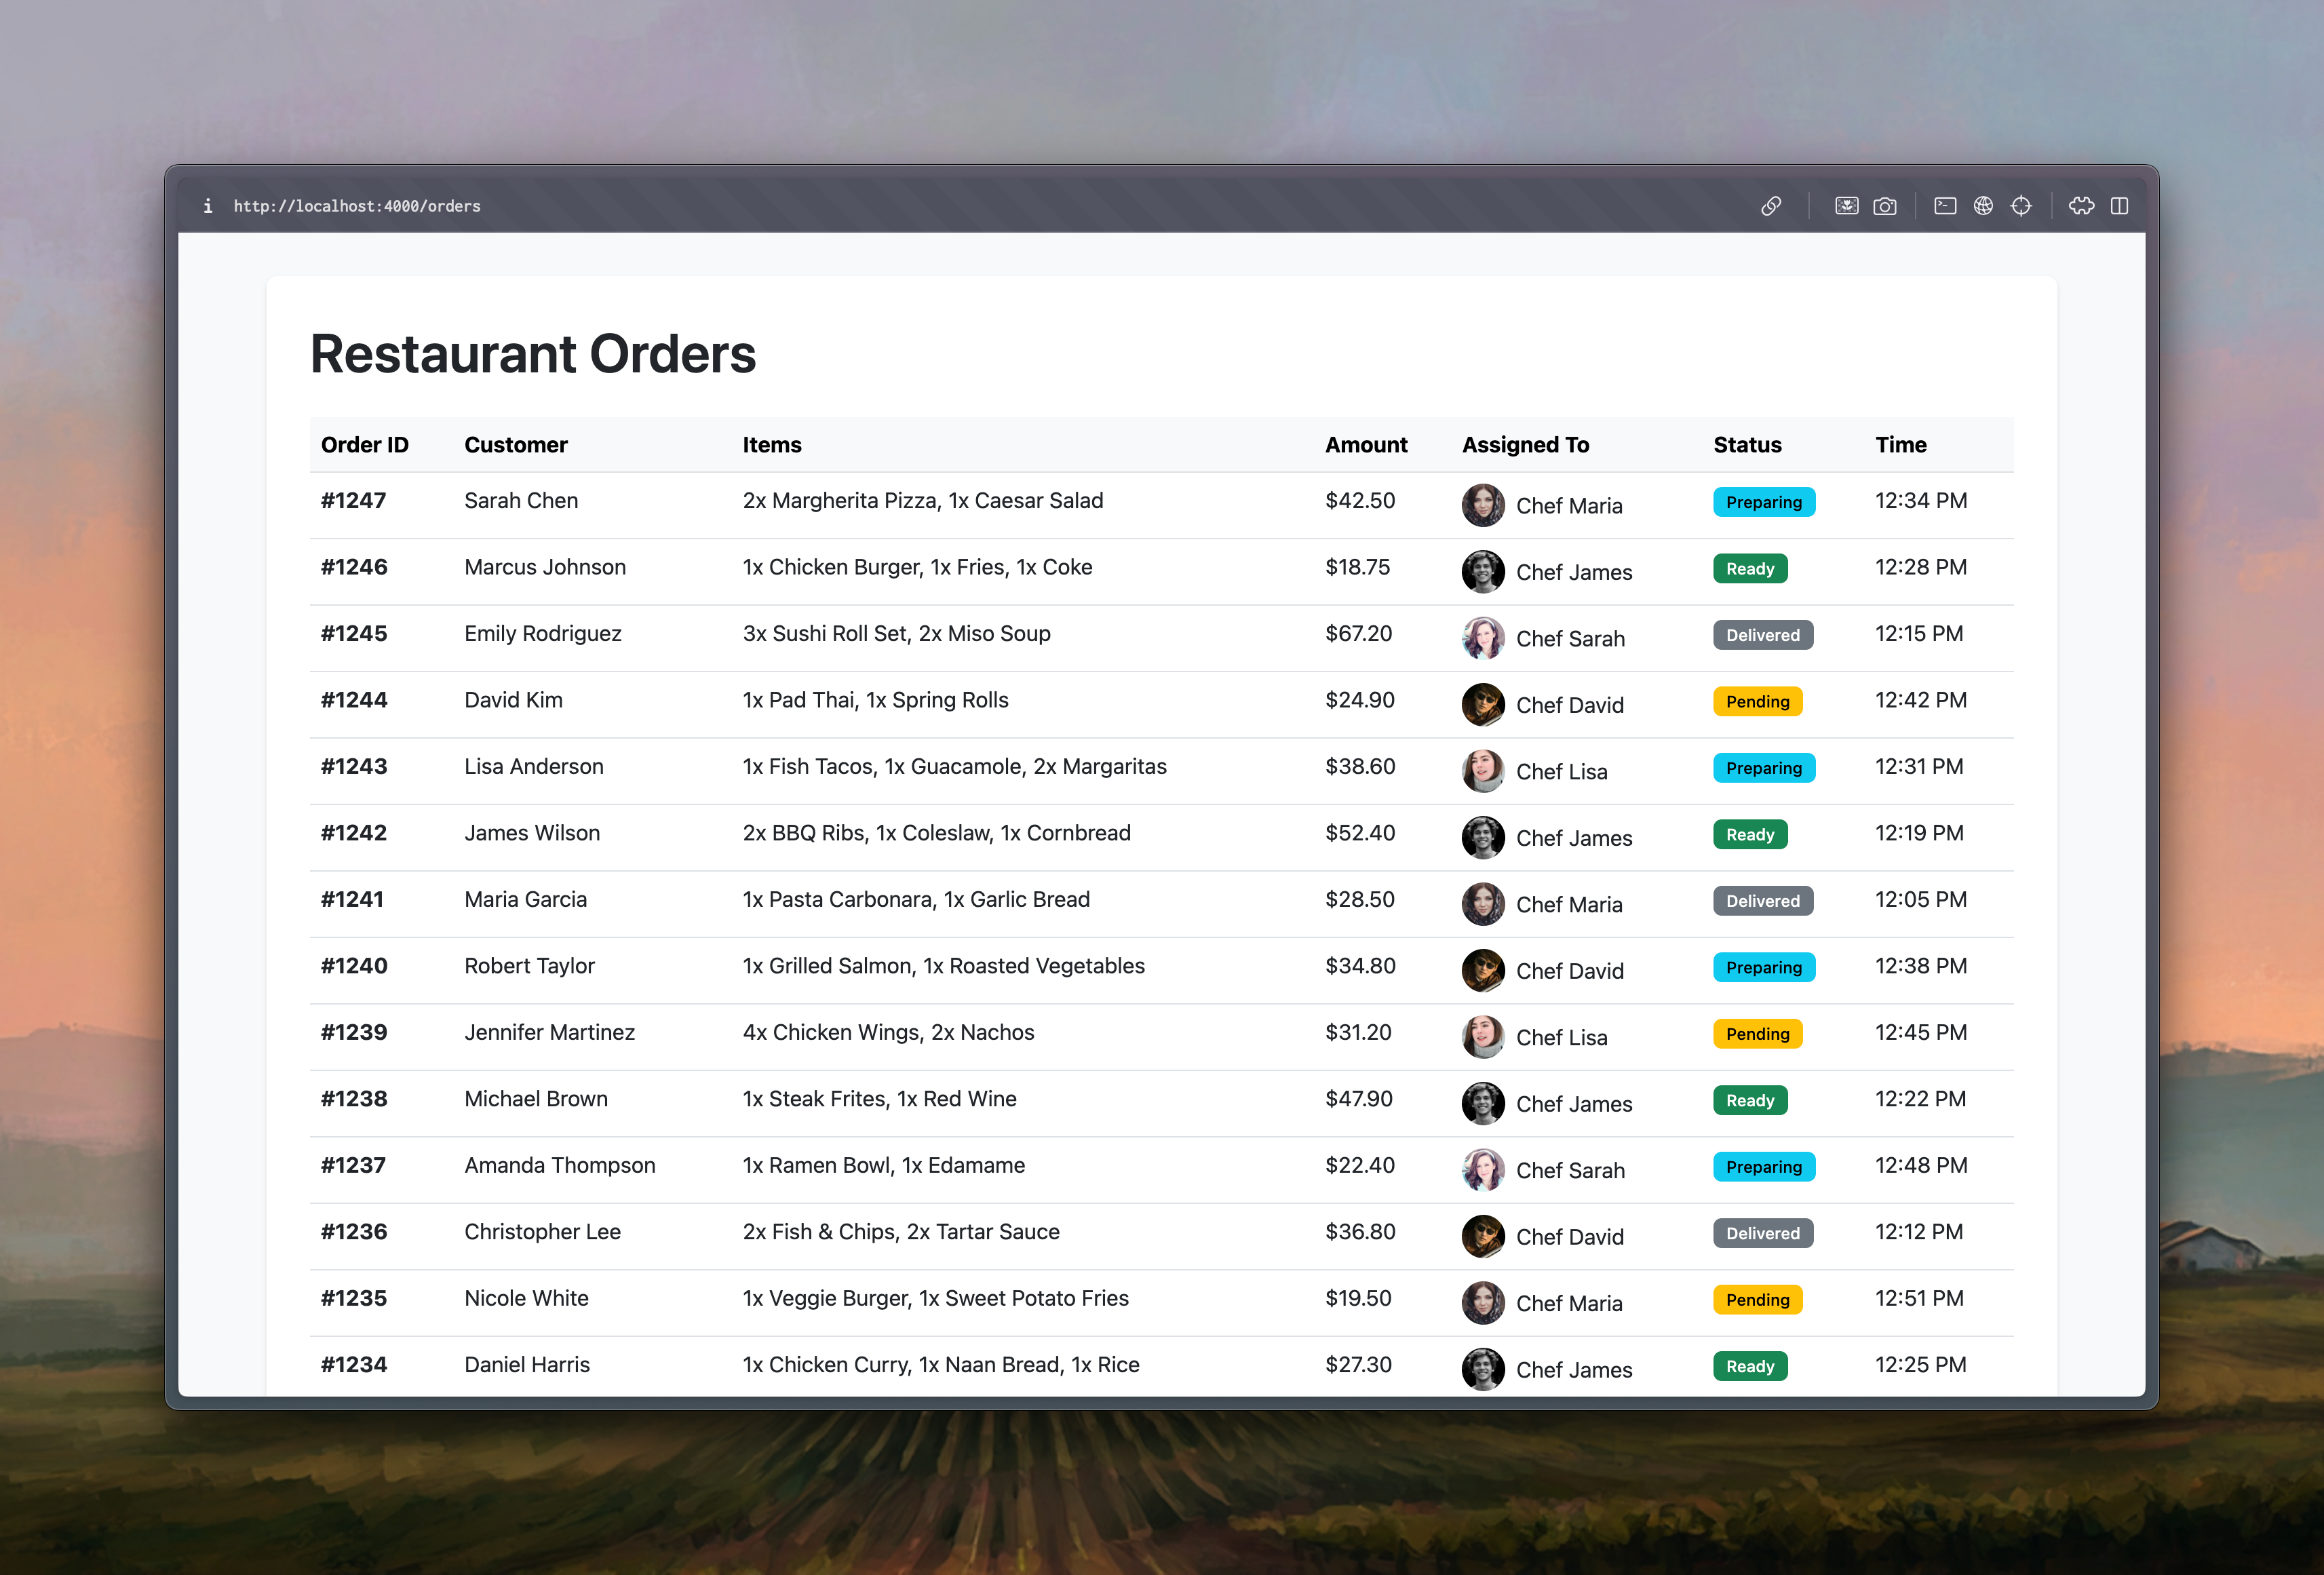
Populate UI elements with real content instantly. Instead of lorem ipsum or placeholder text, ask Cursor to fill lists, tables, buttons, and forms with taxonomy-compliant content that matches your domain. Tell it to populate a user table with realistic names, companies, roles, and activity timestamps, and it generates complete datasets immediately. It can pull real avatars from services like uifaces.co or Random User Generator, integrate them with your data, and wire everything together, all without you manually copying URLs or switching windows.
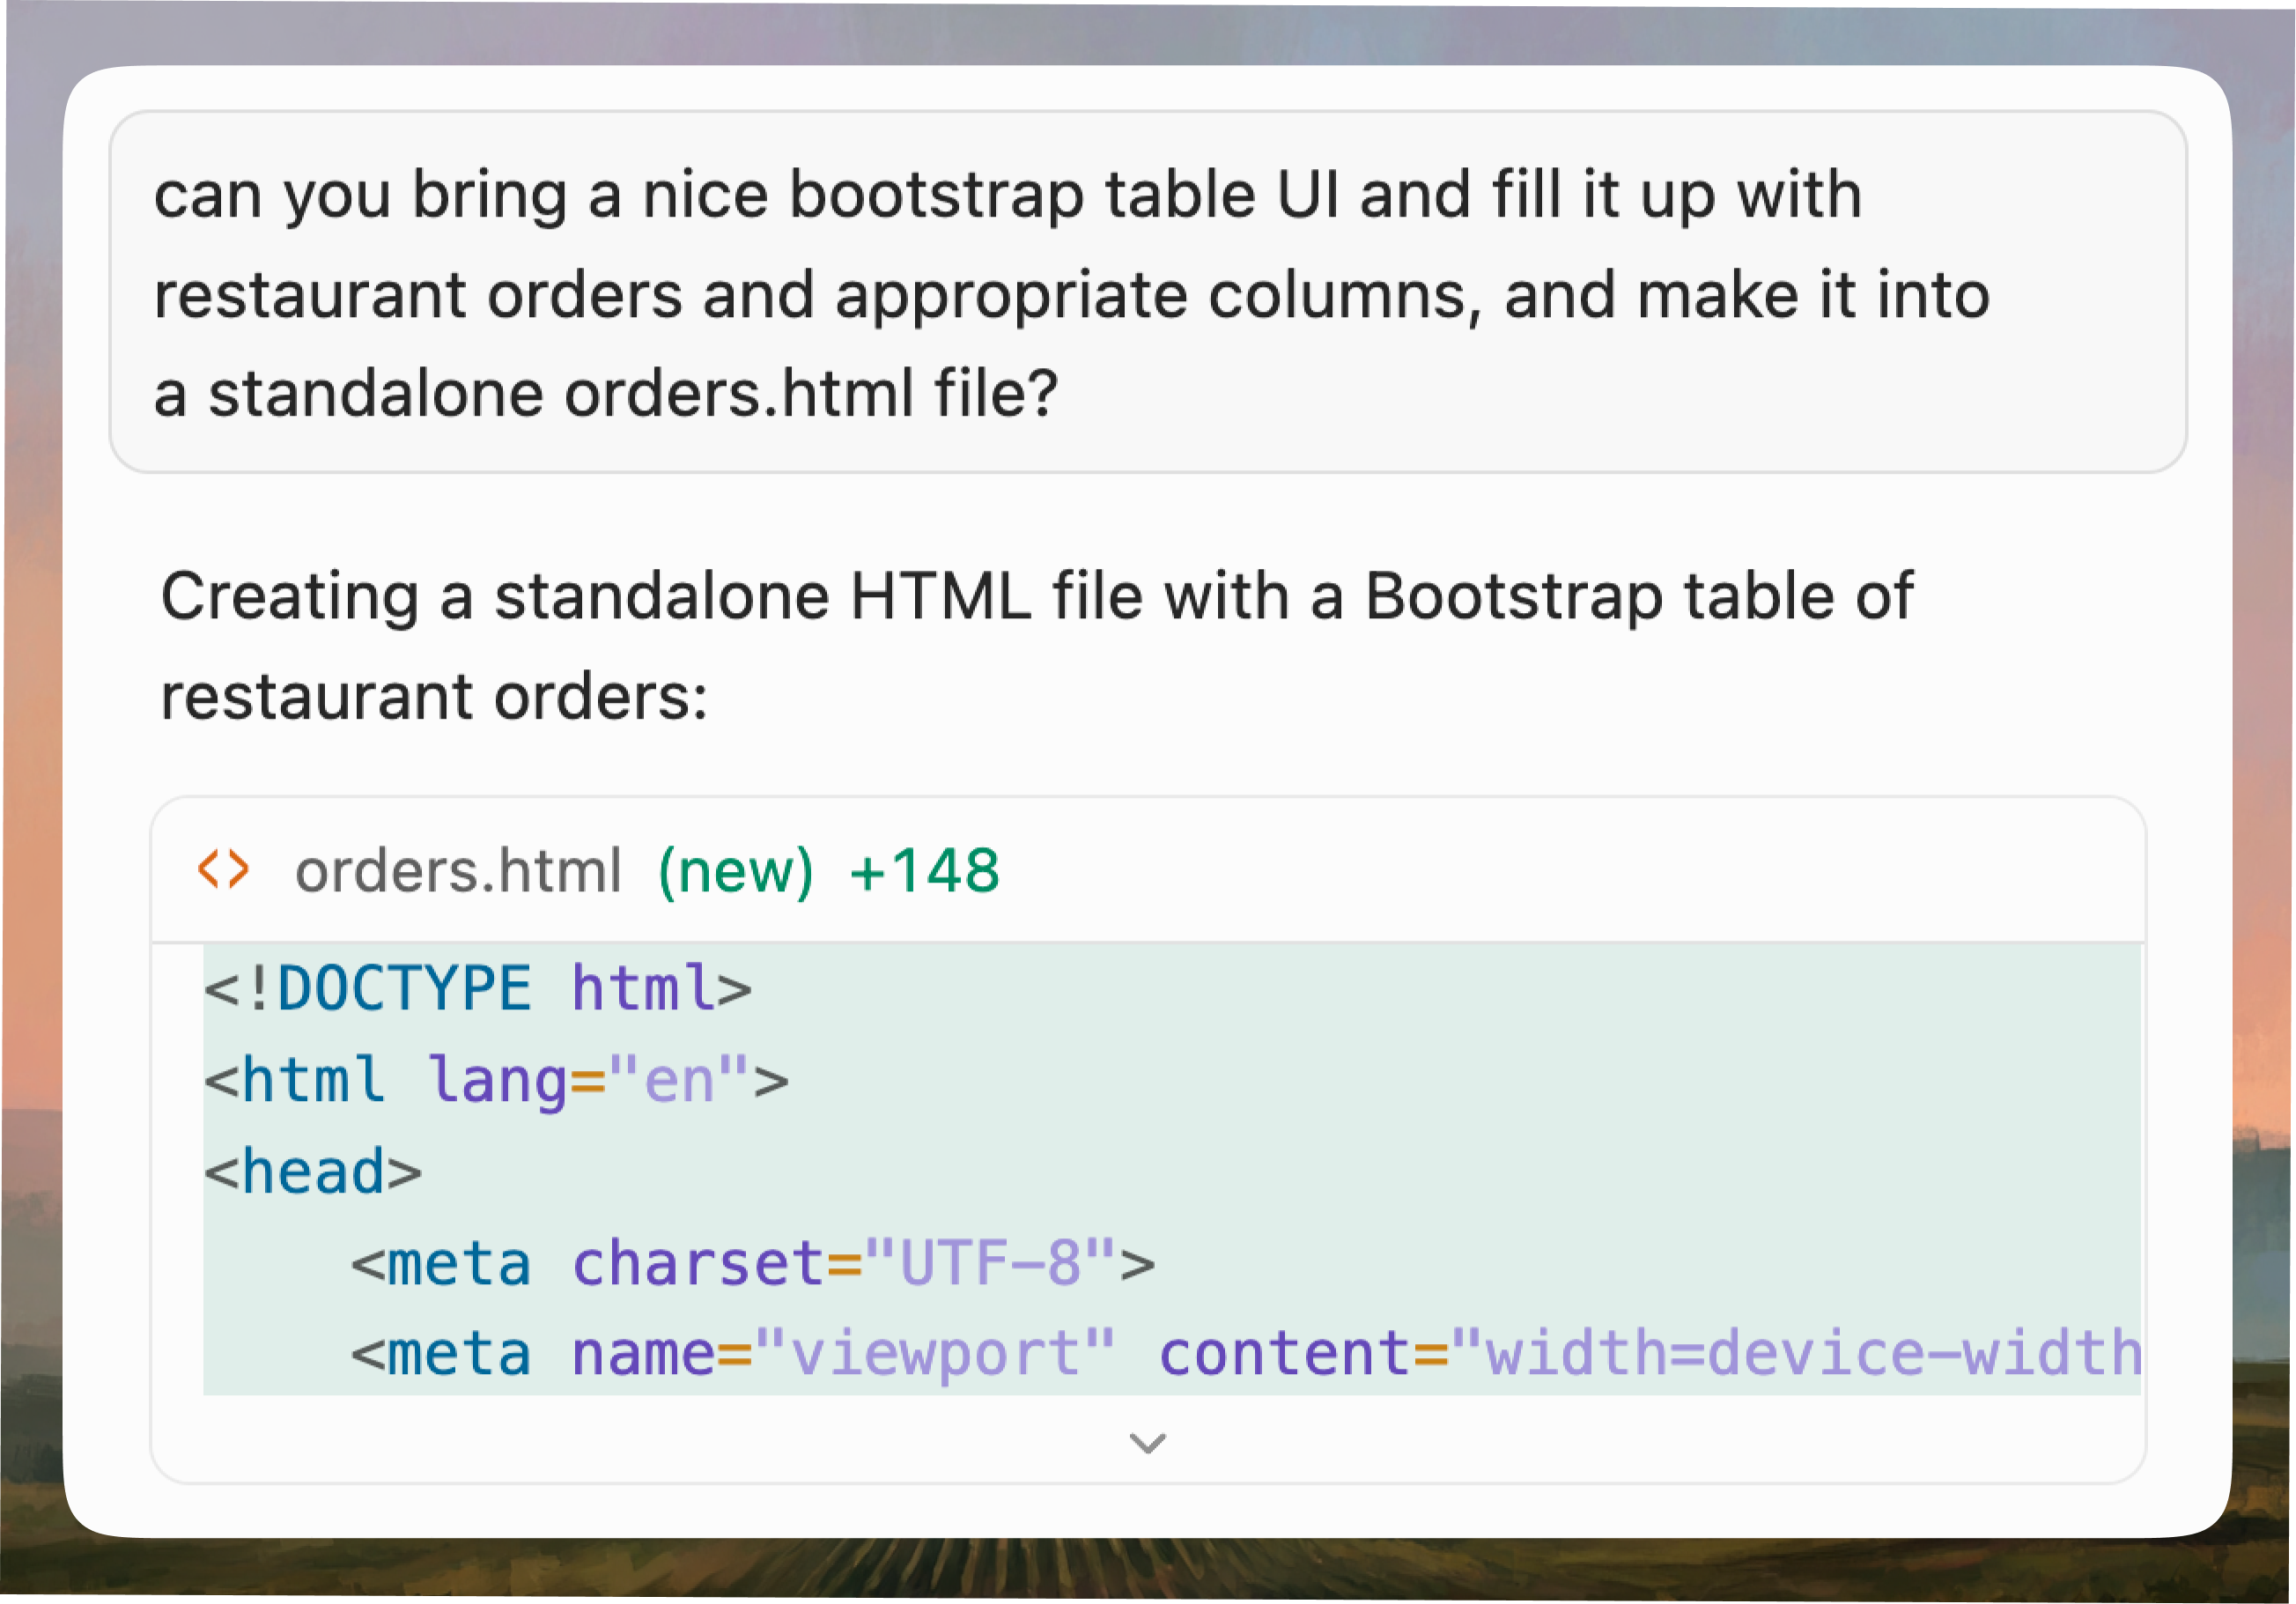 Cursor generating real data
 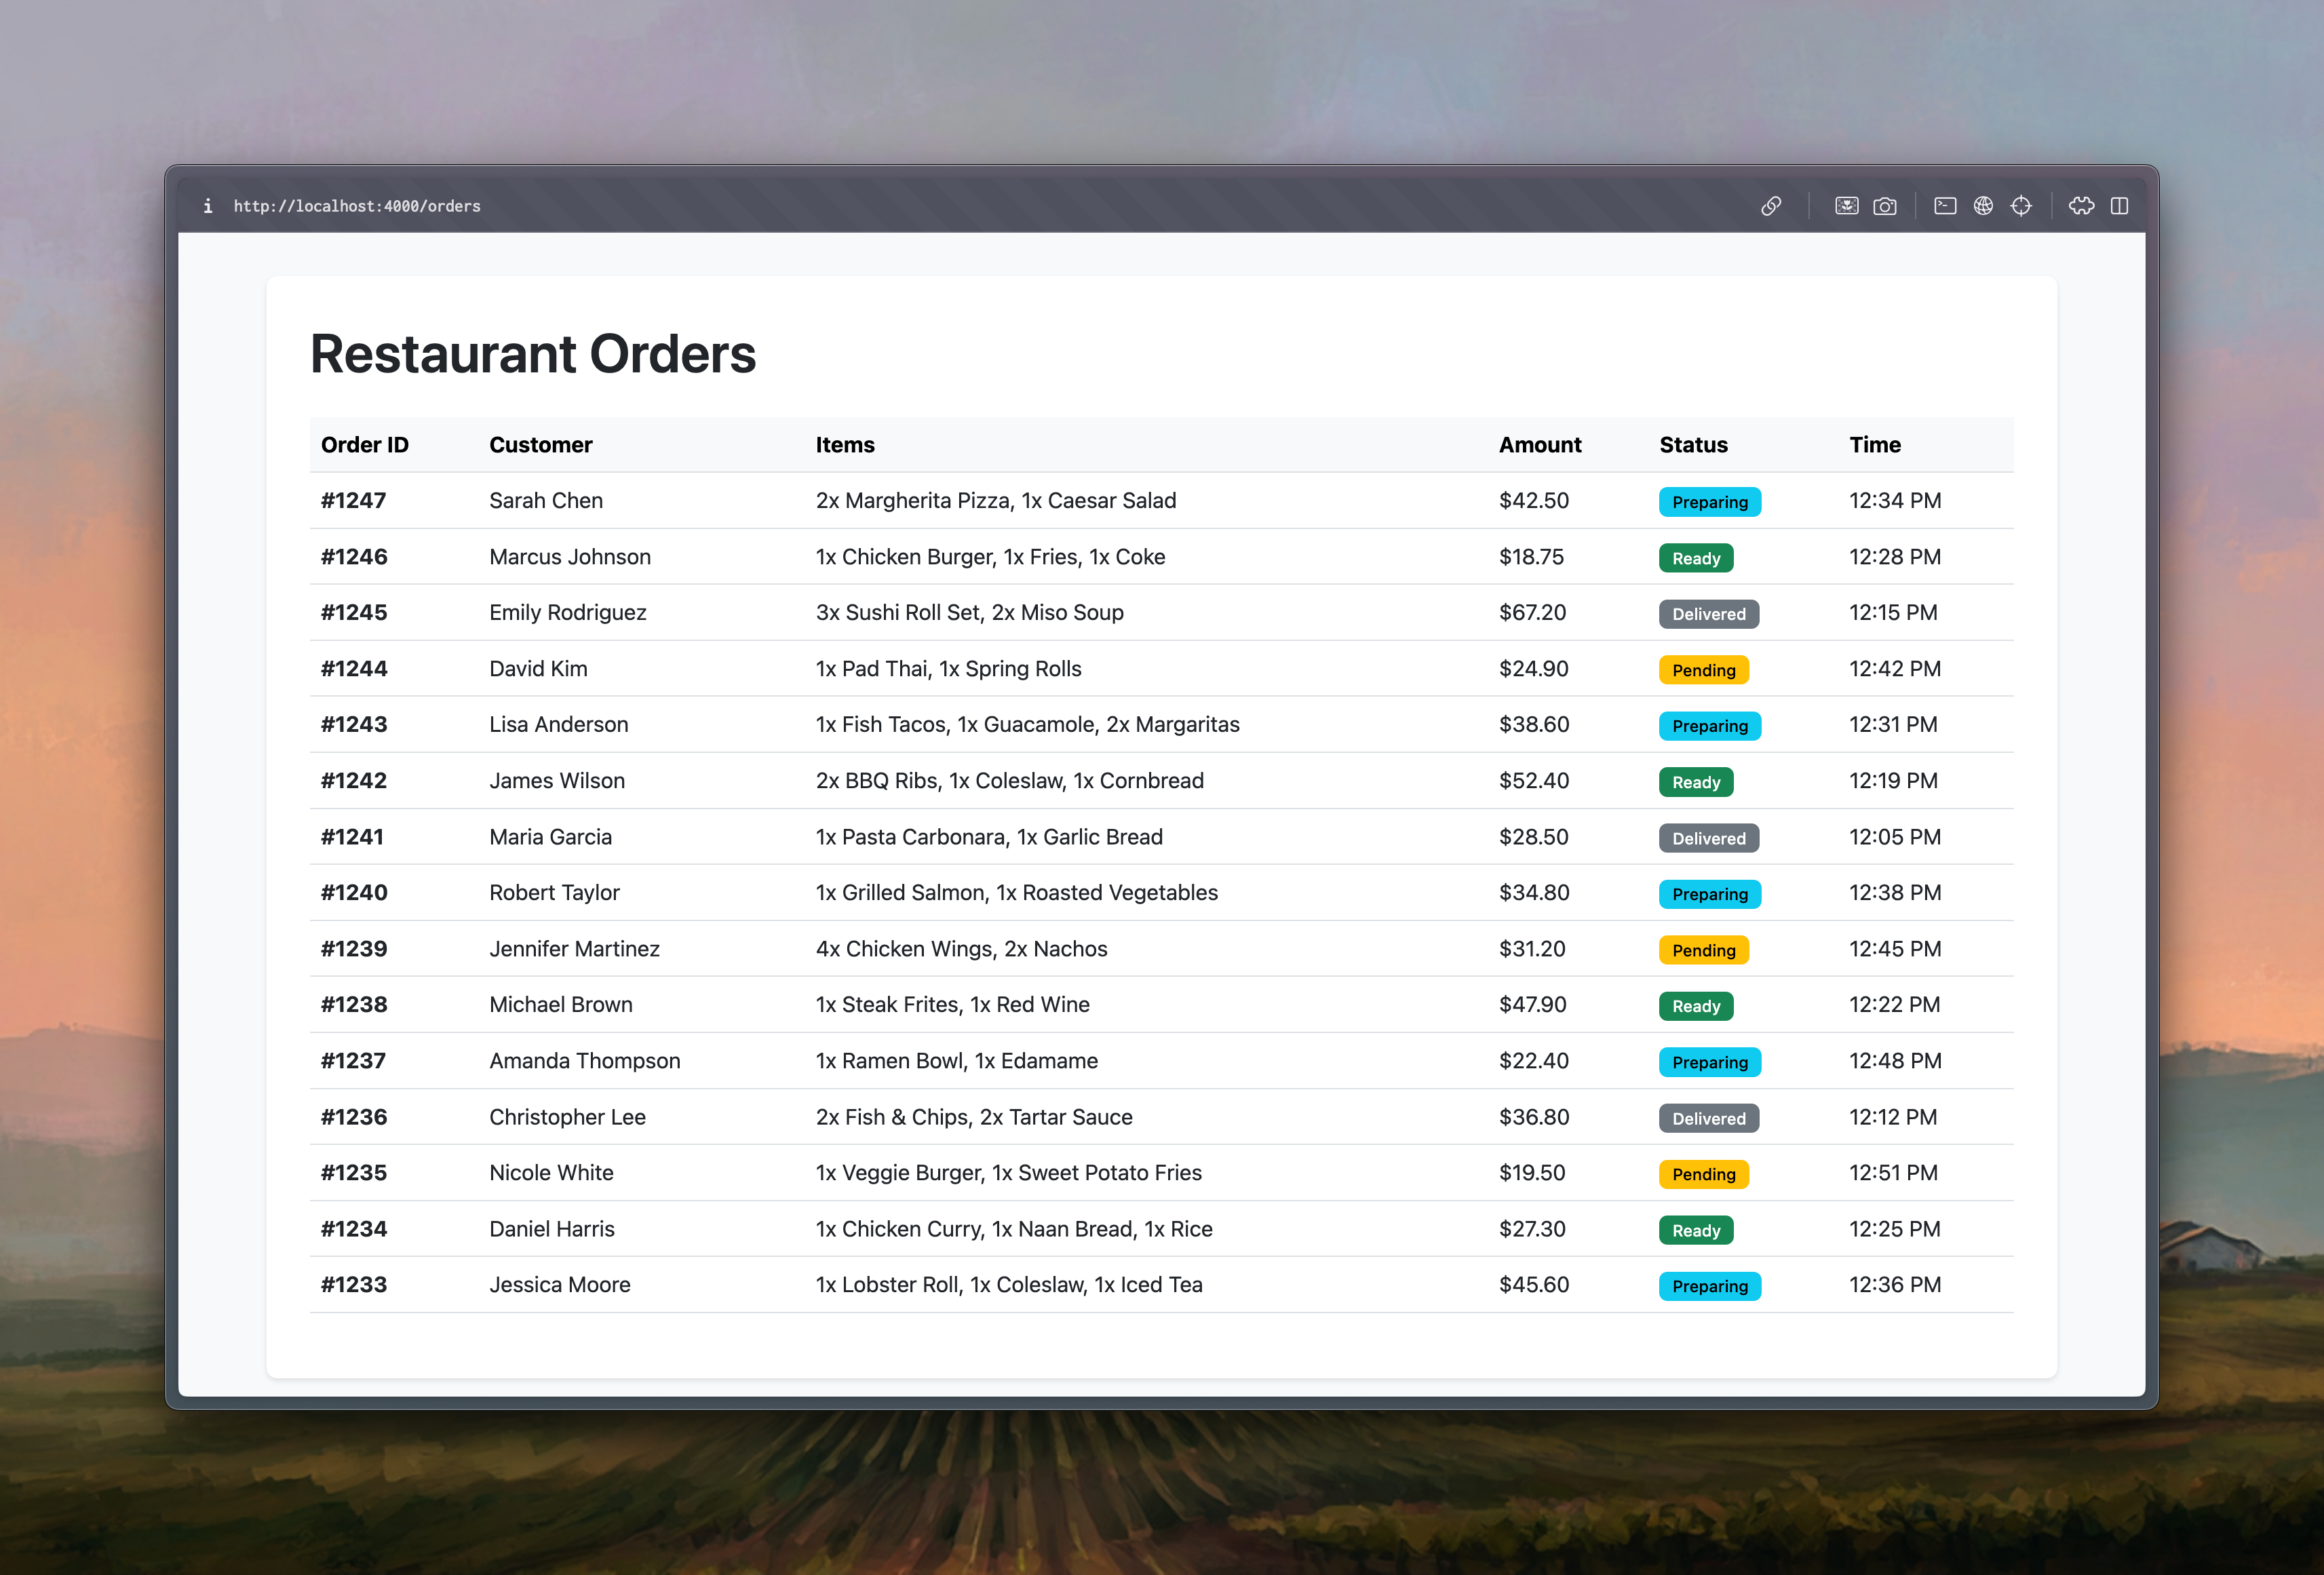 This took less than 10 seconds
Research and integrate powerful libraries on demand. Need charts? Data visualization? Shimmer loaders? Motion design? Ask Cursor to research options, compare libraries, and integrate the best one for your needs. It can pull from thousands of open source repos, understand their APIs, write the integration code, and have it working in your prototype in minutes, not hours of manual research and trial-and-error.
 Added people and photos in 30 more seconds...
Access real data sources without context switching. Cursor can fetch real people’s names, avatars, and metadata from public APIs, generate domain-relevant content like ticket titles, alert messages, or project names that reflect real-world semantics, and keep everything consistent across your prototype. You stay in flow, and your prototype gains the realism that makes stakeholders take it seriously.
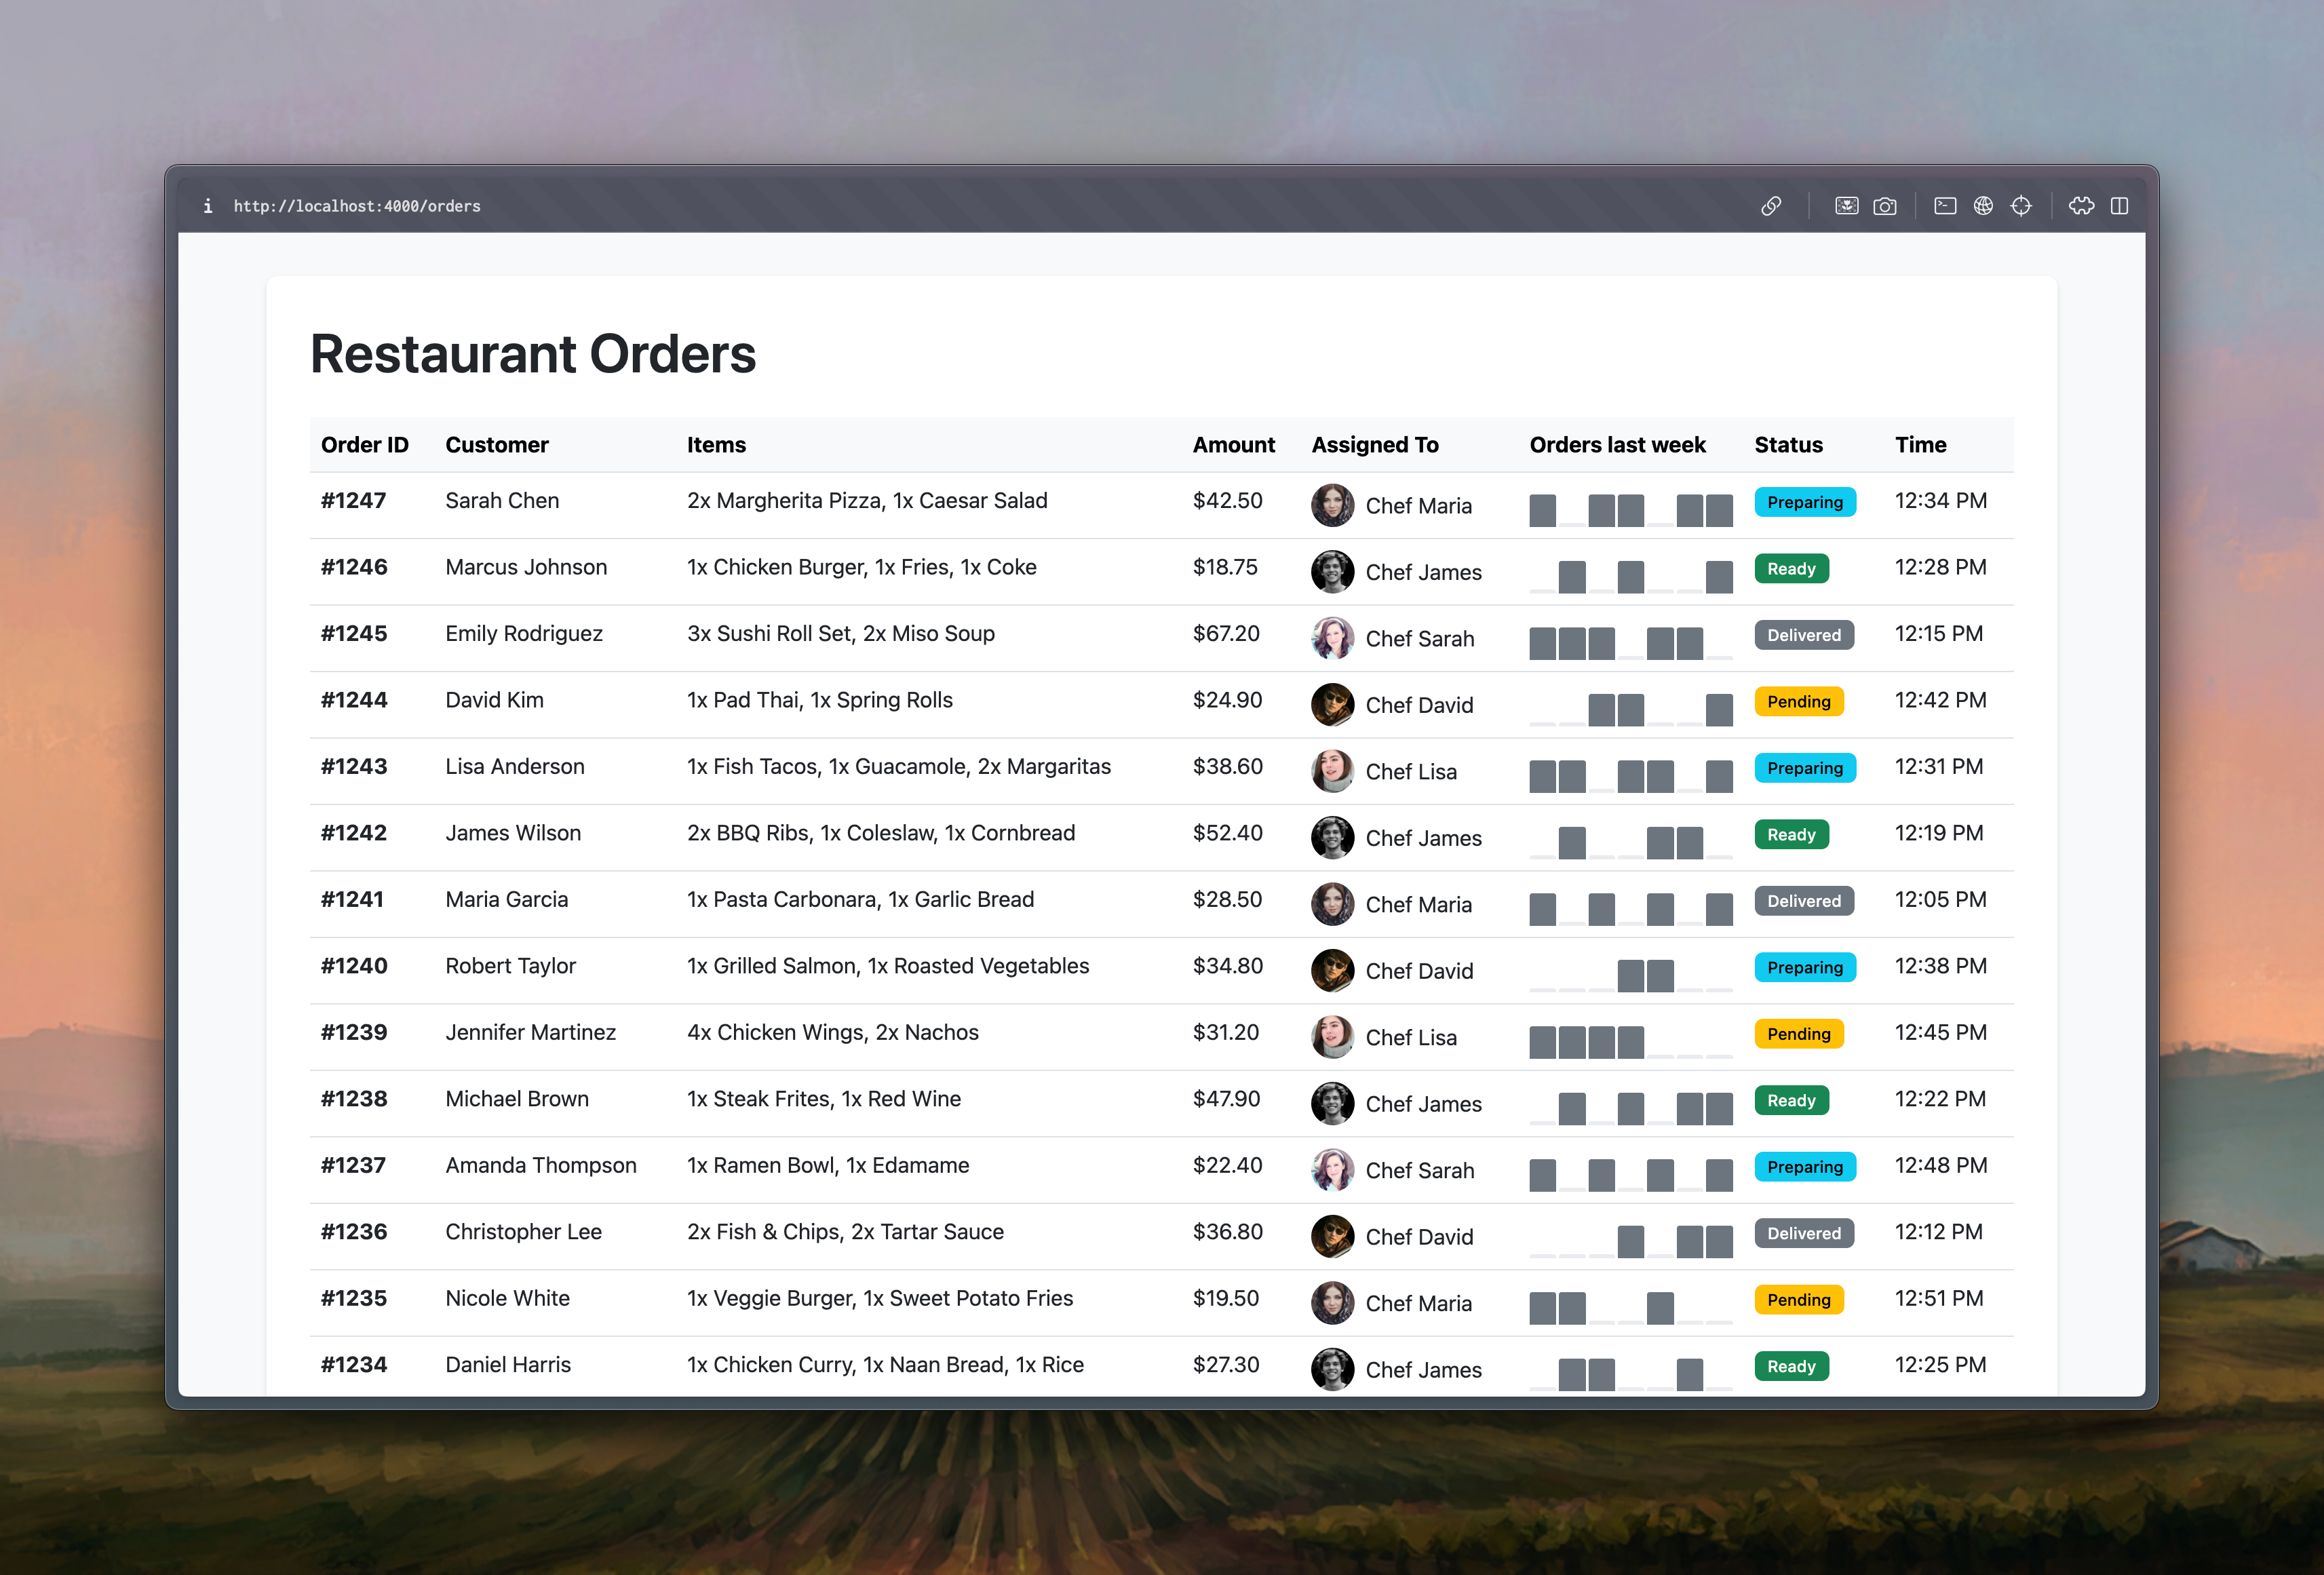 ...and added data-viz a hot minute later!
Cursor makes a great product & design sparring partner.
Vibe coding is not limited to getting AI to do the work. You have access to real-time intelligence right where you’re building. When you use Cursor, treating it like a thought partner sitting beside you unlocks a whole new level of creativity that you really have to experience to understand.
You have access to real-time intelligence right where you’re building.
Instead of asking:
“Add a filter for restaurant categories.”
Imagine if you asked this:
“We’re exploring how users browse restaurants in our food app. What are a few interaction patterns that make filtering by cuisine type, price range, and delivery time feel natural on mobile? Show me quick sketches in React that match those patterns.”
Cursor can debate with you. It can help you compare approaches, weigh pros and cons, and expose design trade-offs before you even prototype.
 Sparring on product & design details
You can also spar with it on UX details.
“If we want to emphasize speed of delivery as the main selling point, how might that change what information we show first in the restaurant card?”
“If we removed the cart step entirely and let users order directly from the menu, what would that checkout experience look like?”
This is how designers and PMs can get the most value, by using Cursor to question assumptions, not just to validate them.
Let it argue back. Let it challenge your framing. You do not need to accept every idea it proposes, but in forcing the model to articulate reasoning, you often sharpen your own.
Never make big edits without reviewing the plan first.
AI-generated work moves quickly but is rarely cleanly reversible. Once the model begins changing multiple components or files, its reasoning becomes tangled, and rollbacks get very tricky.
That is why every significant change should start with a quick planning conversation. Describe what you want to achieve and ask AI to outline its approach before it starts building.
Imagine you’re prototyping a food-ordering app. You want to add custom pizza toppings to the order screen. If you simply say “Add toppings to the pizza order flow,” the model might rewrite half the system — the menu, cart, and checkout — in one go.
Instead, ask Cursor to first explain how it intends to do this.
“Show me a step-by-step plan of how you’ll add a toppings selector, connect it to the cart, and update the checkout price.”
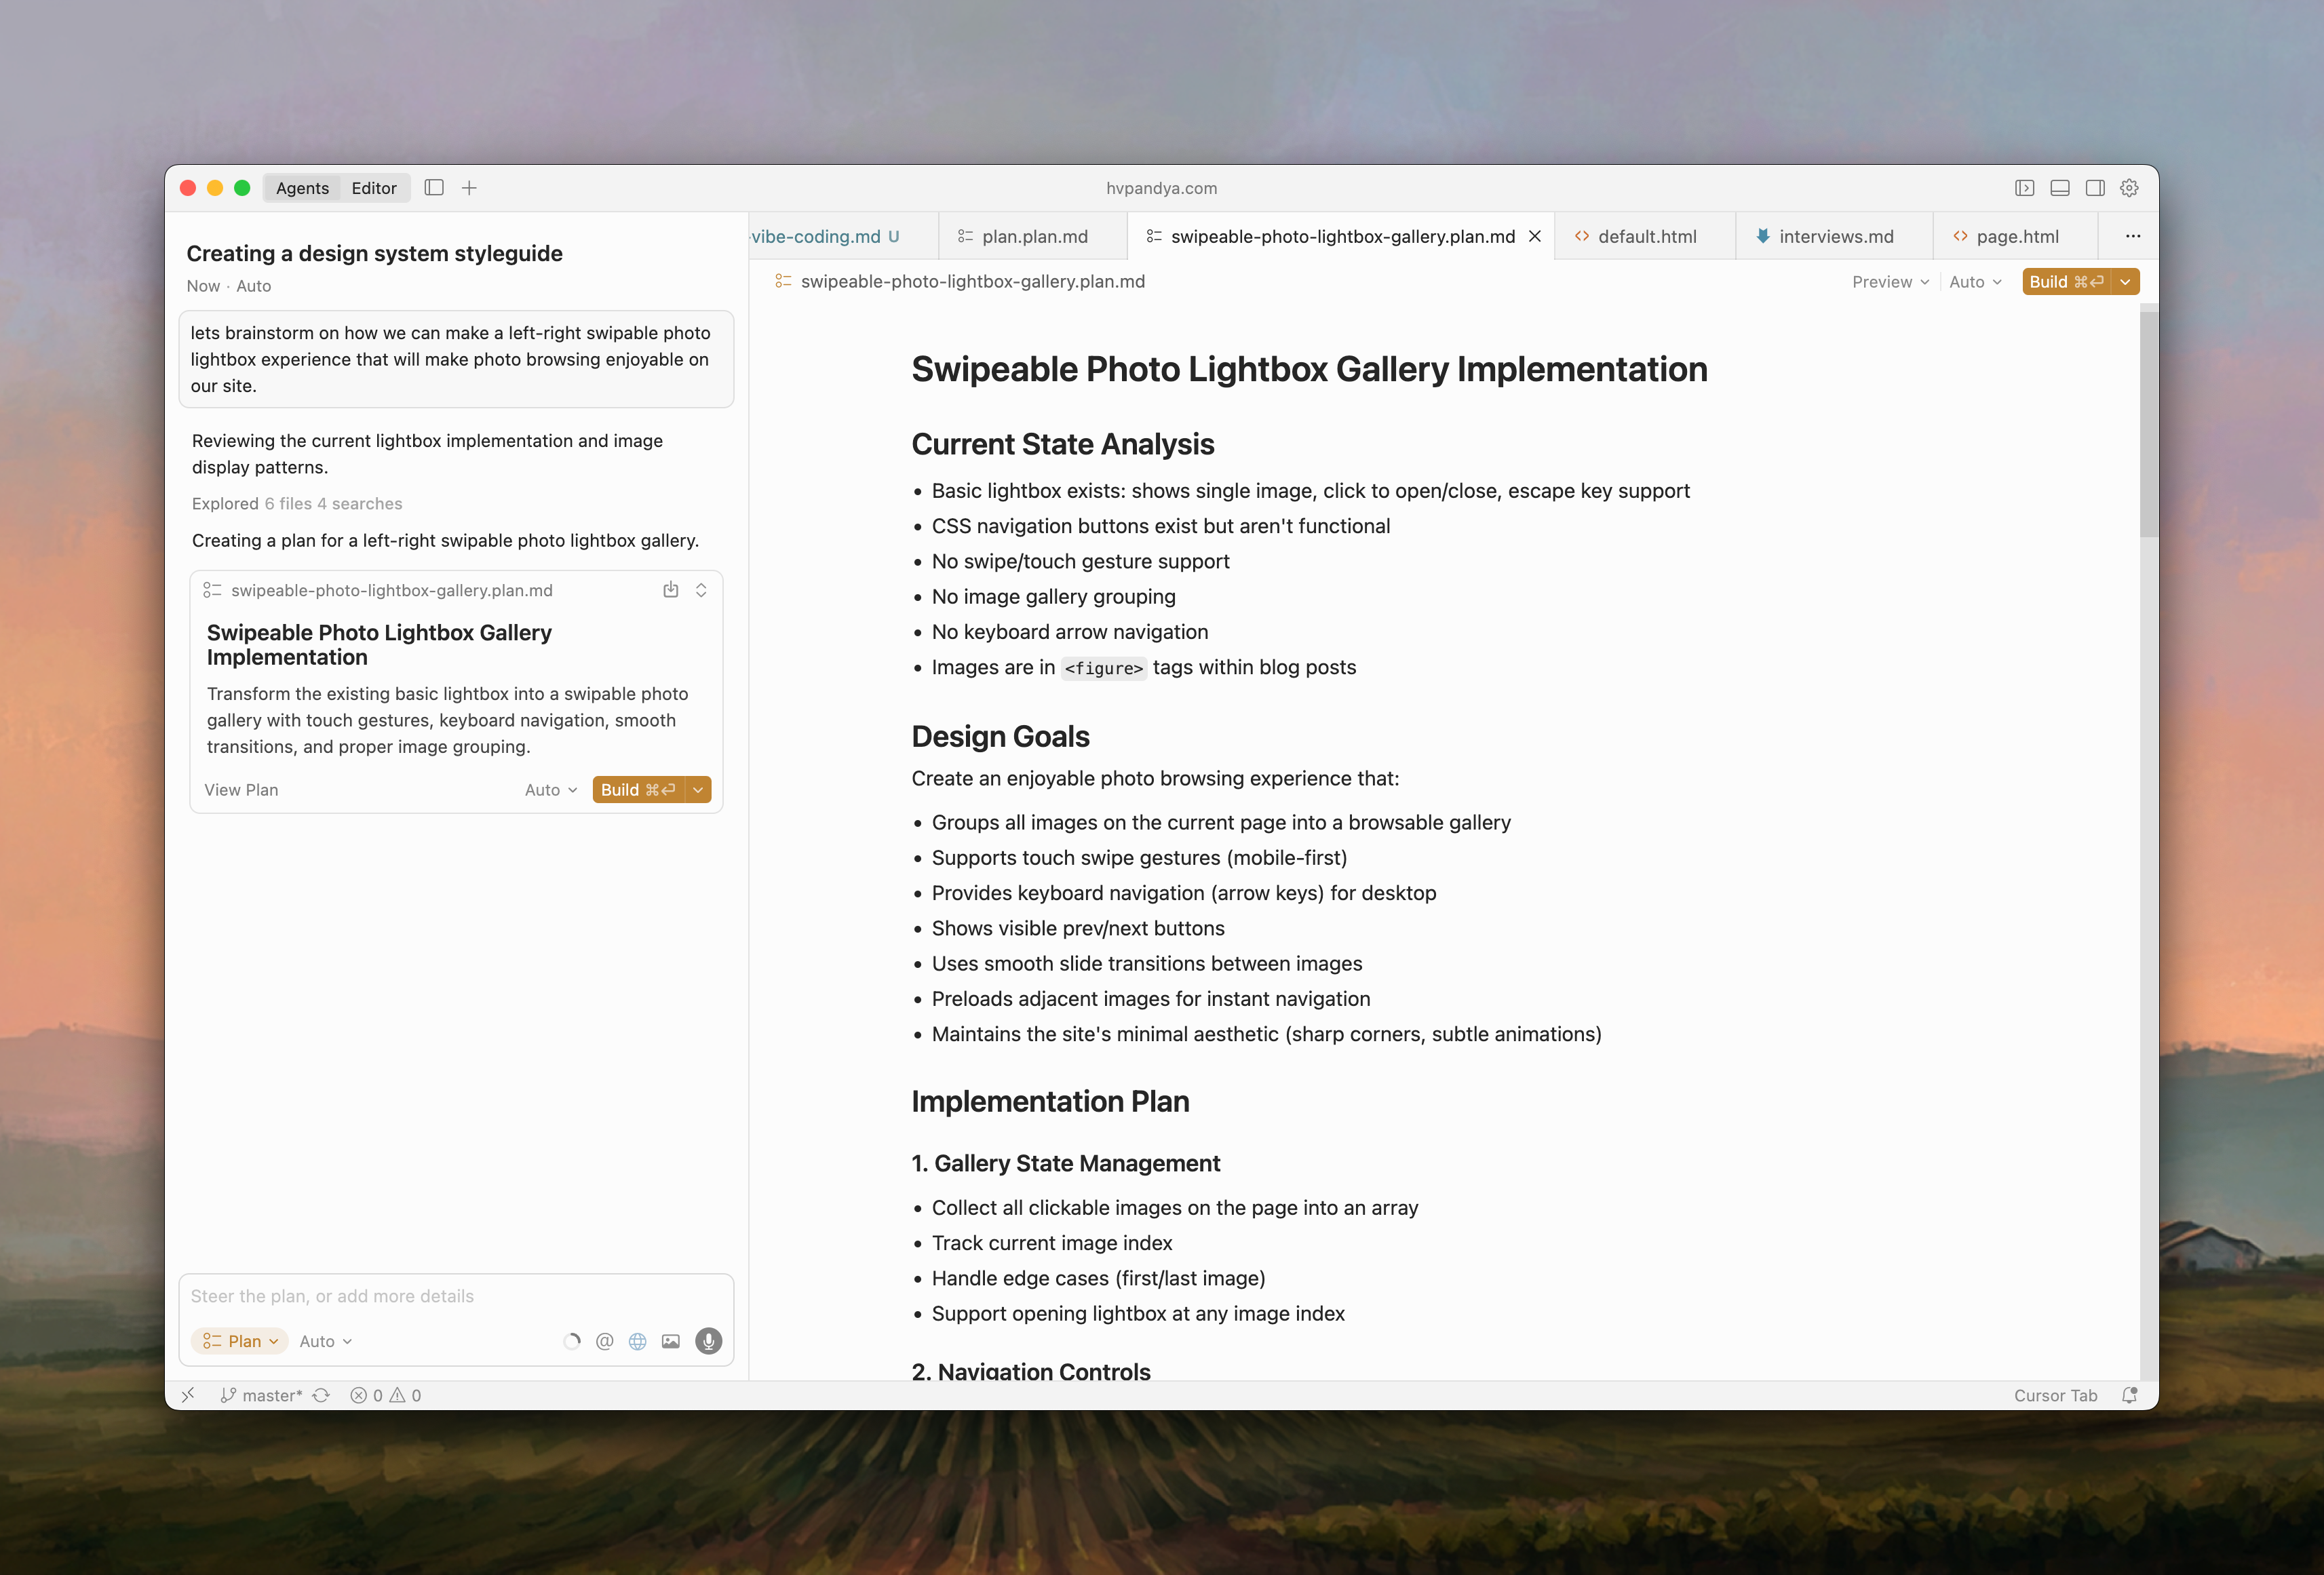 Plan mode in Cursor
I’ve made many mistakes in jumping into edits way too soon. The debugging can take hours if you mess up multi-file changes without a plan. Cursor is very powerful with the Plan mode now. It can map the edits it is planning to make. You can refine the plan, approve it, and then let it execute fully.
Planning gives you the space to catch issues before they create chaos. For PMs and designers, it is the AI equivalent of reviewing wireframes before development starts.
When code doesn’t work, debug with facts even when you’re frustrated.
Debugging is the bane of vibe coding. It’s a real test of your patience too. Sometimes your code just won’t work. Heck I’ve even had instances where the exact working code started to break a few hours later without any new changes.
AI models perform way better with fixing errors when you give them the exact error messages, console logs, context and at times even zeroing in on a few files to look into.
<!-- no-header -->
Behavior you expected:
Behavior you're observing:
Evidence you've collected:
This almost always gets the job done.
But sometimes even that’s not enough. I’d say you should not be afraid to jump into code yourself every once in a while. Linting errors are a good example. They are deterministic and often tedious for LLMs to handle.
A pro-tip for getting faster at fixing linting errors is to use a linter plugin inside Cursor. LLMs fly through these errors when they’re helped by a linter plugin.
Precise prompts give accurate outputs.
When you get an unexpected output from the model, it usually means your prompt left too much open to interpretation.
If the first attempt misses the mark, try again with clearer intent. The more specific you are about what should change and what must stay untouched, the sharper your results.
Structured prompts help. They give the model defined boundaries, making it easier to stay on target. For example:
<!-- no-header -->
Goal: Add a toppings selector to the pizza order flow
Context: CheckoutPage.tsx and CartSummary.ts
Constraint: Do not modify payment logic or delivery address components
This format works like a mini design brief. It sets goals, scope, and constraints in one place, and it helps the model reason more reliably about complex edits.
When you need pixel-perfect outcomes or tight behavioral control, structure your prompt before execution. A good rule of thumb is to use free-flowing prompts for brainstorming, and tightly structured prompts for building.
Prompting is a design process. The more precision you bring, the more predictability you get.
Too many patches and fixes? It helps to write that thing from scratch instead.
When you go through multiple rounds of bug fixes in the same part of code, you often end up with a messy patchwork that is hard to debug. These band-aids make for poor quality code.
A better approach is to stop patching and ask the AI to rebuild that section from scratch using the latest logic and data model. Fresh generations are almost always cleaner because they are free of the legacy fixes.
When things feel tangled, go for a rebuild instead of repairing.
Control your prototype presentations with orchestrated keystrokes.
When presenting or recording your prototype, timing is everything. Add invisible keystrokes that pause the flow until you are ready to continue. For instance, pressing P to advance after explaining a feature.
It keeps your demo perfectly paced for voiceovers, Loom recordings, or live presentations, giving you full control of the story instead of chasing the interactions.
 Keystroke-controlled demo flow
Quick Cursor configuration essentials
Allowlist your routine commands. The first time Cursor asks to run a command like git commit or npm run dev, approve it when prompted. Cursor will remember and automatically execute that command in future chats without asking. You can manage your allowlist later if needed.
 Auto-executing allowlisted commands
 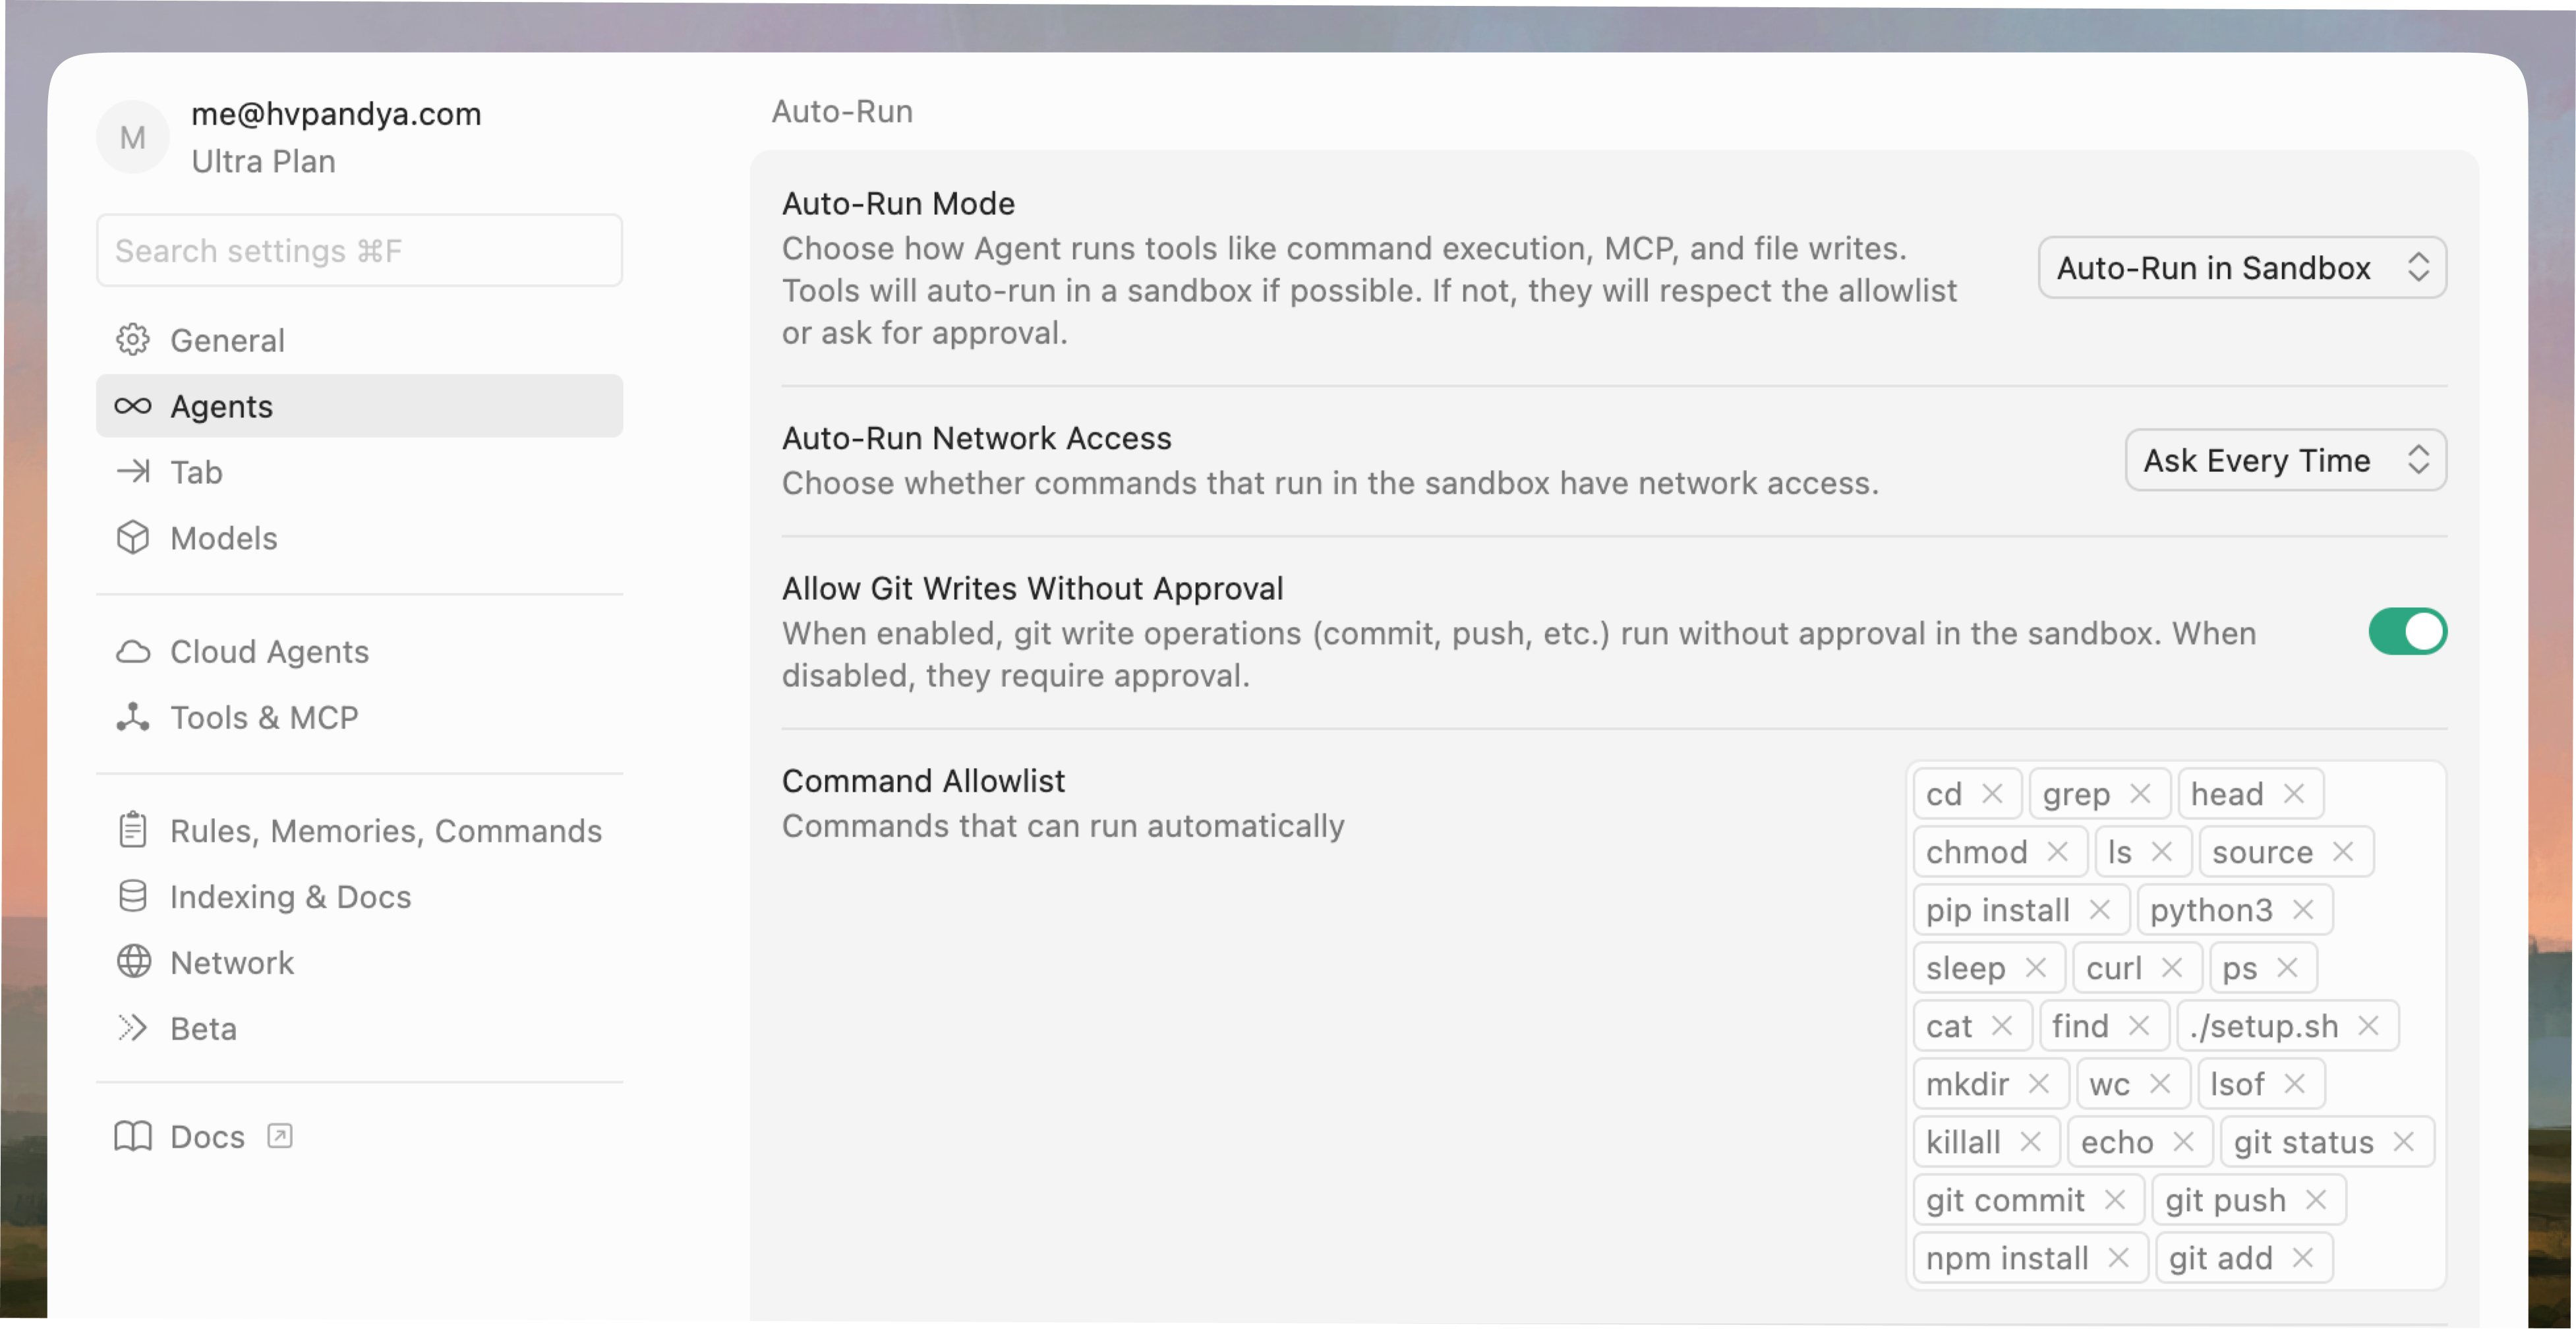 Manage allowlist in settings
Enable hot reload with watch mode. Start your development server npm run dev at the beginning of each session. Cursor’s file watcher will automatically rebuild when files change, so every edit appears instantly in your browser. This creates a continuous feedback loop just like live preview in design tools.
Choose the right model and switch mid-chat. Cursor’s biggest advantage is letting you select models by task and switch between them mid-conversation without losing context. Understand model strengths and pick purpose-built models for specific work:
Claude: Great for reasoning, aesthetics, and UX thinking. Use it to explore product concepts, refine interaction models, and make thoughtful design trade-offs before you build.
GPT: Best for precise execution. It writes clean, consistent code, translates specs into working components, and manages complex logic and refactors reliably.
Gemini: Ideal for exploration and creative range. Use it to brainstorm, visualize UI variations, and experiment with motion, layout, or brand expression at speed.
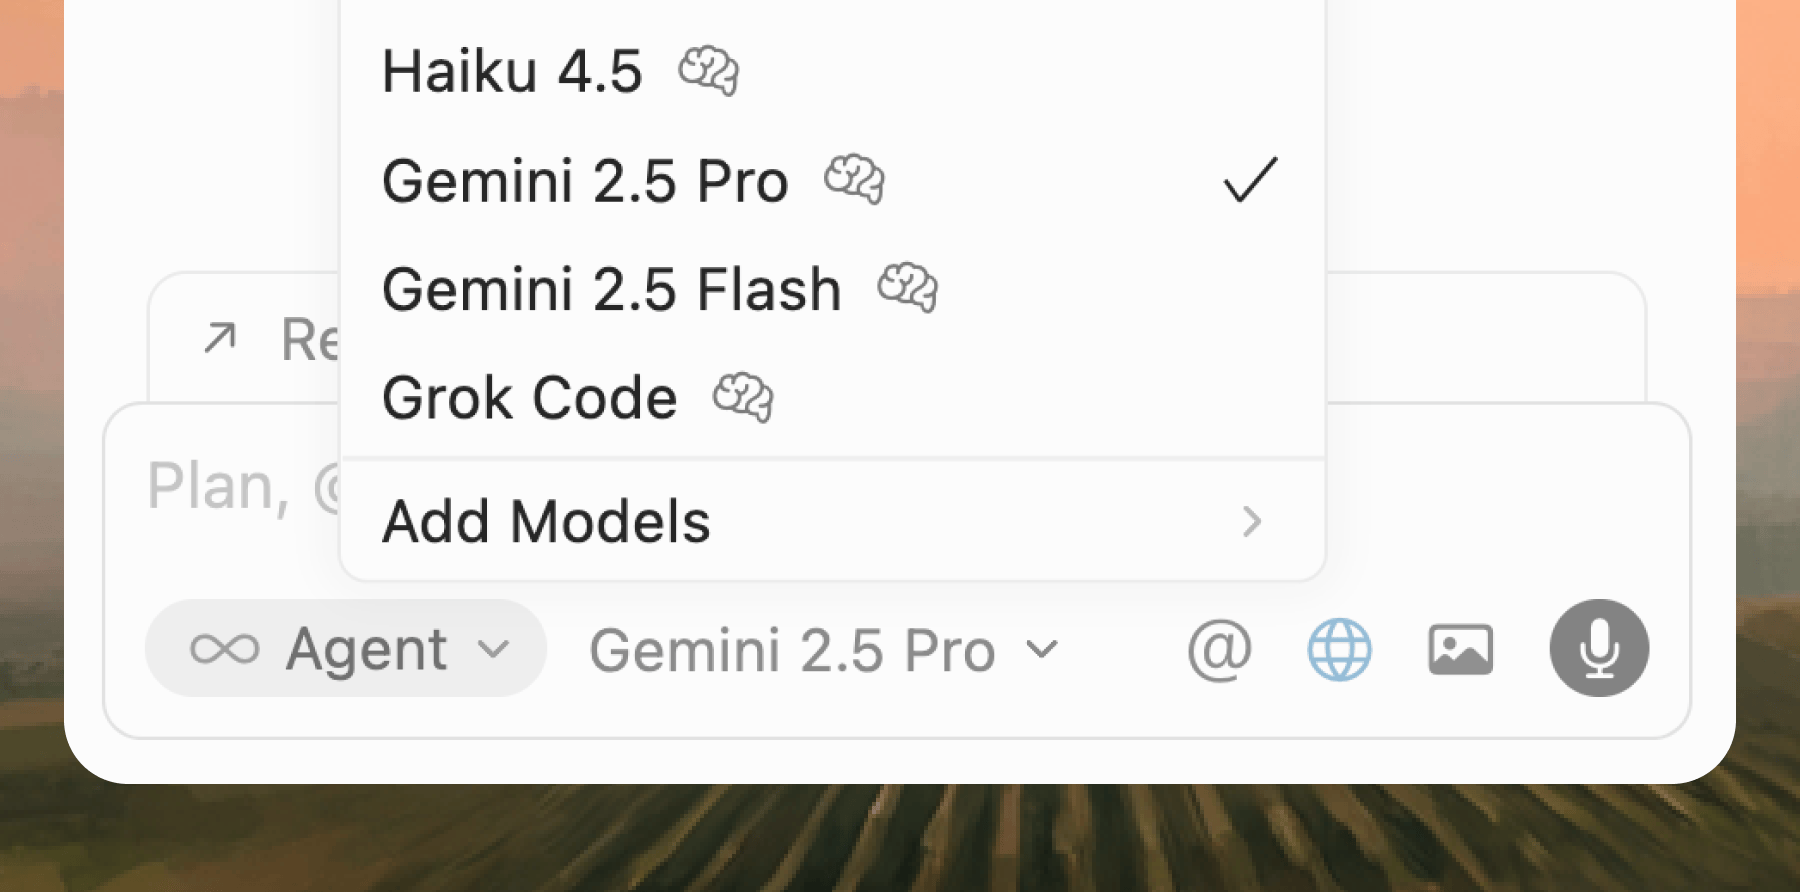 Switching models mid-chat without losing context
 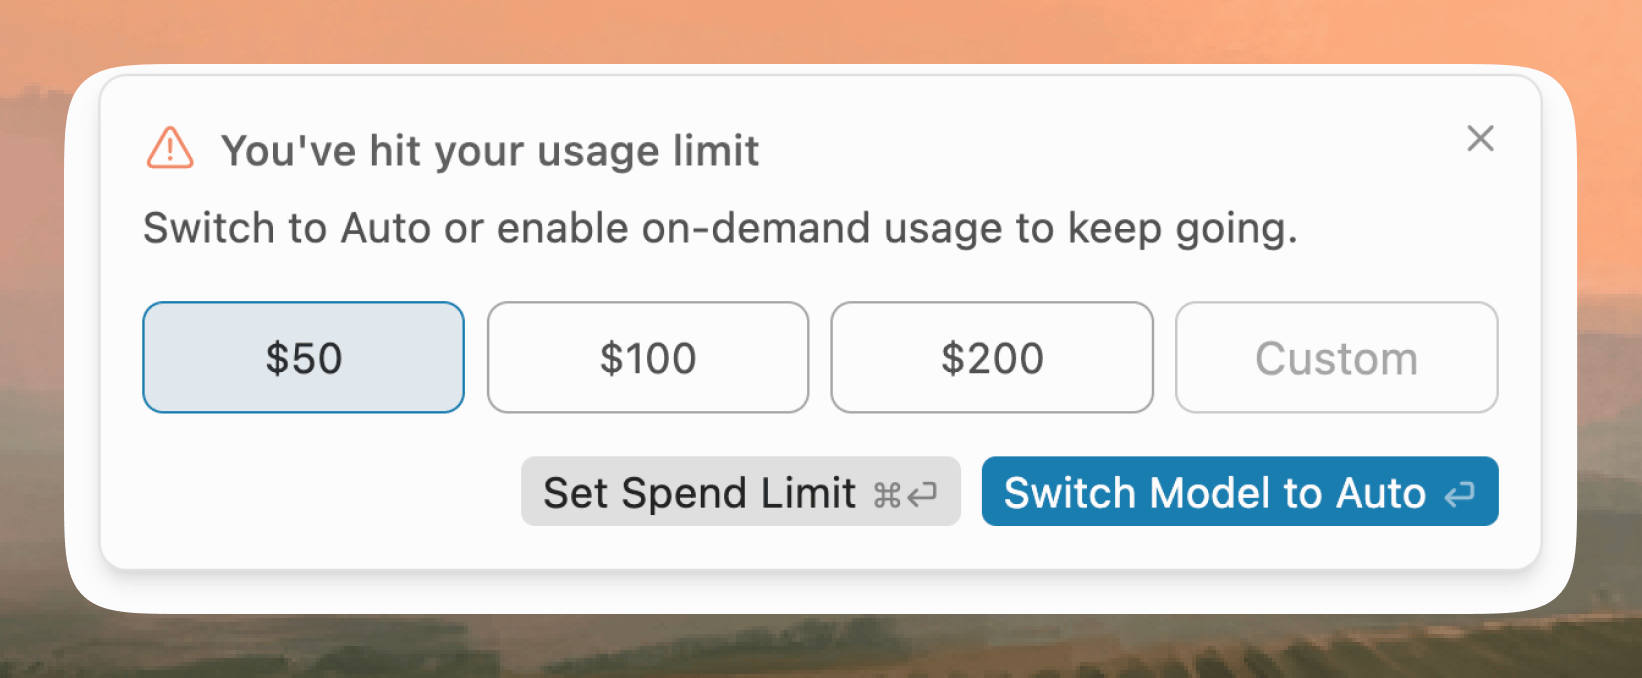 Out of credits notification
 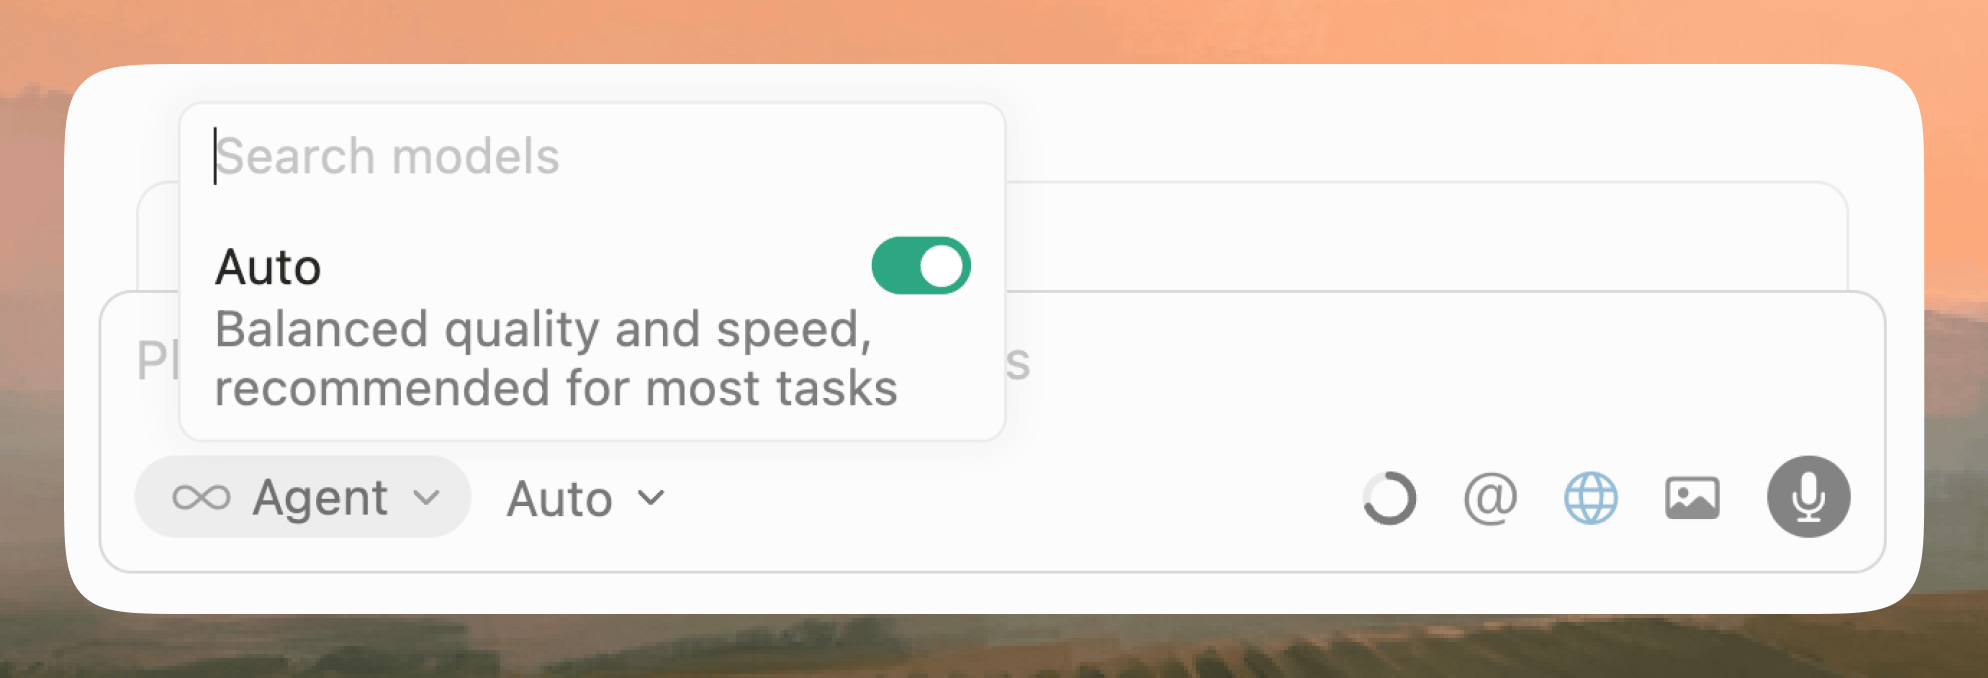 Auto mode fallback access
Enable Auto mode as fallback. When credits run out for premium models, Cursor automatically switches to the fallback Auto mode so your workflow never stops. The fallback maintains conversation context, so you can complete your session and switch back when credits refresh. I’ve found the Auto mode to be reasonably powerful and fast.
Lock package dependencies after first successful build. Once your prototype compiles, ask Cursor to lock all dependency versions in package.json with exact version numbers. Use npm ci instead of npm install when reinstalling to ensure exact versions from the lock file. This may sound trivial but believe me, when package numbers update for external dependencies, they may break your prototype completely and it’d take hours before you realize the issue.
Configure file indexing in Cursor. Cursor indexes your entire codebase for context. Ensure “Index codebase” is enabled for better file references. Exclude large directories (node_modules, .git) in .cursorignore.
The future I imagine
Designers in the 1990s and early 2000s worked in code. They wrote HTML and CSS by hand and saw their designs come alive in the browser. They worked in the real material.
Then came the era of canvas tools. Sketch, Figma, and Photoshop made exploration faster and lowered the barrier for new designers. That decade shaped modern product design culture and helped an entire generation learn to think visually.
Over time, though, design drifted away from execution. We designed representations of interfaces instead of the interfaces themselves. Engineers became translators of design intent, and every screen had to be recreated twice: once in the canvas and then in code. That gap gave rise to design systems, QA reviews, and pixel-parity checks that slowed teams down.
The pendulum is now swinging back. Tools like Cursor make it possible to design directly in code without the old friction. We are returning to working with the material itself, with even better tools this time. If this piece encourages even a few designers to build their own ideas in code, that is progress.
I firmly believe the future of design will be built, not drawn.
| Dimension | Static design | Coded prototypes |
|---|---|---|
| Nature | Mockup of an idea | Working version of an idea |
| Fidelity | Visual and interaction simulation | Fully functional with logic, data, and live responses |
| Iteration speed | Fast for visual tweaks, slow for system logic | Fast across visuals, logic, and system behaviors |
| Collaboration | designer → handoff developer | designer + developer + AI in one shared workflow |
| Content realism | Placeholder or lorem ipsum | Realistic data, dynamic content, and working inputs |
| Discoverability | Feedback limited to visuals | Feedback reveals actual UX and logic friction |
| Reusability | Ends at presentation | Can evolve directly into production code |
| Learning value | Shows taste | Teaches systems thinking and product reasoning |
| Stakeholder impact | “Looks good” | “Works like the real thing” |
| Tool mindset | Static canvas | Living environment |
🤔 Very thoughtful
🙏 So relatable
👍 Was good
❤️ Loved it
🤯 Blew my mind