
Photographer Chris McGinnis has never taken a macro photograph in the field with a tripod in his entire career as an OM SYSTEM ambassador. The reason is simple: mobility trumps stability when you understand the workarounds. Through a combination of advanced image stabilization, field-tested techniques, and strategic flash use, McGinnis captures stunni…
Photographer Chris McGinnis has never taken a macro photograph in the field with a tripod in his entire career as an OM SYSTEM ambassador. The reason is simple: mobility trumps stability when you understand the workarounds. Through a combination of advanced image stabilization, field-tested techniques, and strategic flash use, McGinnis captures stunning close-up photographs of insects, spiders, and other subjects while maintaining the freedom to react, reposition, and explore. McGinnis proves that the barriers to handheld macro work are lower than most photographers think.
Full disclosure: This article was brought to you by OM SYSTEM
At a Glance
- The Lightbulb Moment: When the Flash Changed Everything
- The Low-ISO Advantage: Why Flash Delivers Cleaner Images
- The Stability Trinity: Technology + Field Craft + Flash
- The Practice Ladder: From Lego Figures To Wolf Spiders
- The Focus Decision Tree: Singles Vs. Stacking Vs. Bracketing
- Background Control: From Black Silhouettes To Colorful Context
- Field Craft Fundamentals: Angles, Patience, And The Five-Second Window
- Best Time Of Day: Why Morning Beats Everything
- Beyond Standard Macro: Wide Angles And Telephotos
- The Backyard Philosophy: Owning Your Local Opportunities
- Gear Reality Check: The Minimal Kit That Works
- Experience Over Perfection
Chris McGinnis didn’t always specialize in documenting the tiny worlds most people overlook. He spent years shooting film in the 1990s before graduating from Moravian University in Bethlehem, Pennsylvania with a degree in graphic design. A decade ago, he became obsessed with looking at other photographer’s macro work and found his calling. Today, as an OM SYSTEM ambassador, McGinnis produces world-class close-up photography, mostly within a few miles of his Bethlehem home, proving that compelling close-up photography doesn’t require exotic destinations or complex gear.
![]() Robber Fly & Bottle Fly • Olympus E-M1 Mark II • M.Zuiko 60mm F2.8 Macro OM • 60mm (120mm equivalent) • 1/50sec • f/8 • ISO 200 • 14 Frame Focus Bracket • Stacked Using Helicon Focus
Robber Fly & Bottle Fly • Olympus E-M1 Mark II • M.Zuiko 60mm F2.8 Macro OM • 60mm (120mm equivalent) • 1/50sec • f/8 • ISO 200 • 14 Frame Focus Bracket • Stacked Using Helicon Focus
His approach to the craft is refreshingly honest. “When I first got the 60mm macro lens, I couldn’t figure out how to make the photos jump off the screen like the photographers that I was trying to emulate, so I put it away for almost a year,” McGinnis admits. That early struggle became the foundation for mastering handheld macro photography close to home.
The Lightbulb Moment: When the Flash Changed Everything
That near year-long hiatus with his 60mm macro wasn’t just frustration. It wound up being a turning point. McGinnis felt like he couldn’t get dynamic shots no matter what he tried, and the lens sat unused while he wrestled with whether macro photography was even for him. Eventually, he decided to stop at nothing until he could capture compelling close-up photos.
“I finally said no, I’ve got to dust this thing off and learn how to make compelling images with it,” McGinnis recalls. “My images were good, but the subjects weren’t looking as dynamic as they could have been. I then noticed the macro photographers that I followed all used flash. I’d never shot with a flash before, but I put one on my camera, went out into the field, found this little fly, and took my first flash macro shot. That moment changed everything. I realized a flash was the key to capturing the dramatic look that I’d been missing.”
![]() Olympus OM-D E-M10 • M.Zuiko Digital ED 60mm F2.8 Macro OM • 60mm (120mm equivalent) • 1/160sec • f/9 • ISO 200
Olympus OM-D E-M10 • M.Zuiko Digital ED 60mm F2.8 Macro OM • 60mm (120mm equivalent) • 1/160sec • f/9 • ISO 200
The discovery wasn’t just about better lighting. Flash fundamentally altered what shutter speeds became possible for handheld work. “The flash unlocks a world of possibility in handheld macro work,” McGinnis points out. “Virtually all of my macro photos are shot at 1/100th of a second or slower. Without a flash, shooting handheld at those speeds is more difficult. You’re fighting camera shake and subject movement. With a flash, it becomes easy. I can shoot with one hand in an awkward position and still get sharp images loaded with detail because the flash freezes everything.”
![]() American Bull Frog • OM-1 Mark II • M.Zuiko Digital ED 50-200mm F2.8 IS PRO • 1/125sec • f/5.6 • ISO 200 • 15 Images • In-Camera Focus Stacking
American Bull Frog • OM-1 Mark II • M.Zuiko Digital ED 50-200mm F2.8 IS PRO • 1/125sec • f/5.6 • ISO 200 • 15 Images • In-Camera Focus Stacking
The proof came quickly. McGinnis photographed a praying mantis using a 38-shot focus bracketing sequence, capturing the entire series in about five seconds. “The multi-shot focus bracketing technique allows me to capture dozens of photos with different focus points,” McGinnis explains. “I can then merge them in post-processing to make sure that every inch of my subject is tack sharp. This technique only works when the subject cooperates briefly, but flash makes those narrow windows of opportunity viable. I just need to find that brief window when the subject stays still, and the flash gives me the speed I need to work within those moments.”
The Low-ISO Advantage: Why Flash Delivers Cleaner Images
McGinnis emphasizes his flash workflow delivers an often-overlooked benefit beyond motion freezing: cleaner image quality through consistently low ISO.
The Base ISO Standard
“Most modern OM SYSTEM cameras have a low native ISO of 200,” McGinnis explains. “That’s going to give me the cleanest result because the sensor is engineered to perform optimally at that setting. While higher ISO can still be leveraged to deliver great results, the absolute cleanest images are made at ISO 200.”
The Flash Advantage
“If you have a flash, you can shoot at or near ISO 200 virtually all the time,” McGinnis notes. “Without the sufficient light a flash provides, you can’t always shoot at ISO 200. Having a flash allows you to get images that look sharper because they’re less noisy and have cleaner detail.”
![]() Tiger Bee Fly • Olympus E-M1 Mark II • M.Zuiko 60mm F2.8 Macro OM • 60mm (120mm equivalent) • 1/50sec • f/7.1 • ISO 200 • 5 Frame Focus Bracket • Stacked Using Helicon Focus
Tiger Bee Fly • Olympus E-M1 Mark II • M.Zuiko 60mm F2.8 Macro OM • 60mm (120mm equivalent) • 1/50sec • f/7.1 • ISO 200 • 5 Frame Focus Bracket • Stacked Using Helicon Focus
The comparison to tripod work is instructive. “Yes, you can use slower shutter speeds and lower ISO with a tripod, but you’re stuck in one spot,” McGinnis says. “Also, a slower shutter speed can make your subject appear blurry if they move, even slightly. With a flash, you get those benefits at ISO 200 and can move around freely.”
When to Break the Rule
Higher ISOs can be used to bring ambient color into scenes, when glare from flash starts to look too intense or unnatural, or when shooting without flash. McGinnis accepts the trade-offs when creative benefit outweighs technical cost.
The Stability Trinity: Technology + Field Craft + Flash
Flash solved the light and the shutter speed problem, but it’s only one piece of a three-part system that replaces tripod stability.
The first component is technology. “My OM-1 Mark II has five-axis in-body image stabilization that works together with the built-in stabilization in lenses like the 90mm F3.5 Macro IS Pro,” McGinnis explains. “This combined stabilization system is what makes shooting handheld at 1/100th of a second viable for me.”
![]() OM-1 Mark II • M.Zuiko Digital ED 90mm F3.5 Macro IS PRO • 90mm (180mm equivalent) • 1/100sec • f/7.1 • ISO 200 • 38 Frame Focus Bracket • Stacked Using Helicon Focus
OM-1 Mark II • M.Zuiko Digital ED 90mm F3.5 Macro IS PRO • 90mm (180mm equivalent) • 1/100sec • f/7.1 • ISO 200 • 38 Frame Focus Bracket • Stacked Using Helicon Focus
The second component is field craft. “Without a tripod, keeping the camera stable is still critical,” McGinnis points out. “I’ll lay flat on the ground, lean into trees, or rest my camera directly on the ground. Nothing’s more stable than the ground itself.”
The third component circles back to flash. “While the image stabilization handles my movement as the photographer, the flash freezes the subject’s movement through its brief duration,” McGinnis notes. “It’s a complete system.”
![]() Left: Polyphemus moth • Behind the Scenes
Right: Polyphemus Moth • OM-1 • M.Zuiko Digital ED 90mm F3.5 Macro IS PRO • 90mm (180mm equivalent) • 1/100sec • f/8 • ISO 200 • 40 Frame Focus Bracket • Stacked Using Helicon Focus
Left: Polyphemus moth • Behind the Scenes
Right: Polyphemus Moth • OM-1 • M.Zuiko Digital ED 90mm F3.5 Macro IS PRO • 90mm (180mm equivalent) • 1/100sec • f/8 • ISO 200 • 40 Frame Focus Bracket • Stacked Using Helicon Focus
McGinnis tells a story about a Polyphemus moth that illustrates why understanding this system matters. One evening, he spotted one of North America’s largest moths on a tree. “You have to understand the opportunity and take the right approach,” he stresses. “I knew I needed a lot of shots to capture the moth’s body details, so I set my OM SYSTEM camera for focus bracketing, so I could combine them later into a single image with extended depth of field. Focus bracketing is incredibly valuable for overcoming the shallow depth of field that’s inherent to using macro lenses from short working distances. when using a macro lens, since it creates significant background blur that can cause lost details.”
Normally, McGinnis would take single images first to ensure he captured something. “I could feel that I didn’t have long with this moth, so I propped myself up against a tree and shot 40 frames at f/8 and 1/100th of a second. The instant the final shot fired, the moth flew away high above the trees, never to be seen again.”
Without the stability trinity, that 40-shot sequence would have been impossible. The image stabilization kept his shots sharp, field craft provided the foundation, and flash froze both his movements and the moth’s potential shifts.
Understanding the system, however, doesn’t mean it is easy to master it.
The Practice Ladder: From Lego Figures To Wolf Spiders
The stability trinity enables handheld macro work, but McGinnis warns against rushing straight into the field. “You’re setting yourself up for failure without a practice progression.”
McGinnis developed a three-rung ladder that prevents the discouragement that nearly ended his own macro journey.
Rung 1: Indoor Inanimate Objects
“If your goal is to photograph insects, spiders, frogs, and other creatures out in the wild, you most likely won’t succeed if you can’t photograph a Lego figure on your desk in your home office properly,” McGinnis stresses. “Start with small inanimate subjects under controlled circumstances where you can perfect your technique, understand your gear, learn how to use your body to create stability, and get comfortable with the entire process before you ever step outside. Coins, watches, things that are reflective, and things that have texture are all great to practice with. If you can’t do it in controlled circumstances, it will be incredibly difficult to do it out in the field.”
 OM-1 Mark II • M.Zuiko Digital ED 90mm F3.5 Macro IS PRO • 90mm (180mm equivalent) • 1/100sec • ISO 200 •
First image was shot at f/3.5, second image was shot at f/8, third image was shot at f/16, and the fourth image was a 15 image in-camera focus stack shot at f/8
OM-1 Mark II • M.Zuiko Digital ED 90mm F3.5 Macro IS PRO • 90mm (180mm equivalent) • 1/100sec • ISO 200 •
First image was shot at f/3.5, second image was shot at f/8, third image was shot at f/16, and the fourth image was a 15 image in-camera focus stack shot at f/8
Rung 2: Outdoor Inanimate Objects
McGinnis recommends graduating to seeds, grass blades, and leaves. Environmental variables like wind enter the equation, but the subject won’t flee. “These objects are great to practice focus bracketing on, as you can take your time learning how to set up and capture the images,” McGinnis says. “Automatic focus bracketing is built into my OM-1 Mark II, but you can do focus bracketing with any camera, although with a little more manual work of shifting the focus after every shot.”
 The 15 raw photos captured using the in-camera focus stacking.
OM-1 • M.Zuiko Digital ED 60mm F2.8 Macro OM • 1/125sec • f/4 • ISO 200
The 15 raw photos captured using the in-camera focus stacking.
OM-1 • M.Zuiko Digital ED 60mm F2.8 Macro OM • 1/125sec • f/4 • ISO 200 ![]() OM-1 • M.Zuiko Digital ED 60mm F2.8 Macro OM • 1/125sec • f/4 • ISO 200 • 15 Images • In-Camera Focus Stacking
OM-1 • M.Zuiko Digital ED 60mm F2.8 Macro OM • 1/125sec • f/4 • ISO 200 • 15 Images • In-Camera Focus Stacking
Rung 3: Slow, Cooperative Subjects
“Sometimes people won’t photograph pigeons or seagulls because they’re commonplace and boring,” McGinnis states. “But they’re just like the other birds, and they’re great practice subjects. The same applies to close-up and macro photography. Stink bugs and caterpillars might not be glamorous, but they’re cooperative and slow-moving. If these insects don’t inspire you, you might not post these photos to your Instagram, but you can build real skills by taking them. Then when the time comes and the opportunities are fleeting with your dream subject, you have a better chance to capture compelling photos.”
![]() OM-1 • M.Zuiko Digital ED 90mm F3.5 Macro IS PRO • 90mm (180mm equivalent) • 1/80sec • f/6.3 • ISO 200 • 12 Frame Focus Bracket • Stacked Using Helicon Focus
OM-1 • M.Zuiko Digital ED 90mm F3.5 Macro IS PRO • 90mm (180mm equivalent) • 1/80sec • f/6.3 • ISO 200 • 12 Frame Focus Bracket • Stacked Using Helicon Focus
The Focus Decision Tree: Singles Vs. Stacking Vs. Bracketing
Understanding when to use each focus technique is as important as mastering the techniques themselves. McGinnis approaches every subject with a clear decision framework.
Path A: Nervous Subject or Subject You Have Never Photographed Before → Singles
“When I find a subject I’ve never photographed before or I’m nervous it will disappear, I start with single shots,” McGinnis explains. “I shoot from fairly far away to get something on the memory card, then inch closer until I’m composed and close enough. If I reach that point, then I consider in-camera focus stacking, since the focus on a single shot, especially on a macro lens, will fall off and create a shallow depth of field on my subject.”
“My priority is securing something, even with shallow depth of field, before the opportunity vanishes,” McGinnis says.
Path B: Cooperative Subject That Won’t Move → In-Camera Focus Stacking
“My OM-1 Mark II has in-camera focus stacking, which allows you to capture and composite up to 15 frames with different focus points automatically in the camera, delivering a finished image with sharp details throughout my subject within seconds,” McGinnis states. “The result appears on the back screen immediately.”
 Left: OM-1 Mark II • M.Zuiko Digital ED 90mm F3.5 Macro IS PRO • 90mm (180mm equivalent) • 1/100sec • f/9 • ISO 200 • 15 Frame In-Camera Focus Stack
Middle: OM-1 • M.Zuiko Digital ED 90mm F3.5 Macro IS PRO • 90mm (180mm equivalent) • 1/80sec • f/8 • ISO 200 • 15 Frame In-Camera Focus Stack
Right: OM-1 Mark II • M.Zuiko Digital ED 90mm F3.5 Macro IS PRO • 90mm (180mm equivalent) • 1/100sec • f/10 • ISO 200 • 15 Frame In-Camera Focus Stack
Left: OM-1 Mark II • M.Zuiko Digital ED 90mm F3.5 Macro IS PRO • 90mm (180mm equivalent) • 1/100sec • f/9 • ISO 200 • 15 Frame In-Camera Focus Stack
Middle: OM-1 • M.Zuiko Digital ED 90mm F3.5 Macro IS PRO • 90mm (180mm equivalent) • 1/80sec • f/8 • ISO 200 • 15 Frame In-Camera Focus Stack
Right: OM-1 Mark II • M.Zuiko Digital ED 90mm F3.5 Macro IS PRO • 90mm (180mm equivalent) • 1/100sec • f/10 • ISO 200 • 15 Frame In-Camera Focus Stack
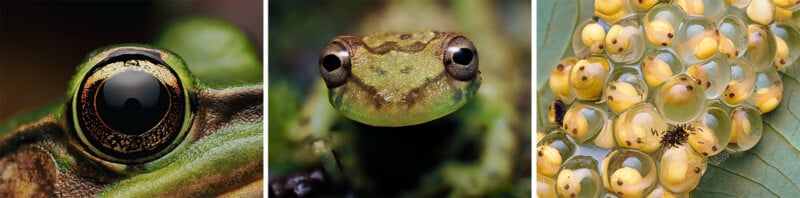
“Frogs are perfect candidates for this OM SYSTEM feature,” McGinnis insists. “When you get a cooperative frog staying still, in-camera focus stacking produces excellent results on their skin texture. I activate it, shoot the sequence, and see the finished image immediately. That instant gratification is wonderful.”
“The limitation of the approach is the maximum of 15-frames and the requirement that the subject stays completely still during the automated sequence, but for many of the subjects that I photograph, this is a fantastic approach,” McGinnis concludes.
Path C: Subject Might Move Or Need More Than 15 Shots → Focus Bracketing
“If I don’t know if the subject will move or if I need more than 15 images, I use in-camera focus bracketing,” McGinnis describes. “I set my focus in front of the subject and take automated shots. The focus shifts back from shot to shot. If my subject moves, I stop, move with it, and try again. If it stays still, I can rapidly take multiple bracketed series.”
 Left: OM-1 • M.Zuiko Digital ED 90mm F3.5 Macro IS PRO • 90mm (180mm equivalent) • 1/100sec • f/6.3 • ISO 200 • 20 Frame Focus Bracket • Stacked Using Helicon Focus
Right: OM-1 Mark II• M.Zuiko Digital ED 90mm F3.5 Macro IS PRO • 90mm (180mm equivalent) • 1/100sec • f/9 • ISO 200 • 55 Frame Focus Bracket • Stacked Using Helicon Focus
Left: OM-1 • M.Zuiko Digital ED 90mm F3.5 Macro IS PRO • 90mm (180mm equivalent) • 1/100sec • f/6.3 • ISO 200 • 20 Frame Focus Bracket • Stacked Using Helicon Focus
Right: OM-1 Mark II• M.Zuiko Digital ED 90mm F3.5 Macro IS PRO • 90mm (180mm equivalent) • 1/100sec • f/9 • ISO 200 • 55 Frame Focus Bracket • Stacked Using Helicon Focus
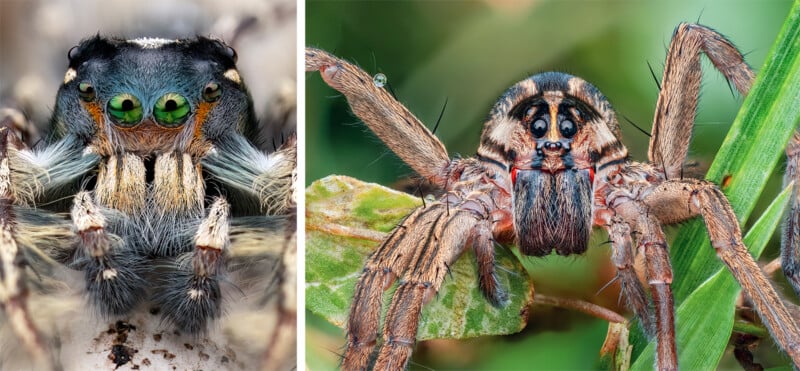
“This approach requires post-processing in software like Helicon Focus, OM Workspace, or Adobe Photoshop, but the nimbleness makes it worthwhile for unpredictable subjects,” McGinnis continues “In my backyard looking for wolf spiders or jumping spiders, I use a lot of focus bracketing,” he adds. “I can react to movements and change angles fast.”
The Secondary Decision: How Much Depth of Field?
McGinnis says that subject complexity determines depth of field needs. “Smooth-skinned frogs blend well in 15-frame stacks,” he describes. “Hairy spiders with complex leg structures need more frames to maintain detail throughout their body. Higher magnification causes greater shallow depth of field, requiring more shots to capture all of the details.”
![]() OM-1 Mark II • M.Zuiko Digital ED 90mm F3.5 Macro IS PRO • 90mm (180mm equivalent) • 1/100sec • f/11 • ISO 200 • 30 Frame Focus Bracket • Stacked Using Helicon Focus
OM-1 Mark II • M.Zuiko Digital ED 90mm F3.5 Macro IS PRO • 90mm (180mm equivalent) • 1/100sec • f/11 • ISO 200 • 30 Frame Focus Bracket • Stacked Using Helicon Focus
When Singles Are Right: The Parallel Planes Technique
Sometimes a single shot at the right angle delivers complete sharpness without stacking. “If you get your sensor plane parallel to the subject, you can create the sense that far more is in focus than you’d expect,” McGinnis states. “When I photograph a grasshopper from the side, I can get the entire length in focus at f/10. I’m aligning parallel to everything I want sharp, so even though my depth of field might only equal a millimeter or two, that’s all I need.”
![]() OM-1 Mark II • M.Zuiko Digital ED 90mm F3.5 Macro IS PRO • 90mm (180mm equivalent) • 1/100sec • f/10 • ISO 200
OM-1 Mark II • M.Zuiko Digital ED 90mm F3.5 Macro IS PRO • 90mm (180mm equivalent) • 1/100sec • f/10 • ISO 200
This works for long subjects photographed from the side or any scenario where everything critical occupies the same focal plane.
“It’s just a matter of understanding the benefits of all of the processes and the reason why you would use one instead of the others,” McGinnis stresses.
Background Control: From Black Silhouettes To Colorful Context
Background control is a powerful creative tool in flash macro work, but McGinnis emphasizes it’s a secondary consideration.
“Usually, I’m thinking about the best approach to get a shot first,” he explains. “Once I’ve gotten that shot and something is on the memory card, then I start to assess the background. Do I need to move to improve it?”
The Black Background Mystery
Many photographers see McGinnis’s images with jet-black backgrounds and assume he shoots at night. The reality is simpler. “The reason why a black background occurs with flash is because my scene around my subject is underexposed, but the flash lights my subject properly,” McGinnis says. “The flash isn’t lighting anything else because the light hasn’t reached whatever is behind my subject. That background remains underexposed and renders as black.”
![]() OM-1 Mark II • M.Zuiko Digital ED 90mm F3.5 Macro IS PRO • 90mm (180mm equivalent) • 1/100sec • f/10 • ISO 200
OM-1 Mark II • M.Zuiko Digital ED 90mm F3.5 Macro IS PRO • 90mm (180mm equivalent) • 1/100sec • f/10 • ISO 200
If the dramatic silhouette effect works, McGinnis recommends using it intentionally. If not, he describes two methods to bring color back.
Method 1: Slower Shutter Speed
“I will drop my shutter speed from 1/100th of a second to 1/50th of a second while reducing flash power to compensate,” McGinnis describes. “This allows more ambient light into the exposure, revealing background colors and context. The trade-off is requiring more stability from the photographer and potentially introducing motion blur if the subject moves.”
![]() OM-1 Mark II • M.Zuiko 150-400mm F4.5 TC1.25X IS PRO • 1/60sec • f/9 • ISO 200 •
OM-1 Mark II • M.Zuiko 150-400mm F4.5 TC1.25X IS PRO • 1/60sec • f/9 • ISO 200 •
Method 2: Closer Background Elements
“Sometimes you can bring elements into the scene to add interest,” McGinnis says. “I’ll look for out-of-focus leaves or branches, and if they’re just out of frame, I might adjust my angle. That simple action can bring color or texture into the background without disrupting the subject.”
 Left: OM-1 • M.Zuiko Digital ED 90mm F3.5 Macro IS PRO • 90mm (180mm equivalent) • 1/100sec • f/8 • ISO 200
Right: OM-1 • M.Zuiko Digital ED 60mm F2.8 Macro OM • 60mm (120mm equivalent) • 1/50sec • f/5.6 • ISO 200
Left: OM-1 • M.Zuiko Digital ED 90mm F3.5 Macro IS PRO • 90mm (180mm equivalent) • 1/100sec • f/8 • ISO 200
Right: OM-1 • M.Zuiko Digital ED 60mm F2.8 Macro OM • 60mm (120mm equivalent) • 1/50sec • f/5.6 • ISO 200
“The OM SYSTEM FL-700WR flash has variable power settings that make these distance adjustments practical when I’m out in the field,” McGinnis notes. “I pair it with a Cygnustech diffuser to soften the light and lower contrast.”
Field Craft Fundamentals: Angles, Patience, And The Five-Second Window
Image stabilization and flash freeze motion, but McGinnis stresses they don’t guarantee that the right area of the subject will be sharp. “You could have a shot that’s sharp, but the focus is not where you want it,” he describes. “Sharp means frozen without motion blur. In focus means your intended area is actually the sharpest. In that split second between acquiring focus and pressing the shutter, if you move even slightly, you lose your intended focus point. You need to be stable and nail your focus.”
 Frame 1: Sharp throughout
Frame 2: In focus on the eyes.
OM-1 • M.Zuiko Digital ED 60mm F2.8 Macro OM • 60mm (120mm equivalent) • 1/100sec • f/9 • ISO 200
Frame 1: Sharp throughout
Frame 2: In focus on the eyes.
OM-1 • M.Zuiko Digital ED 60mm F2.8 Macro OM • 60mm (120mm equivalent) • 1/100sec • f/9 • ISO 200
McGinnis points out that time practicing manual focus on static objects at home prepares him for success in the field. “Manual focus in today’s cameras is incredibly powerful. On my OM-1 Mark II, I can zoom in right on a spider’s eye, and thanks to features like Focus Assist Magnification and Focus Peaking, I feel comfortable nailing that focus almost every time.”
The Patience Paradox
McGinnis identifies two common mistakes that sabotage close-up photography opportunities.
“A common mistake is rushing in,” he notes. “We get excited when we find a subject, rush the approach, and the subject flies away. I’m guilty of this even after years of experience.”
The second mistake is moving too fast while searching. “If I stay in one place and examine one milkweed plant or ten-square-foot area for an hour, I’ll find things I would have walked right past,” McGinnis points out. “It’s unbelievable how much you can find if you slow down and take your time.”
The Five-Second Window
“One of the most popular questions I get is ‘How do you get your subjects to stay still?’” McGinnis says. “There’s no secret. Most subjects don’t stay still for long. I’m looking for those few seconds of opportunity and relying on practice, experience, and predefined camera settings to come together in those small windows.”
![]() Saddleback Caterpillar • OM-1 Mark II • M.Zuiko Digital ED 90mm F3.5 Macro IS PRO • 90mm (180mm equivalent) • 1/100sec • f/10 • ISO 200 • 55 Frame Focus Bracket • Stacked Using Helicon Focus
Saddleback Caterpillar • OM-1 Mark II • M.Zuiko Digital ED 90mm F3.5 Macro IS PRO • 90mm (180mm equivalent) • 1/100sec • f/10 • ISO 200 • 55 Frame Focus Bracket • Stacked Using Helicon Focus
McGinnis describes that Wolf spiders dart around, then stop for several seconds before moving again. Flying subjects often return to the same perch repeatedly after being spooked. “I set focus, relax, don’t move too much, and the opportunity usually returns,” he advises.
Once McGinnis secures that initial capture during those brief windows, he shifts his focus to maximizing the opportunity.
Working the Angles
When time permits, McGinnis says exploring multiple perspectives improves results. “The first angle might be great, but chances are, with a little patience and creativity, you could get an even better result,” he insists. “Move up, down, left, right, back, forward. The definition of a close-up photo isn’t getting as close as you can. Sometimes when I’m having a creative block, backing up helps reset and capture more keepers.”
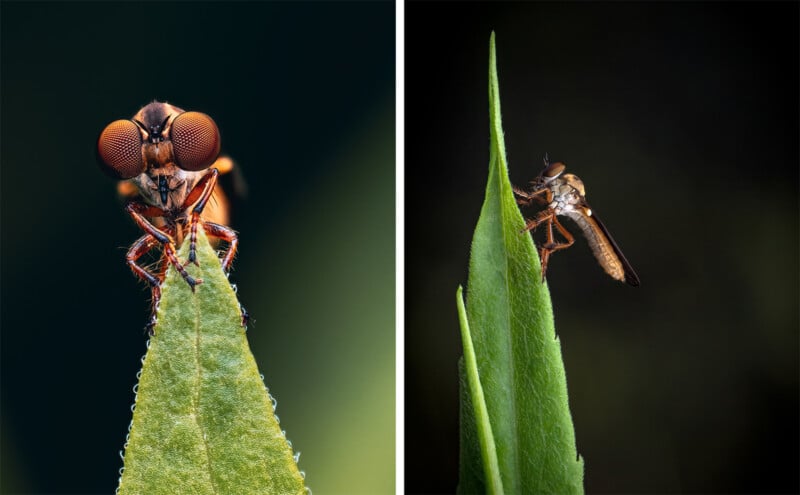 Left: Robber Fly • OM-1 Mark II • M.Zuiko Digital ED 90mm F3.5 Macro IS PRO • 90mm (180mm equivalent) • 1/100sec • f/18 • ISO 200 • 5 Frame Focus Bracket • Stacked Using Helicon Focus
Right: Robber Fly • OM-1 Mark II • M.Zuiko Digital ED 90mm F3.5 Macro IS PRO • 90mm (180mm equivalent) • 1/100sec • f/10 • ISO 200
Left: Robber Fly • OM-1 Mark II • M.Zuiko Digital ED 90mm F3.5 Macro IS PRO • 90mm (180mm equivalent) • 1/100sec • f/18 • ISO 200 • 5 Frame Focus Bracket • Stacked Using Helicon Focus
Right: Robber Fly • OM-1 Mark II • M.Zuiko Digital ED 90mm F3.5 Macro IS PRO • 90mm (180mm equivalent) • 1/100sec • f/10 • ISO 200
The Hundreds-of-Shots Philosophy
“If I find a subject that’s cooperating, I might take hundreds of shots,” McGinnis emphasizes. “I try focus bracketing, in-camera focus stacking, different exposures, backgrounds, angles. We don’t have to show anybody the bad shots. Don’t be afraid to fail. Experiment, work the angles, shoot extensively, then pick the winners.”
Best Time Of Day: Why Morning Beats Everything
Technique and gear enable handheld macro work, but timing dramatically improves success rates. McGinnis’ most successful close-up photographs are almost always captured in early morning hours.
The Temperature Advantage
“The first reason why mornings are exceptional is temperature,” McGinnis says. “Insects are cold-blooded and slow when it’s cold. If you can find subjects before or as the sun rises, they haven’t had a chance to warm up and become active yet.”
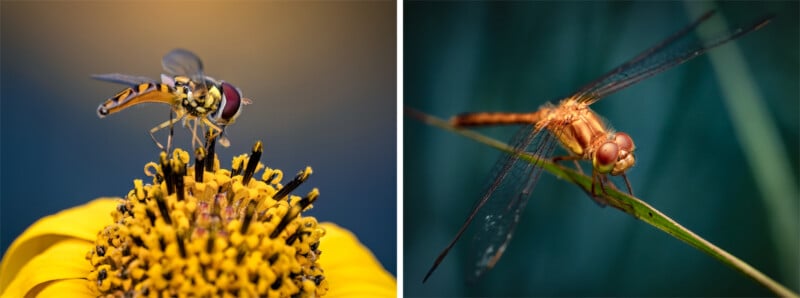
![]() Dragon Fly • OM-1 • M.Zuiko Digital ED 60mm F2.8 Macro OM • 60mm (120mm equivalent) • 1/60sec • f/6.3 • ISO 200 • 21 Frame Focus Bracket • Stacked Using Helicon Focus
Dragon Fly • OM-1 • M.Zuiko Digital ED 60mm F2.8 Macro OM • 60mm (120mm equivalent) • 1/60sec • f/6.3 • ISO 200 • 21 Frame Focus Bracket • Stacked Using Helicon Focus
The difference is dramatic. “A dragonfly at 5 a.m. allows me to get close,” McGinnis explains. “That same dragonfly in the early afternoon won’t let me anywhere near it. Once the sun comes out, insects are active and it’s harder to get close,” McGinnis describes.
The Dew Bonus
“There’s another benefit in the early hours, and that’s morning dew,” McGinnis adds. “Water droplets covering a grasshopper or dragonfly add an interesting visual element, and that dew slows subjects down. When a bee or dragonfly has dew on it, their wings are heavy and they can’t easily move.”
![]() Red Milkweed Beetle • OM-1 • M.Zuiko Digital ED 60mm F2.8 Macro OM • 60mm (120mm equivalent) • 1/50sec • f/5 • ISO 200 • 26 Frame Focus Bracket • Stacked Using Helicon Focus
Red Milkweed Beetle • OM-1 • M.Zuiko Digital ED 60mm F2.8 Macro OM • 60mm (120mm equivalent) • 1/50sec • f/5 • ISO 200 • 26 Frame Focus Bracket • Stacked Using Helicon Focus
Morning vs. Evening
Both morning and evening offer temperature advantages, but morning has an edge. “In the morning, you’re gaining light, not running out,” McGinnis states. “You’re revealing subjects, not losing them. There’s a psychological advantage to gaining opportunity rather than losing opportunity racing against the sunset.”
The Midday Reality
Active insects during midday require different approaches. Telephoto lenses with close-focusing capability, like the M.Zuiko Digital ED 50-200mm F2.8 IS PRO, become valuable tools when proximity is impossible. Faster shutter speeds become necessary.
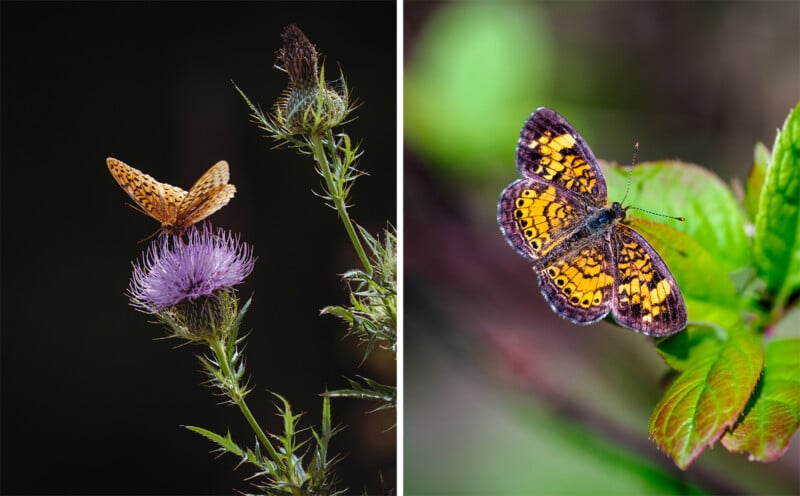 Left: Butterfly • OM-1 Mark II • M.Zuiko Digital ED 50-200mm F2.8 IS PRO • 1/1000sec • f/3.5 • ISO 200
Right: Butterfly • OM-1 Mark II • M.Zuiko Digital ED 50-200mm F2.8 IS PRO • 1/1000sec • f/3.2 • ISO 200
Left: Butterfly • OM-1 Mark II • M.Zuiko Digital ED 50-200mm F2.8 IS PRO • 1/1000sec • f/3.5 • ISO 200
Right: Butterfly • OM-1 Mark II • M.Zuiko Digital ED 50-200mm F2.8 IS PRO • 1/1000sec • f/3.2 • ISO 200
“The FL-700WR flash performs reliably in low pre-dawn light, and my OM-1 Mark II’s autofocus handles the reduced ambient light effectively, so early morning is my favorite time to photograph the macro world, but you can still get good photos in mid-day, however, the process will be much different. A longer lens is critical, and you will need to rely on natural light as opposed to your flash.” McGinnis concludes.
Beyond Standard Macro: Wide Angles And Telephotos
Macro lenses deliver stunning detail, but McGinnis expands his close-up toolkit with lenses that might seem unconventional for the genre.
The Wide-Angle Revelation
“The M.Zuiko Digital ED 8-25mm F4.0 PRO focuses from 3 inches, which matches the working distance of my dedicated macro lenses,” McGinnis explains. “What’s exciting about the 8-25mm is I can use it the same way as my 60mm or 90mm because it can focus incredibly close to my subject,” McGinnis states. “I can be right up close and get all that detail in my subject, but also capture the environmental context. When I want to show where the frog lives or how the snake moves through its habitat, I use the wide-angle lens with the same flash and diffuser.”
![]() OM-1 Mark II • M.Zuiko Digital ED 8-25mm F4.0 PRO OM • 1/100sec • f/13 • ISO 200
OM-1 Mark II • M.Zuiko Digital ED 8-25mm F4.0 PRO OM • 1/100sec • f/13 • ISO 200
When his guide spotted red-eyed tree frogs mating in Panama, McGinnis seized the opportunity. “I used my 8-25mm at f/10, getting close enough that I could actually see the diffuser reflection in the female’s eye,” McGinnis recalls.
![]() OM-1 Mark II • M.Zuiko Digital ED 8-25mm F4.0 PRO OM • 1/100sec • f/10 • ISO 200
OM-1 Mark II • M.Zuiko Digital ED 8-25mm F4.0 PRO OM • 1/100sec • f/10 • ISO 200
The Telephoto Advantage
“What’s remarkable about the OM SYSTEM telephoto lenses is they offer close-focusing capabilities that are rare in the category,” McGinnis states. “With my 40-150mm, 50-200mm, 150-600mm, and 150-400mm lenses, I can get just a few feet from a subject and still focus on it. That is just not possible with most telephoto lenses.”
This capability opens the possibility for high-magnification work with skittish subjects. “When I’m looking at dragonflies, butterflies, frogs, or other subjects that won’t let me get super close, I can use these lenses to bridge that gap,” McGinnis explains. “I can get right into that bubble where the subject might get nervous and fly away, but I can still focus and capture high-magnification shots from further back.”
![]() Butterfly • OM-1 Mark II • M.Zuiko 150-400mm F4.5 TC1.25X IS PRO • 1/60sec • f/5.6 • ISO 3200
Butterfly • OM-1 Mark II • M.Zuiko 150-400mm F4.5 TC1.25X IS PRO • 1/60sec • f/5.6 • ISO 3200
“The 150-400mm F4.5 TC1.25x IS Pro has a built-in teleconverter and focuses from just over 4 feet,” McGinnis describes. “I used it to photograph a plumed basilisk lizard from a moving boat in Panama. There was no way to physically get close. We’re on a moving boat with water between us. I zoomed all the way in, shot at f/5.6, 1/500th of a second, ISO 4000. Even with all that movement, I got a sharp, clean shot.”
![]() Basilisk Lizard • OM-1 Mark II • M.Zuiko 150-400mm F4.5 TC1.25X IS PRO • 1/500sec • f/5.6 • ISO 4000
Basilisk Lizard • OM-1 Mark II • M.Zuiko 150-400mm F4.5 TC1.25X IS PRO • 1/500sec • f/5.6 • ISO 4000
“The 150-600mm F5.0-6.3 IS provides similar close-focusing capability at a more accessible price point,” McGinnis adds. “I used it for a monarch butterfly early one morning, getting down in the grass with my lens on the ground,” he recalls. “At f/6.3, the butterfly remained sharp while everything else painted into a beautiful blur.”
![]() Butterfly • OM-1 Mark II • M.Zuiko Digital ED 150-600mm F5.0-6.3 IS • 1/800sec • f/6.3 • ISO 200 •
Butterfly • OM-1 Mark II • M.Zuiko Digital ED 150-600mm F5.0-6.3 IS • 1/800sec • f/6.3 • ISO 200 •
“These aren’t technically macro shots in the one-to-one magnification sense,” McGinnis clarifies. “But the close-focusing capability delivers high-magnification results from distances that preserve the subject’s comfort, which is exactly what I need.”
The Backyard Philosophy: Owning Your Local Opportunities
McGinnis produces world-class macro work from Bethlehem, Pennsylvania, a city that doesn’t appear on macro photography destination lists.
“Macro and close-up photography offer us a unique opportunity to make compelling images without needing to travel to exotic places,” McGinnis emphasizes. “You don’t have to travel to make compelling work. Regardless of where we live, incredible scenes are waiting right outside our doors. The subjects are there. You just have to slow down and look closer at the miniature world.”
Finding Local Opportunities
McGinnis recommends planting native wildflowers in your yard to automatically attract native insect species. When milkweed appeared in his yard, it brought monarch butterflies with it. Local parks often maintain pollinator projects with unmowed areas. “They save mowing costs, and photographers gain access to acres of bustling macro territory,” McGinnis states. “Wetlands also serve as breeding grounds and places worth exploring, since insects begin their lives in water.”
![]() Bottle Fly • OM-1 Mark II • M.Zuiko Digital ED 90mm F3.5 Macro IS PRO • 90mm (180mm equivalent) • 1/80sec • f/14 • ISO 200 • 6 Frame Focus Bracket • Stacked Using Helicon Focus
Bottle Fly • OM-1 Mark II • M.Zuiko Digital ED 90mm F3.5 Macro IS PRO • 90mm (180mm equivalent) • 1/80sec • f/14 • ISO 200 • 6 Frame Focus Bracket • Stacked Using Helicon Focus
Researching local species is critical. “I assure you that wherever you are, there are close-up photography opportunities,” McGinnis stresses. “Each location has unique opportunities you won’t find elsewhere. Research what subjects are in your area, learn when and where to find them, and start by mastering those subjects.”
The Own Your Backyard Principle
“You’ll sometimes hear this phrase in business: when a store opens downtown, they appeal to local customers before worrying about those outside their area,” McGinnis describes. “It’s the same concept here. Understand the subjects close by before chasing a species you don’t know anything about in an unfamiliar location.”
The Always-Be-Looking Mindset
“Always be on the lookout for new subjects,” McGinnis advises. “Walk around, look closer, flip rocks, get outside, and you’ll be surprised at what you find. I once discovered a tiger bee fly on my mailbox and a robber fly on a street sign across from my house. Wolf spiders are hard to find, but at night they reveal themselves with a headlamp. Their eyes twinkle like diamonds in the grass.”
![]() Narrow-Winged Mantis • OM-1 Mark II • M.Zuiko Digital ED 90mm F3.5 Macro IS PRO • 90mm (180mm equivalent) • 1/100sec • f/16 • ISO 200 • 9 Frame Focus Bracket • Stacked Using Helicon Focus
Narrow-Winged Mantis • OM-1 Mark II • M.Zuiko Digital ED 90mm F3.5 Macro IS PRO • 90mm (180mm equivalent) • 1/100sec • f/16 • ISO 200 • 9 Frame Focus Bracket • Stacked Using Helicon Focus
McGinnis’ weather-sealed ecosystem, consisting of the OM-1 Mark II, 90mm Macro IS Pro, and FL-700WR flash, enables shooting in unexpected conditions. “We get a lot of rain here, but I never let bad weather discourage me from going outside, as some of the most compelling close-up images happen during and after a rainfall.”
Gear Reality Check: The Minimal Kit That Works
McGinnis notes his actual gear list is refreshingly simple.
The Core Kit
“All I really need when I head into the field is my camera, the OM-1 Mark II, my favorite macro lens, the M.Zuiko Digital ED 90mm F3.5 Macro IS PRO, the FL-700WR flash, and my Cygnustech diffuser,” McGinnis states. “The beauty of close-up photography is you don’t need a lot. Light, powerful, and weather resistant will keep you nimble, energized, and shooting in any weather.”
![]()
The Lighter Alternative
The M.Zuiko Digital ED 60mm F2.8 Macro OM offers an even more portable option. “If I want to go lighter, or if I’m photographing subjects where I don’t need quite as much magnification, I have full confidence in my 60mm Macro,” McGinnis describes. “Using this lens instead of the 90mm Macro makes an already small, lightweight kit even smaller. This kit is incredibly portable and capable.”
Optional Add-Ons
“The M.Zuiko Digital ED 8-25mm F4.0 PRO OM joins my kit when I am expecting larger subjects like frogs or snakes. The M.Zuiko Digital ED 150-400mm F4.5 TC1.25X IS PRO or the M.Zuiko Digital ED 150-600mm F5.0-6.3 IS comes along when distant or skittish subjects are likely to be in the location I am photographing.”
![]()
“When I want a light kit with magnification flexibility, I use the Raynox DCR-250 macro adapter with the 60mm,” McGinnis describes. “I opt for the Raynox over extension tubes because it clips on and off the lens easily versus removing the lens to add extension tubes, which can take up valuable time when you are trying to photograph a skittish subject.”
The No-Tripod Freedom
“One of the things I love about macro photography and shooting without a tripod is the minimal mental commitment,” McGinnis emphasizes. “When you have to pack up a bunch of lenses and accessories, it can make the process feel dreadful at times. With my go-to kit, I don’t need to bring much at all. I keep it all together on my desk and I throw it into a small backpack when I want to go out. It just feels easy. I’m mobile, I’m nimble, and I can react to subjects and opportunities instantly.”
Experience Over Perfection
McGinnis emphasizes his philosophy prioritizes being present in the field over technical perfection.
![]() Green Stink Bug • OM-1 • M.Zuiko Digital ED 60mm F2.8 Macro OM • 60mm (120mm equivalent) • 1/80sec • f/7.1 • ISO 200 • 28 Frame Focus Bracket • Stacked Using Helicon Focus
Green Stink Bug • OM-1 • M.Zuiko Digital ED 60mm F2.8 Macro OM • 60mm (120mm equivalent) • 1/80sec • f/7.1 • ISO 200 • 28 Frame Focus Bracket • Stacked Using Helicon Focus
“I’d rather be out and miss shots than stay home because I’m afraid of some technical imperfection,” McGinnis stresses. “That’s the mindset that will allow you to make the most of your time, and therefore, create the most successful images. You might take a hundred images, and maybe only 10 are good enough to share. You took 90 images that aren’t quite good enough, but you also got 10 that are and those 10 wouldn’t have happened if you’d stayed home.”
The Learning Curve Reality
McGinnis acknowledges that handheld macro requires practice. “It’s going to take experience and effort to learn how to stabilize yourself,” he notes. “Even with all of the technology at our fingertips, if you are moving or your subject is moving, you’re going to have blurry images. It’s not realistic to expect every single image to be sharp or portfolio worth, and that’s okay.”
The Core Takeaway
“Some of the best images I’ve ever taken happened because I was willing to go out and try things even when conditions weren’t perfect,” McGinnis concludes. “Early morning light, patient fieldcraft, manual focus practice, understanding my subject’s behavior. These fundamentals matter more than any camera feature. The OM-1 Mark II, the 90mm Macro, the FL-700WR flash, they’re tools that make handheld macro possible, but the photographer’s mindset and field experience are what make the images work. Get out, practice, fail, learn, and keep shooting.”
![A man in a dark rain jacket stands on a metal suspension bridge in a lush, green forest, holding a camera in his right hand. The bridge is w