If you’ve ever tried to move your LLM prototype from your Jupyter notebook into the real world then you already know it’s not as simple as clicking “Run.” I remember the first time I tried hosting an LLM endpoint; it was messy. The model ran fine locally, but once users started sending multiple requests…everything broke.
That’s when I realized what I was missing wasn’t ML knowledge, but LLMOps.
This guide is my attempt to take you from zero to LLMOps Hero, a complete walkthrough of how to run LLMs in production using LangChain, FastAPI, Docker, and a conceptual overview of AWS deployment.
We’ll build a small yet realistic RAG chatbot as a perfect entry point to understand the LLMOps lifecycle.…
If you’ve ever tried to move your LLM prototype from your Jupyter notebook into the real world then you already know it’s not as simple as clicking “Run.” I remember the first time I tried hosting an LLM endpoint; it was messy. The model ran fine locally, but once users started sending multiple requests…everything broke.
That’s when I realized what I was missing wasn’t ML knowledge, but LLMOps.
This guide is my attempt to take you from zero to LLMOps Hero, a complete walkthrough of how to run LLMs in production using LangChain, FastAPI, Docker, and a conceptual overview of AWS deployment.
We’ll build a small yet realistic RAG chatbot as a perfect entry point to understand the LLMOps lifecycle.
Table of contents
- What Exactly is LLMOps?
- Basic Setup
- Data Ingestion and Vectorization
- Building and Running the RAG Chatbot
- Containerization using Docker
- What Actually Changed in the Code
- Deployment Concepts with AWS
- Monitoring, Versioning, Evaluation, and Governance
- Conclusion
What Exactly is LLMOps?
Simply put, LLMOps is the extension of MLOps for Large Language Models.
It’s everything that happens after you’ve trained or chosen your model, from inference optimization, monitoring, prompt orchestration, data pipelines, to deployment, scaling, and governance.
Think of it as the bridge between your model and the real-world ensuring reliability, scalability, observability, and compliance.
Here’s the high-level LLMOps pipeline we’ll cover:
- Data ingestion & vectorization
- Understanding the Dataset
- Building the Vector Store
- Building and Running the RAG Chatbot
- Prompt orchestration using LangChain
- Serving via FastAPI
- Chat UI with Streamlit
- Public Access via Ngrok
- Containerization using Docker
- Deployment concepts with AWS
- Monitoring, versioning, evaluation, and governance
Basic Setup
Before we can start with implementing stuff, let’s do basic setup by installing necessary libraries. I am using Google Colab as the programming environment for this project. Copy the following code for setting up the libraries:
!mkdir llmops-demo
!cd llmops-demo
!python3 -m venv venv
!source venv/bin/activate
!pip install langchain openai faiss-cpu fastapi uvicorn python-dotenv langchain-community
!pip install nest_asyncio pyngrok streamlit
We are also going to use OpenAI and NGROK for this project. You can get their API access tokens/keys from these links:
- OpenAI: https://platform.openai.com/api-keys
- NGROK: https://dashboard.ngrok.com/get-started/your-authtoken
Note that using free version of their API/Auth tokens is enough for this blog. Write the following code in colab to setup these tokens:
import os
from getpass import getpass
os.environ['OPENAI_API_KEY'] = getpass("Enter OPENAI KEY:")
os.environ['NGROK_AUTHTOKEN'] = getpass("ENTER NGROK TOKEN:")
Data Ingestion and Vectorization
Understanding the Dataset
Before building anything, let’s start with the data because that’s really what gives your RAG system its brain. I used a small Kaggle dataset called Sample RAG Knowledge Item Dataset. It’s simple, clean, and perfect for learning. Each row is like a mini “IT helpdesk” note, a short piece of knowledge under a specific topic.
You’ll find two main columns:
- ki_text → the actual content (like “Steps to troubleshoot your VPN connection”)
- ki_topic → the topic label, such as “Networking”, “Hardware”, or “Security”
This dataset is intentionally small which I actually love, because it lets you quickly test different RAG ideas like chunking sizes, embedding models, and retrieval strategies without waiting hours for indexing. It’s extracted from a larger IT knowledge base dataset (around 100 articles), but this trimmed-down version is perfect for experimentation since it’s fast, focused, and great for demos.
Now that we know what our data looks like, let’s start teaching our model how to “remember” it by turning this text into embeddings and storing them inside a vector database.
Building the Vector Store
Once we have our dataset ready, the next goal is to make the model understand it not just read it. And to do that, we need to **convert text into embeddings, **numerical vectors that represent meaning.
Here’s the code to do that:
import os
import pandas as pd

from langchain.text_splitter import RecursiveCharacterTextSplitter
from langchain.embeddings import OpenAIEmbeddings
from langchain.vectorstores import FAISS
from langchain.docstore.document import Document

# Load dataset
df = pd.read_csv("/content/rag_sample_qas_from_kis.csv")

# Use ki_text as main text and ki_topic as metadata
docs = [
Document(page_content=row["ki_text"], metadata={"topic": row["ki_topic"]})
for _, row in df.iterrows()
]

# Split into chunks for embedding
splitter = RecursiveCharacterTextSplitter(chunk_size=800, chunk_overlap=100)
chunks = splitter.split_documents(docs)

# Embed and store in FAISS
embeddings = OpenAIEmbeddings(openai_api_key=os.getenv("OPENAI_API_KEY"))
db = FAISS.from_documents(chunks, embeddings)

db.save_local("vectorstore")
print("Vectorstore created successfully using ki_text as content!")
Woah that’s a lot of code, let’s see what is happening here!
After setting up the dataset, the next step is to help the model “understand” it by converting text into embeddings. We start by loading the CSV and wrapping each record into LangChain Document objects, storing “ki_text” as content and “ki_topic” as metadata. This metadata can later help in filtering or topic-specific retrieval.
Next, each document is split into smaller overlapping chunks (800 characters, 100 overlap) so no idea gets lost between splits. Then, we use OpenAIEmbeddings to convert each chunk into vectors: dense numerical representations of semantic meaning.
Finally, all embeddings are stored in a FAISS vector store, an efficient similarity search index that allows quick retrieval of the most relevant chunks during queries.
At the end of this step, the vector store/ folder acts as your model’s local “memory,” ready to be queried in the next phase.
Also Read: Top 15 Vector Databases for 2025
Building and Running the RAG Chatbot
Here is how our final Chatbot looks like when deployed:
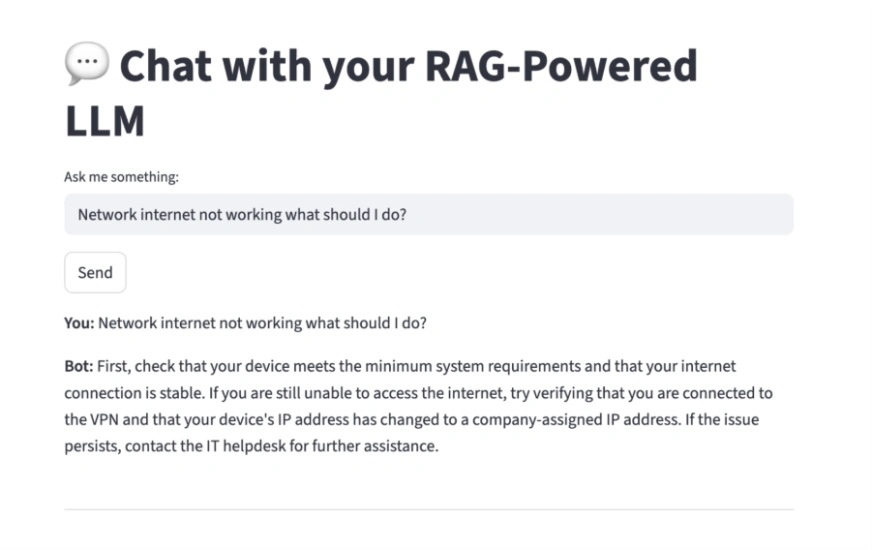
Now let’s cover all the libraries/tools that we need to make this happen and see how it all comes together.
Prompt Orchestration using LangChain
This is where we bring our vector store, retriever, and LLM together using LangChain’s RetrievalQA chain.
The FAISS vector store created earlier is loaded back into memory and connected to OpenAI embeddings. The retriever then acts as the intelligent lookup engine fetching only the most relevant chunks from your dataset.
Each query now flows through this pipeline: retrieved → augmented → generated.
Serving via FastAPI
To simulate a production-ready setup, we add a lightweight FastAPI backend. While optional for Colab, this step mirrors how your RAG model would be exposed in a real-world environment with endpoints ready for external integrations or API requests.
The “/” route simply returns a health message for now, but this structure can easily be extended to handle queries from your UI, Slack bots, or web clients.
Chat UI with Streamlit
On top of the backend, we build an interactive chat interface using Streamlit. This provides a clean, browser-based experience to talk to your RAG pipeline. Users can type questions, hit “Send,” and see contextual, document-aware responses powered by LangChain’s retrieval and reasoning chain.
Each exchange is stored in st.session_state, creating a persistent conversational flow between you and the model.
Public Access via Ngrok
Since Colab doesn’t support direct web hosting, we use ngrok to expose the Streamlit app securely. Ngrok tunnels your local port to a temporary public URL letting anyone (or just you) access the chatbot UI in a real browser tab.
Once ngrok prints a public link, the chatbot becomes instantly accessible.
Putting It All Together
- LangChain orchestrates embeddings, retrieval, and generation
- FastAPI provides an optional backend layer
- Streamlit serves as the interactive UI
- Ngrok bridges Colab to the outside world
And with that you have a fully functional, end-to-end RAG-powered chatbot running live from your notebook.
Here’s your complete code for the RAG Chatbot combining all of the above tools:
from langchain.chains import RetrievalQA

from langchain.vectorstores import FAISS
from langchain.embeddings import OpenAIEmbeddings
from langchain.llms import OpenAI
from pyngrok import ngrok
import nest_asyncio
import threading
import streamlit as st
import uvicorn
from fastapi import FastAPI

# --- Create FastAPI backend (optional) ---
app = FastAPI(title="RAG Chatbot – Backend")

embeddings = OpenAIEmbeddings(openai_api_key=os.getenv("OPENAI_API_KEY"))
db = FAISS.load_local("vectorstore", embeddings, allow_dangerous_deserialization=True)
retriever = db.as_retriever()

qa_chain = RetrievalQA.from_chain_type(
llm=OpenAI(openai_api_key=os.getenv("OPENAI_API_KEY"), temperature=0),
chain_type="stuff",
retriever=retriever,
)

@app.get("/")
def home():
return {"message": "Backend ready"}

# --- Streamlit Chat UI ---
def run_streamlit():
st.set_page_config(page_title="💬 RAG Chatbot", layout="centered")
st.title("💬 Chat with your RAG-Powered LLM")

if "history" not in st.session_state:
st.session_state.history = []

query = st.text_input("Ask me something:")

if st.button("Send") and query:
with st.spinner("Thinking..."):
answer = qa_chain.run(query)
st.session_state.history.append((query, answer))

for q, a in reversed(st.session_state.history):
st.markdown(f"**You:** {q}")
st.markdown(f"**Bot:** {a}")
st.markdown("---")

# --- Launch ngrok and Streamlit ---
ngrok.kill()
public_url = ngrok.connect(8501)
print(f"Chat UI available at: {public_url}")

# Run Streamlit app in background
nest_asyncio.apply()

def start_streamlit():
!streamlit run app.py &>/dev/null&

# Save UI to file
with open("app.py", "w") as f:
f.write('''
import streamlit as st
from langchain.chains import RetrievalQA
from langchain.vectorstores import FAISS
from langchain.embeddings import OpenAIEmbeddings
from langchain.llms import OpenAI
import os

os.environ["OPENAI_API_KEY"] = "''' + os.environ["OPENAI_API_KEY"] + '''"

st.set_page_config(page_title="💬 RAG Chatbot", layout="centered")
st.title("💬 Chat with your RAG-Powered LLM")

embeddings = OpenAIEmbeddings(openai_api_key=os.getenv("OPENAI_API_KEY"))
db = FAISS.load_local("vectorstore", embeddings, allow_dangerous_deserialization=True)
retriever = db.as_retriever()

qa_chain = RetrievalQA.from_chain_type(
llm=OpenAI(openai_api_key=os.getenv("OPENAI_API_KEY"), temperature=0),
chain_type="stuff",
retriever=retriever,
)

if "history" not in st.session_state:
st.session_state.history = []

query = st.text_input("Ask me something:")

if st.button("Send") and query:
with st.spinner("Thinking..."):
answer = qa_chain.run(query)
st.session_state.history.append((query, answer))

for q, a in reversed(st.session_state.history):
st.markdown(f"**You:** {q}")
st.markdown(f"**Bot:** {a}")
st.markdown("---")
''')

# Start Streamlit
get_ipython().system_raw('streamlit run app.py --server.port 8501 &')

print("Chatbot is running. Open the ngrok URL above")
When you run the above code, you will get an output like this:
Chat UI available at: NgrokTunnel: “https://22f6c6d1ef68.ngrok-free.app” -> “http://localhost:8501” Chatbot is running. Open the ngrok URL above.
This is the URL on which your Chatbot is deployed: https://22f6c6d1ef68.ngrok-free.app/
This link is available for access from anywhere on the internet in the world. You can share it with your friends or use it to try your bot yourself. Pretty neat right?
By utilizing tools such as Streamlit, FastAPI, NGrok and LangChain we were able to deploy and end to end RAG based Chatbot in the real world with just few lines of code. Imagine the possibilities this has for you; the sky is the limit of what you can achieve.
Containerization using Docker
At this point, we have a fully working RAG chatbot: backend, UI, and all. But if you’ve ever tried deploying that setup across environments, you’ll know the pain: missing dependencies, version mismatches, broken paths are the usual chaos.
That’s where Docker comes in. Docker gives us a neat, portable way to package the entire environment with all the tools such as FastAPI, Streamlit, LangChain, FAISS, and even your vector store into one consistent unit that can run anywhere.
If you want to deploy exact same RAG Chatbot as above but want to do it through Docker then this will be your updated code to do so:
import os
import subprocess
from pyngrok import ngrok

# --- Create Streamlit UI ---
streamlit_code = """
import streamlit as st
import requests

st.set_page_config(page_title="RAG Chatbot", page_icon="", layout="centered")
st.title("RAG Chatbot – LLMOps Demo")
st.write("Ask questions from your knowledge base. Backend powered by FastAPI, deployed in Docker.")

query = st.text_input("💬 Your question:")

if query:
with st.spinner("Thinking..."):
try:
response = requests.get(f"http://localhost:8000/ask", params={"query": query})
if response.status_code == 200:
st.success(response.json()["answer"])
else:
st.error("Something went wrong with the backend.")
except Exception as e:
st.error(f"Error: {e}")
"""

with open("streamlit_app.py", "w") as f:
f.write(streamlit_code.strip())

# --- Create requirements.txt ---
with open("requirements.txt", "w") as f:
f.write("fastapi\nuvicorn\nstreamlit\nlangchain\nopenai\nfaiss-cpu\npyngrok\nrequests\n")

# --- Create Dockerfile ---
dockerfile = f"""
FROM python:3.10-slim

WORKDIR /app
COPY . .

RUN pip install --no-cache-dir -r requirements.txt

EXPOSE 8000 8501

ENV OPENAI_API_KEY=${{OPENAI_API_KEY}}

CMD bash -c "uvicorn from_zero_to_llmops_hero_your_101_guide_to_running_llms_in_production:app --host 0.0.0.0 --port 8000 & streamlit run streamlit_app.py --server.port 8501 --server.address 0.0.0.0"
"""

with open("Dockerfile", "w") as f:
f.write(dockerfile.strip())

# --- Install Docker if needed ---
try:
subprocess.run(["docker", "--version"], check=True)
except Exception:
print("Installing Docker...")
subprocess.run(["apt-get", "update", "-qq"], check=True)
subprocess.run(["apt-get", "install", "-qq", "-y", "docker.io"], check=True)

# --- Check if Docker daemon available ---
try:
subprocess.run(["docker", "build", "--version"], check=True)
docker_available = True
except Exception:
docker_available = False

if docker_available:
print("Building Docker image...")
subprocess.run(["docker", "build", "-t", "rag-chatbot-ui", "."], check=True)

print("Running container (FastAPI + Streamlit)...")
subprocess.run(["docker", "run", "-d", "-p", "8000:8000", "-p", "8501:8501",
"-e", f"OPENAI_API_KEY={os.getenv('OPENAI_API_KEY')}",
"rag-chatbot-ui"], check=True)
else:
print("Docker not supported in Colab — running natively instead.")
print("Starting FastAPI + Streamlit locally...")

# Run both apps directly
import threading

def run_fastapi():
os.system("uvicorn from_zero_to_llmops_hero_your_101_guide_to_running_llms_in_production:app --host 0.0.0.0 --port 8000")

def run_streamlit():
os.system("streamlit run streamlit_app.py --server.port 8501 --server.address 0.0.0.0")

threading.Thread(target=run_fastapi).start()
threading.Thread(target=run_streamlit).start()

# --- Expose via ngrok ---
ngrok.kill()
public_url = ngrok.connect(8501)
print(f"Your RAG Chatbot UI is live at: {public_url}")
print("API (FastAPI docs) at: <ngrok_url_for_8000>/docs")
What Actually Changed in the Code
If you look closely at the new code block, a few major things stand out:
1. Creation of a Dockerfile
This is like the recipe for your app. We’re starting from a lightweight python:3.10-slim image, copying all project files, installing dependencies from requirements.txt, and exposing two ports:
- 8000 for the FastAPI backend, and
- 8501 for the Streamlit UI.
At the end, both servers are launched inside the same container using a single command:
CMD bash -c "uvicorn ... & streamlit run ..."
That single line makes Docker run both FastAPI and Streamlit together, one serving the API, the other serving the interface.
2. Automated Requirements Handling
Before building the Docker image, we generate a clean requirements.txt file programmatically, containing all the libraries we used: fastapi, uvicorn, streamlit, langchain, openai, faiss-cpu, pyngrok, and requests.
This ensures your Docker image always installs the exact packages your notebook used, no manual copy-paste.
3. Building and Running the Container
Once Docker is available, we run:
subprocess.run(["docker", "build", "-t", "rag-chatbot-ui", "."]) subprocess.run(["docker", "run", "-d", "-p", "8000:8000", "-p", "8501:8501", ...])
This builds an image named rag-chatbot-ui and spins up a container that runs both the backend and frontend. If you’re on a local machine, this would give you two live endpoints immediately:
- http://localhost:8000/docs → FastAPI
- http://localhost:8501 → Streamlit UI
4. Fallback for Colab
Because Google Colab doesn’t support the Docker daemon directly, we handle it gracefully. If Docker isn’t available, the script automatically launches FastAPI and Streamlit in two background threads, so the experience remains identical.
Why This Matters?
This small shift from notebook code to a containerized setup is the real turning point from “playing with LLMs” to “running LLMs like a product.”
Now you have:
- Reproducibility → the same environment everywhere
- Portability → deploy on AWS, GCP, or even your laptop
- Scalability → multiple containers behind a load balancer later
And yes, it’s the exact same app just wrapped neatly in Docker.
Deployment Concepts with AWS
Deploying your LLM system on AWS opens up production-grade scalability but it’s a topic deserving its own deep dive. From hosting your FastAPI app on EC2 or ECS, to storing vector databases on S3, and using AWS Lambda for event-driven triggers, the possibilities are vast. You can even integrate CloudFront + API Gateway for secure, globally distributed inference endpoints.
For now, just know that AWS gives you all the building blocks to move from a local Docker container to a fully managed, auto-scaling setup. We’ll explore this entire workflow with infrastructure-as-code, CI/CD pipelines, and deployment scripts in the next article.
Monitoring, Versioning, Evaluation, and Governance
Once deployed, your system’s real work begins monitoring and maintaining it. Tracking latency, retrieval accuracy, hallucination rates, and version drift are essential to keeping your chatbot both reliable and explainable. Add versioning, evaluation, and governance, and you have the foundations of production-grade LLMOps.
These areas deserve their own spotlight. In the next article, we’ll go hands-on with logging, evaluation dashboards, and model governance all built directly into your RAG pipeline.
Conclusion
We started from zero, setting up a simple chatbot UI and step by step, built a complete LLMOps workflow:
- Data ingestion, Vector store creation, Embedding, Prompt orchestration, Serving via FastAPI, containerizing with Docker, and preparing for deployment on AWS.
- Each layer added structure, scalability, and reliability turning an experiment into a deployable, maintainable product.
- But this is just the beginning. Real LLMOps begins after deployment when you’re monitoring behavior, optimizing retrieval, versioning embeddings, and keeping your models safe and compliant.
In the next part of this series, we’ll go beyond setup and dive into AWS deployments, observability, versioning, and governance the things that truly make your LLMs production-ready.
Let me know your thoughts/questions below!
Sanad is a Senior AI Scientist at Analytics Vidhya, turning cutting-edge AI research into real-world Agentic AI products. With an MS in Artificial Intelligence from the University of Edinburgh, he’s worked at top research labs tackling multilingual NLP and NLP for low-resource Indian languages. Passionate about all things AI, he loves bridging the gap between deep research and practical, impactful products.