Zomato’s new MCP (Model Context Protocol) server makes it possible to order food solely using AI chat. The system was launched in 2025, and permits AI assistants like ChatGPT, Claude, etc. to directly interact with Zomato. In practice, it’s like simply say, “order a pizza nearby,” and the AI does everything. In this guide, we cover what Zomato’s MCP server is and how it works and walk through setting it up step-by-step.
By the end of this guide, you’ll have a solid understanding of how Zomato’s MCP enables seamless “zero-UI” food ordering with AI, and how to connect it with other tools like Claude Desktop or the [Gemini CLI. ](https://www.analyticsvidhya.com/blog/2025/08/gemini-cli-for-githu…
Zomato’s new MCP (Model Context Protocol) server makes it possible to order food solely using AI chat. The system was launched in 2025, and permits AI assistants like ChatGPT, Claude, etc. to directly interact with Zomato. In practice, it’s like simply say, “order a pizza nearby,” and the AI does everything. In this guide, we cover what Zomato’s MCP server is and how it works and walk through setting it up step-by-step.
By the end of this guide, you’ll have a solid understanding of how Zomato’s MCP enables seamless “zero-UI” food ordering with AI, and how to connect it with other tools like Claude Desktop or the Gemini CLI.
Table of contents
What is the Zomato MCP Server?
Zomato’s MCP server is a Node.js implementation of the Model Context Protocol, which exposes Zomato’s food-ordering APIs as conversational tools. Basically, it is an interface between an AI assistant and Zomato’s services. Zomato’s MCP server registers functions, like searchRestaurants, getMenu, addToCart, and checkout so that your AI can “call” them via chat.
For example, if you say:
“find me pizza places near me,”
the backend server speaks to Zomato’s database and returns results.
What’s Special About Zomato’s MCP Implementation?
The Zomato MCP server exposes specific actions (tools) for the AI to access and communicates through either STDIO or HTTP/SSE. In the case of Zomato’s MCP it can perform actions like get_menu, add_to_cart, checkout and much more. So when the AI makes a request (like making a request for the getRestaurantsForKeyword tool), the external service server translates the request into Zomato API calls and returns structured JSON data as a response.
This means, for example, that any AI model compatible with the MCP standard will communicate with Zomato’s system on your behalf.
Key Features of the Zomato MCP Server
The MCP server of Zomato enables the AI to leverage all food ordering capabilities. Essentially, it gives your Assistant personal ordering functionality. The primary functions are as follows:
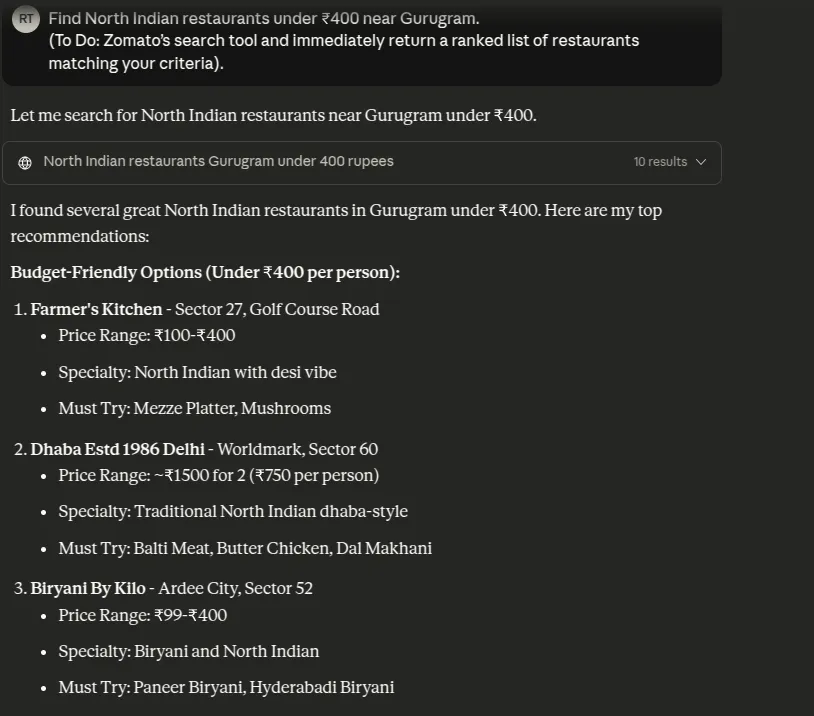
- **Restaurant Discovery: **Explore restaurants in your area by location, cuisine type, price tier, or rating. For example, you might say “Find North Indian Restaurants under ₹400 near me”, and in seconds see all the options.
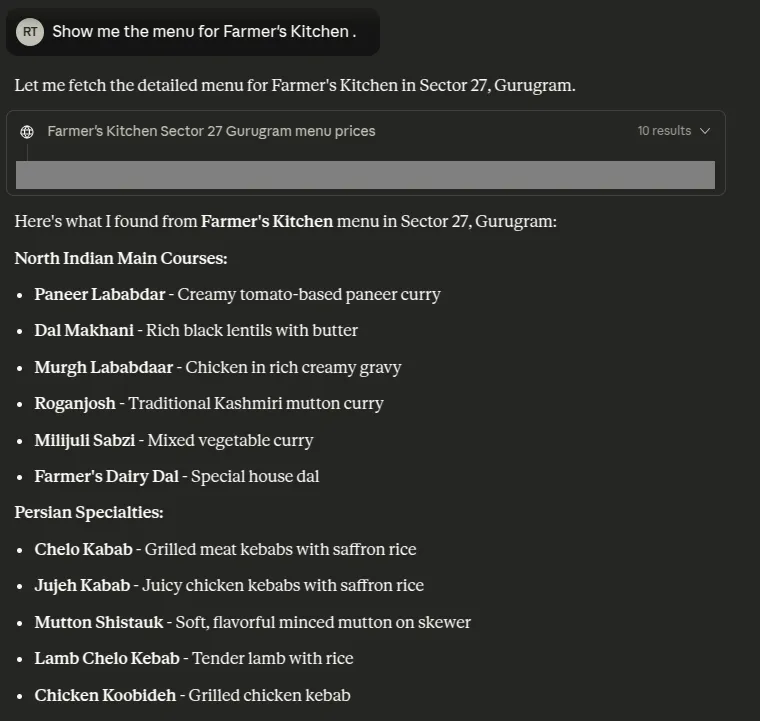
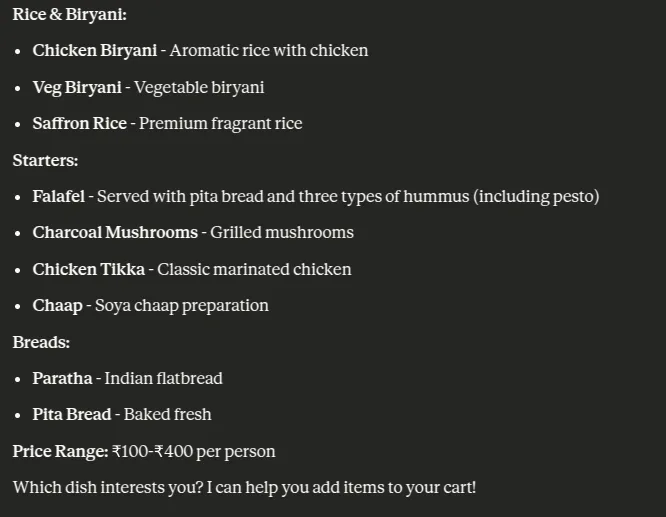
- **Menu Browsing: **Access in-depth menus for any specific restaurant. The AI will be able to retrieve the item names, description, prices, and options for each item. You might say “Show me the menu for [Restaurant Name]”, and you will be able to see the menu without ever leaving the chat window.
- **Cart Management: **Build and edit your cart via voice. You can use voice to add and remove items and organize the details (e.g., “Add Butter chicken and 2 rotis to my cart”). The MCP server will handle the cart operations (including modifiers and extras) behind the scenes.
- Order Checkout & Payment: Once the order is in the cart, the AI will be able to place the order and check you out. It will apply any discounts and offers and create the payment request. The server will generate a UPI QR code for you to pay at checkout.
Setting Up the Zomato MCP Server
To use the MCP server, you run an MCP client (local or remote) which will connect your AI host to Zomato’s remote server. Below is a high-level setup process:
-
Node.js: You will need to have Node.js installed (version 16 or higher will work) so that you can run the MCP connector tool. Use the command line to check with `node -v`.
-
**Zomato Account: **You will need a Zomato login to authorize the assistant. You don’t need anything special – just your standard account login (it can be free or paid) that you use when checking out.
-
**AI Host/Client: **Determine where the assistant is going to run. There are many standard options:
-
Claude Desktop (which has native MCP support),
-
ChatGPT (via the ChatGPT Connector or VS Code Copilot), or
-
Gemini CLI (Google’s open-source terminal AI).
You will find a way to add the Zomato MCP server to the environment you choose.
Claude Desktop Configuration
Claude Desktop may be the easiest way to try the MCP server. Once Node.js is set up, you will use npx (a Node package runner) to access, or run, Zomato’s MCP. Here is the process:
- **Edit Claude’s Config: **Open the Claude Desktop application and navigate to Settings > Developer > Edit config. This opens the claude_desktop_config.json file.
- **Add Zomato Server: **In the JSON file, you need to add a server in the section called “mcpServers”. For example:
{

"mcpServers": {

"zomato-mcp": {

"command": "npx",

"args": [

"mcp-remote",

"https://mcp-server.zomato.com/mcp"

]

}

}

}
- This tells Claude it needs to run npx mcp-remote https://mcp-server.zomato.com/mcp whenever it accesses Zomato tools.
- Save and Restart: Once you save the file, you will need to quit Claude completely (Cmd+Q on a Mac or close the application from the taskbar on Windows). Once you reopen it, Claude will load Zomato MCP server.
- **Authentication with Zomato: **After completing the above steps you are ready to run a command using Zomato. If you have never run a command (for example, “find pizza places near me”) using Zomato, Claude will give you an authorization link. You can click the link, log in to your Zomato account, and finish the process. Once you have done this, Claude will save the Oauth token that it received, and you will not need to log back in again. The GitHub readme states that the MCP server is using Oauth for secure authentication.
Integrating with ChatGPT, Gemini CLI or VS Code
If you use ChatGPT, terminal, or VSCode integrations, you can add the MCP server there as well:
Gemini CLI: Open ~/.gemini/settings.json Add a zomato-mcp entry under the mcpServers array:
"mcpServers": {

"zomato-mcp": {

"command": "npx",

"args": ["mcp-remote", "https://mcp-server.zomato.com/mcp"]

}

}
Save the file and restart the Gemini CLI. Type /mcp to confirm the new server is listed. As before, you will authenticate through the OAuth link.
VS Code: Visit to Zomato MCP repository. Scroll down and click on Install in VsCode and add the following mcp.json file or by clicking the “Install in VS Code” button, point the url or command to https://mcp-server.zomato.com/mcp:
{
{
"servers": {
"zomato-mcp-server": {
"url": "https://mcp-server.zomato.com/mcp",
"type": "http"
}
},
}
Once you have added this entry, you just have to restart VS Code and authenticate through the link when you are prompted. This is the same process as with the Gemini CLI entry.
Once everything is configured correctly, you will see zomato-mcp as a connected server listed in your tool, and you are ready to use it to execute commands through your AI interface (e.g., using /mcp in Gemini or typing your query in Claude, etc.).
ChatGPT: Utilize the official ChatGPT Connector. In the ChatGPT settings for Connectors (Plugins), set up a new MCP connector pointing to https://mcp-server.zomato.com/mcp. Verify the redirect URL (chatgpt.com/connector_platform_oauth_redirect) is allowed.
Quick Verification
To confirm the setup was successful, attempt a simple test query after restart:
- In Claude/VSCode/Gemini, ask a simple prompt example, “Show me vegetarian restaurants near my location.” The assistant should display a swift reply prepared by Zomato.
- In Gemini CLI, you can type the command /mcp list (or /mcp) to see the list of available servers and check to see if zomato-mcp appears.
If you’re authorization has been successfully initialized, then the assistant will not request a login again for the same account; otherwise, refelect to check the redirect URLs and your JSON formatting.
Using Zomato MCP: Workflow Examples
- **Search Restaurants: **Ask a query similar to “Find North Indian restaurants under ₹400 near Gurugram”.

- Browse Menu: Once you had selected a restaurant, ask something like “Show me the menu for Themis Barbeque House”.
- Add to Cart: To build your order, prompt something like “Add 1 Butter Paneer Masala and 3 Butter Naan’s to my cart.”

Security and Authentication
The security of your interactions is managed using OAuth. When you first issue any Zomato prompt, the AI client will open a link that will enable you to securely log into your Zomato account and allow permissions. Once you approve access, the MCP server receives an access token tied to your Zomato account. Claude or the Gemini CLI then stores the token so you can skip future logins. The server handles all authentication, and the AI never sees your Zomato password.
Payments are always secure. The MCP server never processes a credit card; it simply provides a UPI QR code which you can scan with your banking app.
Zomato has currently allowed specific redirect URLs (being used in the Claude Desktop or ChatGPT plugin redirects, etc.) to simply OAuth. If you are using a different setup, you may need Zomato to add your specific redirect uri.
Conclusion
Zomato’s MCP server represents a revolutionary leap forward for AI-powered food ordering. With a quick command, customers can search, browse, cart and check out from Zomato’s ordering platform simply by talking with an AI assistant. As we’ve outlined, this technology shows how an app can fade into the background and allow AI to become the user interface. It dramatically increases the speed of ordering and offers personalization and allows for seamless interoperability of AI systems connecting every order.
The movement toward MCP servers like Zomato’s will eliminate the line between chatbots and actionable services soon. For Zomato, the MCP server sets a precedent for taking a food app and transforming it into an AI assistant.
Frequently Asked Questions
Q1. How does the Zomato MCP server let an AI order food for me?
A. It exposes Zomato’s ordering APIs as MCP tools. Your AI can search restaurants, read menus, add items to cart, and check out through structured requests handled by the server.
Q2. Do I need anything special to set it up?
A. You need Node.js, a Zomato account, and an AI client that supports MCP such as Claude Desktop, ChatGPT with Connector, Gemini CLI, or VS Code.
Q3. How is authentication handled and is it secure?
A. Login happens through OAuth. You approve access in a browser, the AI stores an access token, and your password is never shared. Payments use a UPI QR code for secure checkout.
Hello! I’m Vipin, a passionate data science and machine learning enthusiast with a strong foundation in data analysis, machine learning algorithms, and programming. I have hands-on experience in building models, managing messy data, and solving real-world problems. My goal is to apply data-driven insights to create practical solutions that drive results. I’m eager to contribute my skills in a collaborative environment while continuing to learn and grow in the fields of Data Science, Machine Learning, and NLP.