Use Jupyter code executor to help your agent finish tasks in a smarter way
20 Nov 2025 — 16 min read
 Exclusive Reveal: Code Sandbox Tech Behind Manus and Claude Agent Skills. Image by DALL-E-3
In today’s tutorial, we’ll explore how to connect your agent app to a self-hosted Jupyter server. This gives you a powerful, stateful code runtime sandbox.
This tutorial uses a more universal approach to recreate the core tech behind commercial products like Manus and Claude Agent Skills. Learning this saves you 40 hours of trial and error. It also makes your enterprise-grade a…
Use Jupyter code executor to help your agent finish tasks in a smarter way
20 Nov 2025 — 16 min read
Exclusive Reveal: Code Sandbox Tech Behind Manus and Claude Agent Skills. Image by DALL-E-3
In today’s tutorial, we’ll explore how to connect your agent app to a self-hosted Jupyter server. This gives you a powerful, stateful code runtime sandbox.
This tutorial uses a more universal approach to recreate the core tech behind commercial products like Manus and Claude Agent Skills. Learning this saves you 40 hours of trial and error. It also makes your enterprise-grade agent even more powerful than off-the-shelf solutions.
As always, the source code is at the end of this post. Feel free to grab it.
Introduction
We’ve shown that letting agents generate Python code and run it in a sandbox is more flexible, scalable, and cheaper in token cost than fixed function calls like Function Calling or MCP. It’s the best way to boost an LLM’s math skills and solve complex problems.
In our previous article, we demonstrated this advantage with a multi-agent system that plans, generates, and reflects:
Like Claude’s Code Execution MCP, this method runs LLM-generated Python code inside a containerized Python runtime.
 Multi-agent system based on a Python command-line sandbox. Image by Author
But after using it many times, you’ll notice a problem. Even with added reasoning and reflection logic, the agent still can’t reliably write code on its own based on the current environment to finish a task.
Here’s a simple example: give the agent an unknown CSV file and ask it to clean the data, then analyze and extract insights.
Current agent systems built on command-line Python sandboxes can’t handle this.
To understand why, let’s look at how human data analysts actually work.
When faced with new data, analysts first load it into a DataFrame in a Jupyter notebook. Then they use .head() to check column names and rough data types.
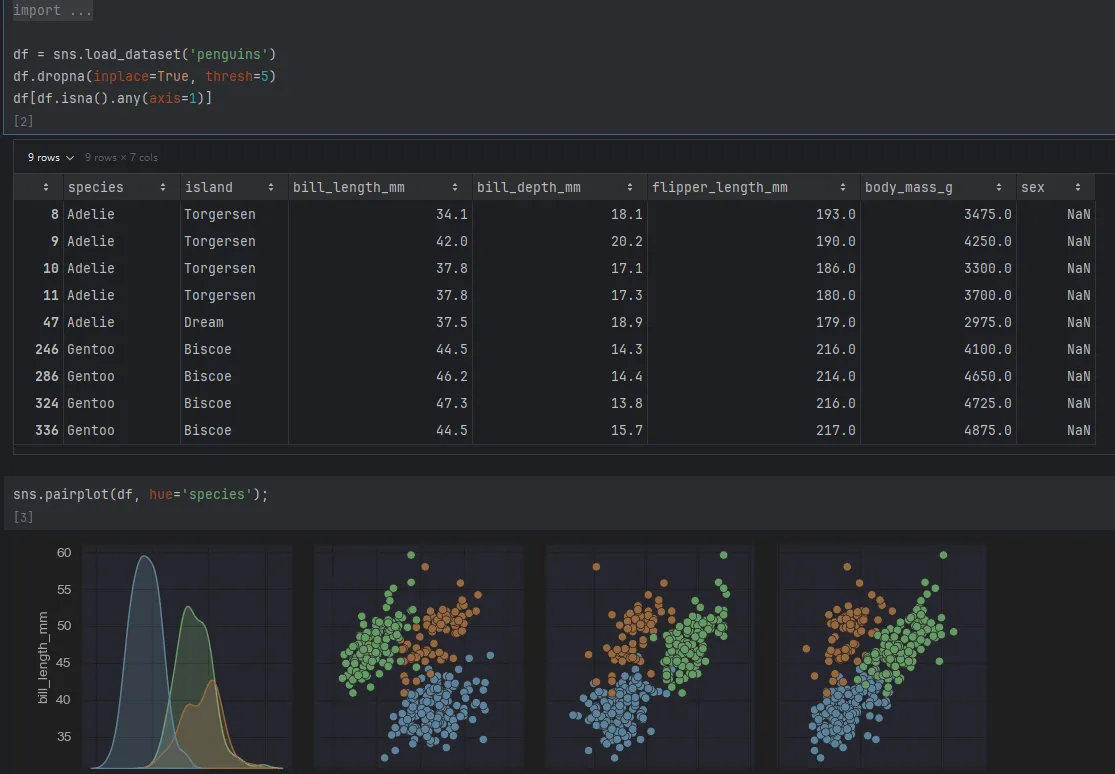 Data analysts usually run code step by step in a Jupyter notebook. Image by Author
Only after seeing the structure do they write the next code block—calculating averages, medians, or dropping missing values.
This shows the weakness of command-line-based Python runtimes. They’re stateless. The next code snippet can’t reuse variables or states from the previous run. Jupyter environments are fundamentally different—they keep state.
 The difference between Command Line Executor and Jupyter Executor. Image by Author
Yet most modern agent frameworks only offer stateless, command-line-style Python sandboxes. Some support connections to paid services like Claude Code Executor or Azure dynamic code containers—but those cost money and have tight resource limits.
So What Am I Giving You?
Value you’ll get from this article
This tutorial teaches you how to reliably connect your agent system to an internal Jupyter Server—or one hosted on platforms like vast.ai. This brings huge benefits:
- You no longer need expensive commercial code sandboxes. This cuts your compute costs dramatically.
- Your code and files run in a trusted, internal runtime. This gives you rock-solid data security and compliance.
- You can tap into your company’s massive compute resources. This matters a lot when handling big data or needing GPU parallel processing.
- You gain real production-ready ability to deploy agents and code sandboxes across distributed systems—not just a toy running on your laptop.
- You keep a stateful Jupyter-based sandbox. Your agent can decide what code to write next based on the results from the previous step.
This article covers:
- We’ll first use Autogen’s Docker API version to create a Jupyter code sandbox. This gives you a basic feel for stateful runtimes.
- Then we’ll examine the limits of this Docker-API approach and what real enterprise apps need.
- We’ll tweak Autogen’s existing modules so they connect directly to a standalone Jupyter Server.
- How to containerize and manage Jupyter Server deployment—and make it smooth with Docker Compose.
- Adjust the Jupyter image’s
Dockerfileso idle compute resources get reclaimed automatically. - Practice all this with a small hands-on project.
- Finally, explore how other agent frameworks like LangChain can unlock the full power of Jupyter code sandboxes.
This is an exclusive, detailed guide that fully reveals this core technology. Don’t wait—let’s get started!
Environment Setup
Build a Jupyter Kernel container
The “code sandbox” your agent connects to relies on containerization for safety and environment isolation. So first, prepare a Docker image that runs Jupyter Server.
The heart of any Docker container is the Dockerfile. To save you time, here’s the full content:
# Dockerfile.jupyter
FROM python:3.13-slim-bookworm

WORKDIR /app

COPY requirements.txt /app/requirements.txt

RUN pip install --no-cache-dir jupyter_kernel_gateway ipykernel numpy pandas sympy scipy --upgrade

RUN pip install --no-cache-dir -r requirements.txt --upgrade

EXPOSE 8888

ENV TOKEN="UNSET"
CMD python -m jupyter kernelgateway \
--KernelGatewayApp.ip=0.0.0.0 \
--KernelGatewayApp.port=8888 \
--KernelGatewayApp.auth_token="${TOKEN}" \
--JupyterApp.answer_yes=true \
--JupyterWebsocketPersonality.list_kernels=true
I won’t explain basic Docker concepts. Check out this great DataCamp course to fill any gaps.
This file uses python:3.13-slim-bookworm as the base image—not a pre-built Jupyter image—because we’ll customize the Jupyter environment later.
I pulled essential dependencies out of requirements.txt and installed them separately. This maximizes Docker layer caching.
Here’s the requirements.txt content:
matplotlib
xlrd
openpyxl
I included some basic Jupyter launch parameters. As we go, we’ll add more to build the complete Jupyter code sandbox.
Once your Dockerfile is ready, run this command to build the image:
docker build -t jupyter-server .
Don’t start the Jupyter container yet—we’ll explain why later.
💡 If you’re feeling a bit shaky on Docker basics, or you just want to get more confident before building your own images, I’ve got something for you.
DataCamp’s Introduction to Docker course walks you through everything step-by-step—from what containers are, to using the Docker CLI, writing your first Dockerfile, and keeping your images secure.
It’s hands-on, beginner-friendly, and focused on what data folks actually need. Definitely worth checking out if you want to skip the guesswork and start working with Docker like a pro.
Install the Autogen agent framework
Most agent frameworks have moved Jupyter runtime support into paid offerings. Right now, Autogen is the only solid open option that supports Jupyter runtimes.
To build agents, first install the autogen-agentchat package:
pip install -U "autogen-agentchat"
To use containerized code executors, also install Autogen’s Docker client library:
pip install "autogen-ext[docker-jupyter-executor]"
With the image built and Autogen installed, you’re ready to code.
Using the Jupyter Code Sandbox
Start with the recommended Docker API approach
Let’s begin with the official API example to see how Autogen’s code executor works.
Autogen has three key modules for Jupyter + Docker: DockerJupyterCodeExecutor, DockerJupyterServer, and CodeExecutorAgent.
DockerJupyterServer uses the Docker API to start a container from a given image, mount directories, and store Jupyter connection info.
DockerJupyterCodeExecutor handles all operations with the Jupyter Kernel API. Once it gets connection info from the server, you can submit and run code.
CodeExecutorAgent is a special Autogen agent that pulls Python code from context and executes it. If you give it a model_client, it can even write its own code and reflect on results.
 The roles of different modules related to the Jupyter code sandbox. Image by Author
Now let’s build a code executor agent to test if this stateful Jupyter sandbox works.
Remember the jupyter-server Docker image we built? Use it to initialize DockerJupyterServer.
server = DockerJupyterServer(
custom_image_name="jupyter-server",
expose_port=8888,
token="UNSET",
bind_dir="temp",
)
Then use that server to create a DockerJupyterCodeExecutor instance:
executor = DockerJupyterCodeExecutor(
jupyter_server=server,
timeout=600,
output_dir=Path("temp")
)
Note: both server and executor mount your local temp folder into the container. Code can read/write files there, but inside the Jupyter kernel, the working directory is /app, not temp.
Next, create the CodeExecutorAgent. Just pass the executor instance to the code_executor parameter.
code_executor = CodeExecutorAgent(
"code_executor",
code_executor=executor,
)
Now write a main method to test coder_executor.
async def main():
async with executor:
code1 = TextMessage(
content=dedent("""
```python
x = 1+2
print("Round one: The calculation for the value of x is done.")
“”“), source=“user” ) response1 = await code_executor.on_messages(messages=[code1], cancellation_token=CancellationToken()) print(response1.chat_message.content)
code2 = TextMessage( content=dedent(“”“
print("Round two: Get the value of variable x again: x=", x)
“”“), source=“user”, ) response2 = await code_executor.on_messages(messages=[code2], cancellation_token=CancellationToken()) print(response2.chat_message.content)
asyncio.run(main())
To check stateful execution, call `code_executor` twice:
First, define a variable `x` and compute something\.
Second, print `x`\.
In a command-line sandbox, this fails—the second run doesn’t know about `x`\. But with Jupyter’s stateful kernel, the variable stays alive between calls \(as long as you use the same executor\):
The code in the next round was able to access the variables from the previous round\. Image by Author
I’ve already shown how this stateful sandbox helps agents solve hard problems\. Read more here:
[How I Crushed Advent of Code And Solved Hard Problems Using Autogen Jupyter Executor and Qwen3A detailed guide on using AI to generate code and solve puzzles automatically and quicklyData Leads FuturePeng Qian](https://www.dataleadsfuture.com/how-i-crushed-advent-of-code-and-solved-hard-problems-using-autogen-jupyter-executor-and-qwen3/)
This method—starting a Jupyter container from an image via code—is called “Docker out of Docker\.”
### Problems with Docker out of Docker
If you’re just testing Jupyter’s superpowers on your local machine, `DockerJupyterServer` works fine\.
But the big issue? The Jupyter Server actually starts on the same machine running your agent code\.
This breaks down if you need serious compute power, or plan to deploy to production:
For data security or performance, companies often use powerful internal Jupyter Servers\. If your data is gigabytes big, you need a server with tens of GBs of RAM—not your laptop\.
Things get worse if you containerize your agent app\. Due to network isolation, your agent container might start a Jupyter container but fail to reach it\.
You wouldn’t run both agent and Jupyter on the same web server\. Instead, deploy Jupyter on a dedicated compute server and let multiple agents share it—maximizing hardware use\.
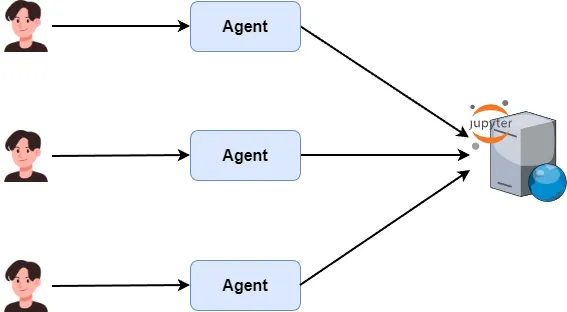You can let multiple agents access the same Jupyter Server\. Image by Author
For example, I rented a GPU server on vast\.ai, set up JupyterLab, and want my agent to connect directly for data analysis\.
### Let agents connect to the Jupyter Server directly
By now it’s clear: to use external compute power, your agent must connect to a pre-deployed Jupyter Server—not spin up its own\.
You won’t find this solution anywhere online\.
So here’s today’s key reveal: how to connect your multi-agent app to a self-hosted Jupyter Kernel server—for low cost \(vs\. Azure/Claude\) and high compute power\.
****Here’s what you’ll discover next:****
1. How to connect directly to a self-hosted Jupyter service for enterprise-grade agent code sandbox deployment\.
1. Use Docker Compose to manage your Jupyter code sandbox—easier, cleaner, and way more fun\.
1. Tweak your Jupyter image settings to automatically reclaim idle compute resources \(no more wasted GPUs\!\)\.
1. Build a simple multi-agent app and see firsthand how this sandbox supercharges complex problem-solving\.
1. Can LangChain and other agent frameworks tap into this power too? Spoiler: absolutely—and we’ll show you how\.
💡 ****Unlock Full Access for Free\!****
Subscribe now to read this article and get instant access to ****all exclusive member content \+ join our data science community discussions\.****