Things used in this project
Story
Imagine having a miniature weather station right on your desk - compact, modern, and smart. With this Arduino-based Tabletop Weather Station, you can monitor real-time temperature and humidity using a DHT 11 sensor and display the data on a 0.96-inch OLED screen.
This project is perfect for students, makers, and hobbyists who want to learn about IoT fundamentals, sensor integration, and data visualization.
Whether you’re working on a school project or improving your smart home setup, this mini weather station will add a professional touch to your workspace.
Supplies
- Arduino Uno x1: Main controller & humidity
- DHT11 Sensor x1: Measures temperatures & humidity
- SSD1306 Display (0.96“) x1: 128x64 I2C screen for data display
- Jumpe…
Things used in this project
Story
Imagine having a miniature weather station right on your desk - compact, modern, and smart. With this Arduino-based Tabletop Weather Station, you can monitor real-time temperature and humidity using a DHT 11 sensor and display the data on a 0.96-inch OLED screen.
This project is perfect for students, makers, and hobbyists who want to learn about IoT fundamentals, sensor integration, and data visualization.
Whether you’re working on a school project or improving your smart home setup, this mini weather station will add a professional touch to your workspace.
Supplies
- Arduino Uno x1: Main controller & humidity
- DHT11 Sensor x1: Measures temperatures & humidity
- SSD1306 Display (0.96“) x1: 128x64 I2C screen for data display
- Jumper Wires as required : For circuit connections
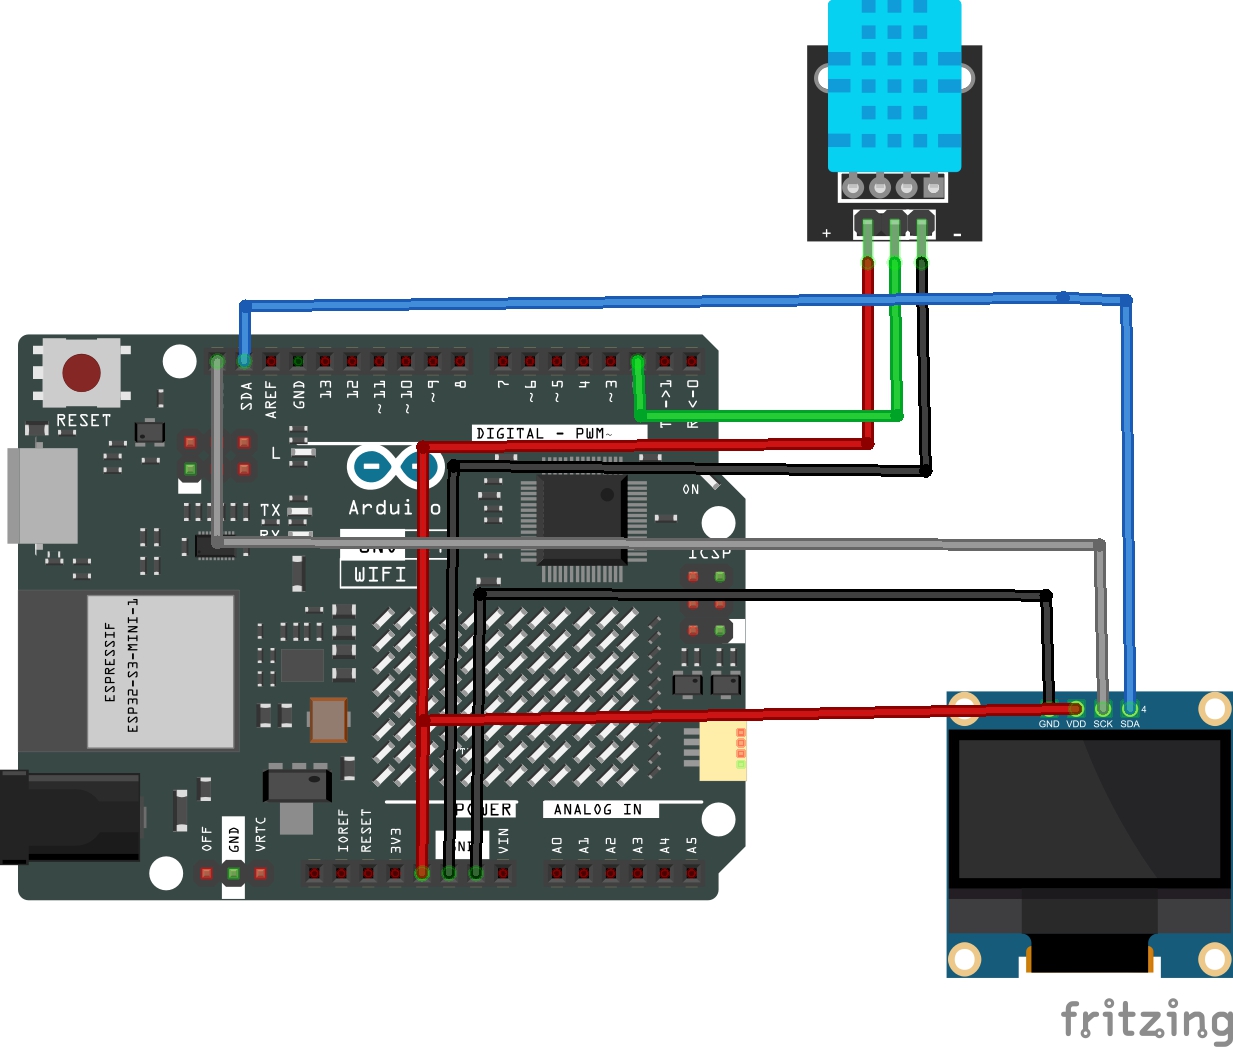
Step 1: Circuit Diagram & Wiring
Connect your components according to the table below:
- DHT 11 Signal to Arduino Pin D2
- DHT 11 GND to Arduino’s GND Pin
- DHT 11 VCC to Arduino’s 3.3v Pin
- OLED VCC to Arduino’s 5v Pin
- OLED GND to Arduino’s GND Pin
- OLED SCL to Arduino’s SCL Pin
- OLED SDA to Arduino’s SDA Pin
Tip: Ensure your OLED I2C address is set to 0x3c. You can use an I2C scanner sketch if unsure.
Step 2: Installing Libraries
To make your project run smoothly, open your Arduino IDE and install these libraries:
- Adafruit SSD1306
- Adafruit GFX Library
- DHT Sensor Library
Install them via:
Sketch -> Include Library -> Manage Libraries...
Then search each one by name and click Install.
Step 3: Upload the Code
Now It’s time to program your Arduino.
here’s the full, ready-to-upload code:
#include <Wire.h>#include <Adafruit_GFX.h>#include <Adafruit_SSD1306.h>#include <DHT.h>// ==== OLED SETTINGS ====#define SCREEN_WIDTH 128#define SCREEN_HEIGHT 64#define OLED_ADDR 0x3CAdafruit_SSD1306 display(SCREEN_WIDTH, SCREEN_HEIGHT, &Wire, -1);// ==== DHT SETTINGS ====#define DHTPIN 2#define DHTTYPE DHT11DHT dht(DHTPIN, DHTTYPE);void setup() {Serial.begin(115200);delay(1000);Serial.println("Initializing DHT11 + SSD1306 OLED...");if (!display.begin(SSD1306_SWITCHCAPVCC, OLED_ADDR)) {Serial.println("❌ SSD1306 not found! Check wiring or I2C address.");while (1);}display.clearDisplay();display.setTextColor(SSD1306_WHITE);display.setTextSize(1);display.setCursor(20, 25);display.println("Initializing...");display.display();dht.begin();delay(2000);}void loop() {delay(2000);float humidity = dht.readHumidity();float temperature = dht.readTemperature();if (isnan(humidity) || isnan(temperature)) {Serial.println("⚠️ Failed to read from DHT11 sensor!");display.clearDisplay();display.setTextSize(1);display.setCursor(25, 25);display.println("Sensor Error!");display.display();return;}int tempInt = (int)temperature;int humInt = (int)humidity;Serial.print("Temperature: ");Serial.print(tempInt);Serial.print(" °C | Humidity: ");Serial.print(humInt);Serial.println(" %");display.clearDisplay();display.setTextSize(1);display.setCursor(35, 0);display.println("DHT11 DATA");display.setTextSize(1);display.setCursor(0, 20);display.print("Temp: ");display.print(tempInt);display.println(" C");display.setCursor(0, 40);display.print("Hum : ");display.print(humInt);display.println(" %");display.display();}
Once uploaded, open the Serial Monitor (115200 baud) to view live readings.
Step 4: View Live Data
The OLED screen will now display your room’s:
DHT11 DATATemp: 28 CHum : 62 %
Readings update every two seconds, allowing you to observe temperature and humidity changes in real-time.
Step 5: Future Enhancement
This basic project can easily evolve into a more advanced IoT station. Here are some exciting next steps:
IoT Control
Upgrade You Arduino to the UNO R4 Wi-Fi and connect your weather station to your cloud or Blynk app for real-time monitoring.
Audio/Visual Feedback
Add a buzzer or RGB LED that reacts to environmental changes - for example, blinking when humidity exceeds 70%
Taking It to the Next Level - With JUSTWAY
Your prototype works - but if you plan to showcase it at an exhibition, tech fair, or investor demo, presentation is key.
This is where JUSTWAY turns your DIY project into a professional-grade prototype that looks as impressive as it performs.
JUSTWAY - The Future of Hardware Prototyping
JUSTWAY isn’t just another fabrication company - it’s a creator’s launchpad.
From rapid prototyping to full scale production, JUSTWAY helps makers, startup, and engineers bring their ideas to life with precision, quality, and style.
What JUSTWAY Offers
**CNC Machining: **Choose from 6061 aluminum or 304 stainless steel for strong, sleek, and durable enclosures - ideal for polished weather stations or IoT devices.
Sheet Metal Fabrication: Laser-cut and CNC-bent panels with powder-coated finishes give your device an industrial, professional appearance ready for deployment.
Injection Molding: Ready to scale up? JUSTWAY supports mass production with precision injection molding for durable, consistent results.
**Urethane Casting: **Perfect for small batches or presentation models, giving your project that production-ready look during early filed testing.
3D Printing (SLA/HP-PA12)
- SLA Resin (Transparent): Ideal for showcasing your internal electronics, LEDs and Arduino boards.
- HP-PA12 Nylon (Matte Black): A sleek, stealth-engineered design that feels premium and futuristic.
Pro Maker Tip: Want your project to look like it came straight out of a sci-fi movie? Choose transparent SLA resin for a techy, illuminated look - or matte HP-PA12 for a stealthy, minimalist design.
How to Get Started with JUSTWAY ( 4 Easy Steps)
- Upload your CAD files at JUSTWAY.com
- Select your material and surface finish
- Preview your 3D model in real-time
- Place your order - transparent pricing, fast delivery, zero hidden fees.
JUSTWAY - Turning Your Ideas into Reality:
Whether you’re a student, a hobbyists or a hardware startup,JUSTWAY helps bridges the gap between imagination and production.
Transform your breadboard-based weather station into a professional IoT device with industry-level quality and aesthetics.
JUSTWAY ensures your projects don’t just function beautifully, but also look the part when its time to present them to the world.
From transparent display cases to robust enclosures - JUSTWAY makes your prototype look as good as it performs.
Conclusion
You’ve built a Tabletop Weather Station that blends creativity, coding, and engineering. With simple components like the DHT11 sensor and SSD1306 OLED display, you now have a compact device that visualizes real-time environmental data.
But why stop there?
With JUSTWAY, you can take your weather station from a simple prototype to a professional-grade IoT product ready to showcase, scale, or sell.
So go ahead - built it, prefect it, and present it proudly
**Read more
Schematics