ESPHome makes adding a display to your smart home setup more accessible than ever. You can start with a simple DIY project by connecting a basic screen to an ESP32 board, or choose from a growing ecosystem of pre-built displays that work with ESPHome right out of the box.
If you’ve used ESPHome, you know it’s a straightforward way to turn microcontrollers into smart devices that integrate seamlessly with Home Assistant. But when it comes to picking a display, the options can feel overwhelming — OLED, LCD, ePaper, DIY or ready-made… which path is right for you?
This guide breaks it down into four clear parts. Whether you’re building a basic status screen or a full…
ESPHome makes adding a display to your smart home setup more accessible than ever. You can start with a simple DIY project by connecting a basic screen to an ESP32 board, or choose from a growing ecosystem of pre-built displays that work with ESPHome right out of the box.
If you’ve used ESPHome, you know it’s a straightforward way to turn microcontrollers into smart devices that integrate seamlessly with Home Assistant. But when it comes to picking a display, the options can feel overwhelming — OLED, LCD, ePaper, DIY or ready-made… which path is right for you?
This guide breaks it down into four clear parts. Whether you’re building a basic status screen or a full-featured interactive hub, we’ll help you choose the right display type for your skills, budget, and goals.
Key Advantages of Using ESPHome for Displays
ESPHome streamlines the entire process of creating smart displays, offering distinct benefits that set it apart from traditional microcontroller programming:
- **Simplified Configuration: **Use straightforward YAML-based setup instead of complex low-level coding, significantly reducing development time.
- Native Home Assistant Integration: Directly access and display any entity data from your smart home ecosystem and trigger automations with minimal configuration.
- **Hardware Flexibility: **The same core configuration can adapt across different display technologies—from basic OLEDs and color LCDs to low-power ePaper—allowing easy hardware upgrades without rewriting your core logic. ESPHome Logo
DIY ESPHome Display with PMOLED (The Perfect Starting Point, around $10)
Begin your display journey with the most accessible combination: PMOLED screens paired with ESP32 boards. This setup is low-cost, widely available, and delivers immediate, satisfying results.
Why PMOLED is Best for Beginners
While AMOLED offers better performance for color displays, PMOLED provides the perfect balance of affordability and simplicity for monochrome projects. The PMOLED + ESP32 combination significantly reduces common beginner hurdles:
- **Minimal Wiring: **The I²C interface requires only four connections.
- **Proven Compatibility: **It’s one of the most tested and documented setups in the ESPHome community.
- **Instant Gratification: **Go from unboxing to displaying sensor data in under an hour.
Hardware Setup
A classic choice is an budget-friendly PMOLED display using the SSD1306 driver chip over the I²C interface. These screens are lightweight, inexpensive, and easy to connect to your ESP32 or ESP8266 with just four wires. The 0.96-inch 128×64 model is most common, though other SSD1306-based sizes like 0.66-inch work just as well—just update the resolution in your ESPHome YAML.
ESPHome Display with a PMOLED + ESP32
Real-world Ideas
- Morning Greeter: A tiny OLED in your entryway that cycles through key info: indoor temperature/humidity, the current weather, and whether family members are home.
- **Focus Clock: **On your desk, a small screen displaying the time, a “focus mode” timer, and notifications from Home Assistant — minimal yet functional. A simple and tiny ESPHome display built with a 0.96″ OLED and an ESP8266 D1 Mini, originally shared by tejasitraj on GitHub.
Build with Seeed
👉 For the ultimate budget-friendly start, pair the Seeed Studio XIAO ESP32-C3 ($4.99) with a Grove OLED Display 0.66″ (SSD1306)(~$5.50) and a 4-Pin Conversion Cable($3.5). This ~$14 combo is all you need to complete the projects in this section. The ESP32-C3 is perfectly capable of driving this display over I²C, making it the most affordable and fully functional gateway into ESPHome.
Thinking ahead? If you plan to upgrade to a larger SPI screen or add many sensors later, the XIAO ESP32-S3 ($7.49) is a worthwhile investment for its greater expandability and power. But for Level 1, the C3 is more than enough.
DIY ESPHome Display Using LCD
After experimenting with basic OLED displays, LCD technology opens up possibilities for full-color, high-refresh-rate dashboards that bring your data to life with vibrant visuals.
Hardware Setup
A widely adopted configuration involves a 2.4-inch or 2.8-inch LCD module equipped with an ST7789 driver IC. This combination offers a cost-effective, well-supported solution that integrates smoothly with ESPHome.
Integration Guide
Connect the display to your ESP32 via the SPI interface—only a few pins are required. You can then use ESPHome’s built-in components to visualize sensor readings, text labels, and graphical elements in real time.
Project Ideas
🖥️ Smart Home Status Panel Build a dedicated, color-rich display for your essential Home Assistant data—perfect for a quick, at-a-glance overview. Show Wi‑Fi strength, battery levels, ambient temperature, or any entity you choose. Ideal if you enjoy designing clean, informative dashboards that focus on visual monitoring.
An ESPHome display built with an ILI9341 3.2″ TFT LCD and an ESP32, originally shared by tejasitraj on GitHub.
👆 Smart Home Control Panel Create a touch‑enabled dashboard using an LCD with a touch controller (like a resistive XPT2046). Directly manage lights, thermostats, and smart plugs right from the wall, while also viewing live data. Perfect for building a command center that combines full‑color visual feedback with tactile interaction.
Make it with Seeed
The Seeed Studio XIAO ESP32-S3 is ideal for driving SPI-based LCD screens with its dual-core processor and abundant GPIO pins. Pair it with a 2.4” TFT LCD, or 2.8” TFT touch screen, and you have a vibrant, fully customizable smart dashboard setup ready for ESPHome.
ESPHome Display Using ePaper
For displays that quietly blend into your environment—visible all day while sipping minimal power—ePaper technology offers unique advantages for always-on applications.
Hardware Setup
For DIY enthusiasts, standalone ePaper modules (like 2.9” or 4.2” panels) work great with ESP32 boards via SPI connection. These displays only consume power during refresh cycles, making them ideal for battery-powered applications.
Project Idea
🗓️** Smart Calendar & Schedule Board** — Display your daily schedule, to-do lists, and upcoming events as a persistent, glare-free central hub.
An ePaper display project built with a Seeed Studio XIAO 7.5″ ePaper Panel, originally shared by u/RMB– on Reddit.
Make it with Seeed
There are two ways to build your own ESPHome ePaper display:
- Modular setup (requires soldering): XIAO ESP32-C3 or S3 + the XIAO ePaper Driver Board + black-and-white or color ePaper display This option offers flexibility for those enjoy assembling and customizing their projects.
- **All-in-one setup (for a faster, no-soldering experience):
**XIAO ePaper Display Board (which already includes the XIAO ESP32 S3 Plus) and connect it directly to your ePaper screen. It delivers higher performance, built-in connectivity — ideal if you just want to plug in and start creating.
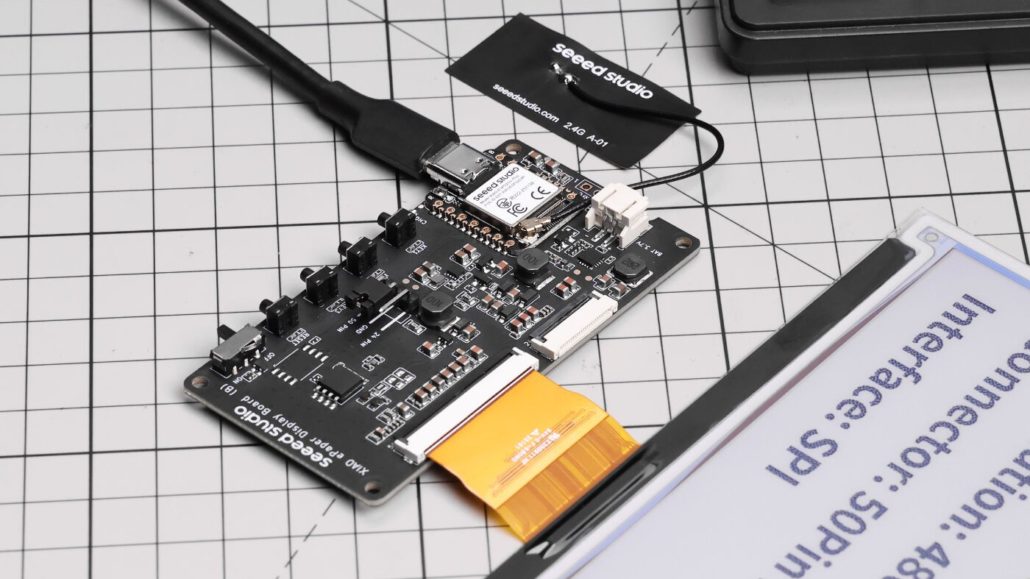 XIAO ePaper Display Board(ESP32-S3)
If you prefer a professional, ready-to-use solution, the Seeed Studio reTerminal E series provides a pre-assembled, ESPHome-compatible ePaper smart display. It’s the simplest way to incorporate a sophisticated ePaper dashboard into your smart home. (More details in the last section)
ESPHome-Ready Display Devices
When you’re ready to move beyond basic DIY projects, pre-integrated display devices offer polished solutions that handle hardware complexity so you can jump straight into customizing your interface with ESPHome.
Why Choose a Pre-Integrated ESPHome Display?
Devices designed for ESPHome provide a stable foundation for interactive projects, with several practical benefits:
**Optimized for Home Assistant: **Hardware and software are pre-configured to work seamlessly with ESPHome, reducing setup time and compatibility issues.
**Hardware Reliability: **Get a thoroughly tested system with guaranteed compatibility between display, controller, and power components.
**Ready-to-Run Design: **Get a fully integrated system out of the box—no soldering, wiring, or mechanical fabrication required. Ideal for those who prefer to focus on software and dashboard design rather than hardware assembly.
Seeed Studio’s ESPHome-Capable Display
SenseCAP Indicator D1
The SenseCAP Indicator D1 is an open-source touch display built around the ESP32-S3 and RP2040. It supports ESPHome out of the box, enabling developers to quickly build dashboards or control panels for scenarios such as climate monitoring, energy tracking, or smart home control. (SenseCAP Indicator D1S/Pro has built-in environmental sensors)
For more details, see the SenseCAP Indicator D1 page on the official ESPHome Device Repository: https://devices.esphome.io/devices/seeed-sensecap/
The SenseCAP Indicator D1, featuring a 4-inch touch screen powered by an ESP32 and RP2040 dual-MCU architecture.
reTerminal E epaper
The reTerminal E Series, available in both black/white and color ePaper versions, provides a complete display solution fully compatible with ESPHome. Based on ESP32, it delivers an always-on, low-power screen ideal for smart home displays, information panels, or environmental monitoring. This pre-assembled package includes everything you need—no extra setup required.
*reTerminal E e ink display *
Find Your Perfect ESPHome Display
ESPHome provides multiple paths to enhance your smart home with the right display. From a basic DIY setup to a fully integrated device, you can apply the same configuration skills across different hardware. Whether you prefer hands-on learning with a $10 starter kit or ready-to-use functionality, the perfect solution awaits.
Your perfect smart home display awaits—all powered by the unified, Home Assistant-native experience that ESPHome provides.