Published November 3, 2025
Written by
We may earn from vendors via affiliate links or sponsorships. This might affect product placement on our site, but not the content of our reviews. See our Terms of Use for details.
Create, assign, and manage Zoom breakout rooms with ease. This step-by-step guide helps hosts and IT admins run smooth and organized sessions.
Breakout rooms are one of Zoom’s most useful collaboration tools, allowing hosts to divide participants into smaller groups for focused discussions, workshops, or training sessions. For IT professionals, understanding how to configure, launch, and monitor these rooms is critical for smooth operations, especially in large or hybrid meetings.
This guide walks you through eve…
Published November 3, 2025
Written by
We may earn from vendors via affiliate links or sponsorships. This might affect product placement on our site, but not the content of our reviews. See our Terms of Use for details.
Create, assign, and manage Zoom breakout rooms with ease. This step-by-step guide helps hosts and IT admins run smooth and organized sessions.
Breakout rooms are one of Zoom’s most useful collaboration tools, allowing hosts to divide participants into smaller groups for focused discussions, workshops, or training sessions. For IT professionals, understanding how to configure, launch, and monitor these rooms is critical for smooth operations, especially in large or hybrid meetings.
This guide walks you through everything you need to know about creating and managing breakout rooms in Zoom: from enabling the feature and assigning participants to using host controls, recording sessions, and avoiding common pitfalls.
Before learning how to create breakout rooms in Zoom, make sure your account and client setup meet the requirements.
- You have a Zoom licensed account: Breakout rooms must be enabled in the Zoom web portal by an admin.
- You updated the Zoom desktop client: Available for Windows, macOS, or Linux (mobile apps have limited control features).
- You have host or co-host privileges: Only hosts and co-hosts can create and manage rooms.
- **You’ve turned on optional add-ons: **The Large Meeting add-on may be required for sessions with more than 300 participants.
Step 1: Enable breakout rooms in the Zoom web portal
- Sign in to the Zoom web portal as an admin or user with permission.
- Go to Settings > In Meeting (Advanced).
- Scroll to Breakout Room and toggle it on.
- Optional: Check “Allow host to assign participants when scheduling” if you plan to pre-assign rooms. This setting applies to all future meetings unless you disable it again.
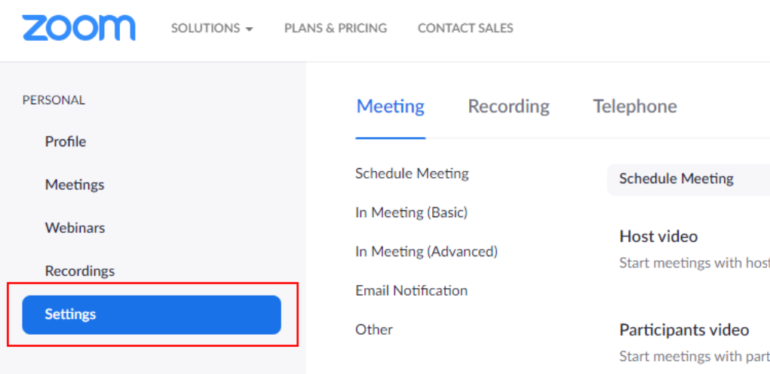 Click on Settings to get started with your breakout rooms setup. (Image: Hunter College Campus)
Step 2 (optional): Pre-assign breakout rooms
Pre-assigning rooms saves time for training sessions, classrooms, or recurring meetings where the same participants need to work together.
- When scheduling a meeting in the web portal, check the **Breakout Room pre-assign **box.
- Choose Create Rooms to add participants manually by name or email.
- Alternatively, import a CSV file containing room names and participant email addresses.
- Save your meeting.
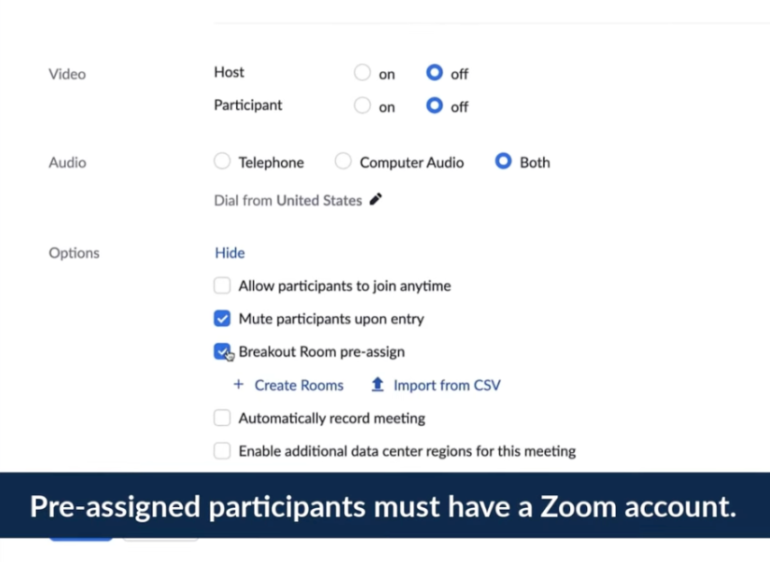 Click on Breakout Room pre-assign. (Image: YouTube)
Participants must sign in with the exact email used in the pre-assign list. Otherwise, they won’t be automatically placed in the correct room.
Step 3: Create breakout rooms during a live meeting
If you haven’t pre-assigned rooms, you can create them once the meeting starts.
-
As the host, click the Breakout rooms icon in the toolbar.
-
Select the number of rooms you want to create.
-
Choose how to assign participants:
-
**Automatically: **Zoom divides participants evenly across rooms.
-
**Manually: **You select which participants go into each room.
-
Let participants choose: This enables self-selection, allowing users to join or switch rooms on their own (requires an updated client).
-
Click Create, then configure room options before opening them.
 Click on the Breakout rooms icon.
Step 4: Configure breakout room options
Before launching, click the Options button in the breakout rooms panel.
- Automatically move participants into rooms.
- Allow participants to return to the main session at any time.
- Set a timer and automatically close rooms after a specified duration.
- Notify the host when the breakout time is over.
- Save current assignments for future recurring meetings.
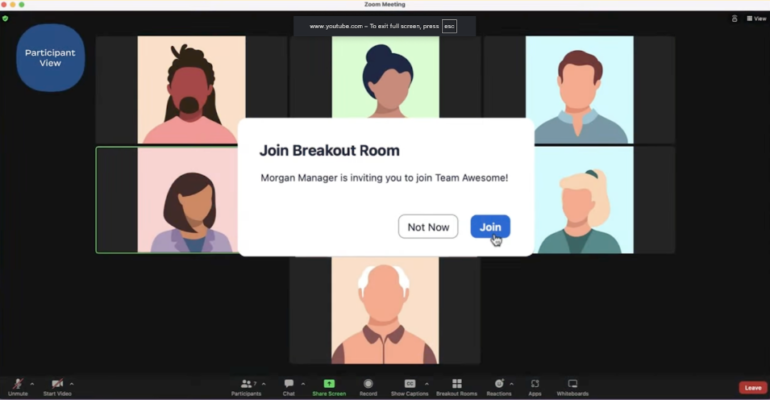
Once the settings look right, click Open All Rooms. Participants will receive a prompt to join.
 Move participants to the appropriate breakout room. (Image: YouTube)
Did you know that you can easily offer support to participants even during breakout sessions? Instruct them to click Ask for Help inside their respective breakout rooms anytime they need to reach out. You’ll receive a pop-up notification in the main meeting window with the participant’s name and room number. Click Join Breakout Room to go directly to that group.
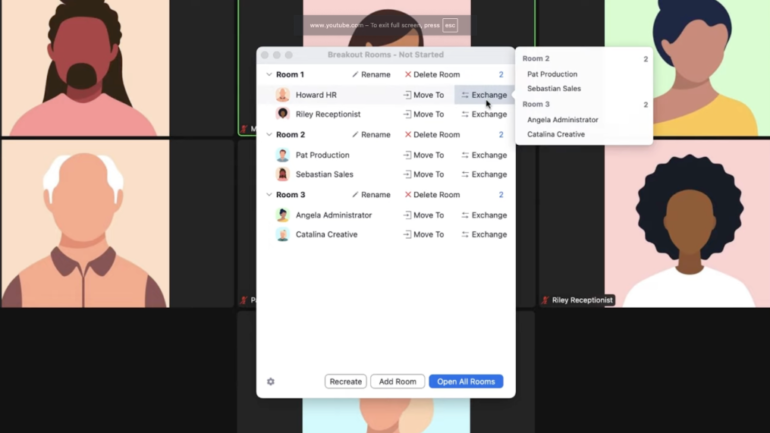
Step 5: Manage breakout rooms during the session
Once rooms are active, you’ll see the status of each in your breakout rooms panel.
- You can join or leave any room. Select a room and click Join to enter it. Click Leave Room to return to the main session.
- To move or exchange participants, use Move To or Exchange to balance groups. The panel shows which rooms are active and how many participants are in each.
Click **Broadcast Message **to send a short text note (up to 200 characters) to every breakout room. You can also use your microphone to broadcast your voice or simultaneously share your screen with all the breakout room participants.
 Click the Join button. (Image: YouTube)
 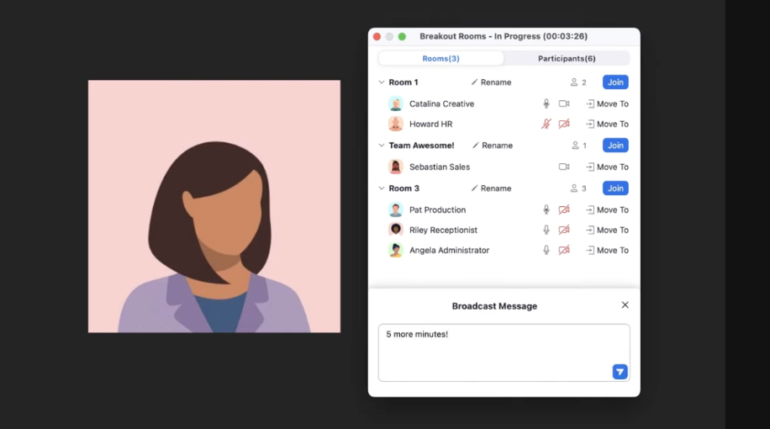 Send a quick note through the Broadcast Message functionality. (Image: YouTube)
Pro tip: Broadcast messages are ideal for time updates or instructions. Keep them short, as Zoom messages appear for about 10 seconds and can’t be recalled.
Step 6: Recording in breakout rooms
Breakout room recording has specific behavior to note:
- Cloud recording only captures the main meeting, not breakout sessions.
- Local recording must be enabled by the host, who can grant permission to one or more participants per room.
Each local recording is stored on that participant’s computer. You’ll need to collect files manually after the meeting if you want centralized copies.
To enable this feature:
- In the meeting controls, click Participants > hover over a name > click More > Allow Record.
- Remind recorders to start recording after entering their breakout room.
Step 7: Closing breakout rooms
When time’s up, click Close All Rooms. Participants will see a 60-second countdown before returning to the main session (adjustable in settings).
Once everyone’s back, you can share takeaways, answer questions, or reopen rooms for another round of discussion.
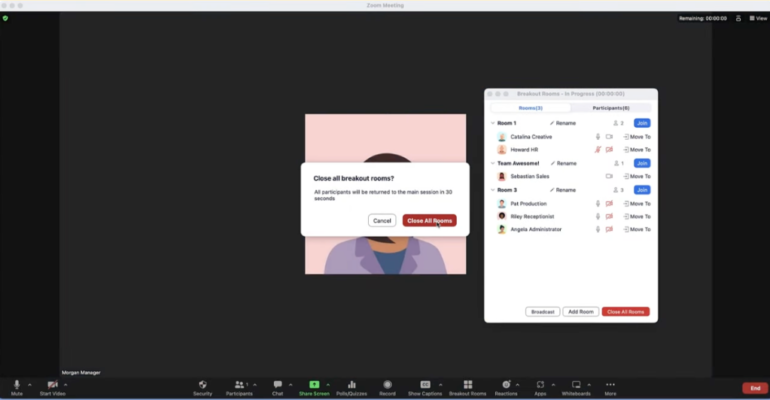 Simply hit “Close all Rooms” to end the breakout session. (Image: YouTube)
Why Zoom remains a top choice for conducting breakout sessions
Many organizations and educational institutions rely on virtual platforms to facilitate breakout sessions and focus-group discussions. Zoom’s breakout rooms continue to be one of the most popular collaboration tools, particularly for training, workshops, and moderated discussions. Its flexibility in pre-assigning participants, broadcasting messages, and room monitoring gives hosts control that other platforms often lack.
For organizations running large virtual events or hybrid meetings, Zoom’s breakout rooms make it easy to scale collaboration securely and efficiently. Explore advanced features or increase participant capacity to meet your specific business needs.
Troubleshooting common issues
This troubleshooting table I’ve created helps hosts and IT admins quickly identify common issues, their possible causes, and steps to resolve them.
| Common issues | Possible causes | Recommended fix |
|---|---|---|
| Pre-assignments not working | + Participants not signed in with the same email as in the CSV + Guests or unauthenticated users not automatically placed | + Ask participants to sign in using their assigned email + Manually assign guests during the live meeting |
| Broadcast message won’t send | + Outdated Zoom desktop client + “Broadcast message to all rooms” is disabled in account settings | + Update the Zoom desktop client + Enable the broadcast setting in the Zoom web portal |
| Participants can’t choose rooms | + Self-select feature is not supported in older clients, browsers, or mobile apps + Participants using outdated software | + Have attendees update their Zoom desktop app + Manually assign mobile or browser users to rooms |
| Breakout room button missing | + Breakout rooms not enabled in web portal settings + User lacks host or co-host privileges | + In Settings, select In Meeting (Advanced), toggle on Breakout Room + Confirm you’re signed in as host or co-host |
Zoom breakout room limitations
While Zoom breakout rooms are one of the most efficient ways to conduct smaller group discussions, you should be aware of certain limitations. For one, it currently supports up to 100 breakout rooms per meeting and up to 1,000 pre-assigned participants (depending on your plan and account type). Hosts can move between rooms, but co-host permissions may vary by configuration.
As for the recordings, note that cloud recordings only capture the main meeting room. If you need recordings from inside breakout rooms, participants must record locally with host permission enabled. Each recording is saved to the local device and must be collected after the session.
Best practices when handling Zoom breakout sessions
Even with the right setup, managing breakout rooms requires planning and attention to detail. These practical tips help hosts and IT facilitators run sessions that stay organized, on schedule, and free from common disruptions.
Run a practice session before the live event
Testing the breakout room process in advance ensures all configurations work as intended, especially when pre-assigning participants or using advanced features like self-selection or broadcasting.
A short dry run allows you to identify software version issues, permissions conflicts, or audio problems before participants experience them. It also gives co-hosts and moderators a chance to rehearse transitions and clarify their roles.
Use descriptive room names
Label each breakout room clearly (e.g., Team A: Development, Team B: QA) so participants instantly know where to go. Descriptive naming reduces confusion during setup and simplifies monitoring during the session.
It’s especially helpful when dealing with large groups or when multiple co-hosts are managing separate discussions. A consistent naming convention also helps late joiners or external guests find their assigned groups quickly.
Assign a co-host for support
Having a co-host is essential for large or complex meetings. They can monitor chat, assist users struggling to join their rooms, and handle troubleshooting without interrupting the flow of the session. Co-hosts can also manage timing, broadcast messages, and reassign participants if needed. This shared responsibility keeps the primary host focused on facilitation, not technical management.
Keep the main room open
Always keep the main meeting room active as a central help area. This allows latecomers, disconnected participants, or those experiencing technical difficulties to rejoin the session without disrupting active breakouts.
It’s also a safe space for the host or co-host to make quick announcements or resolve issues privately. Treat the main room as your session control center: It should remain accessible until all breakouts conclude.
Use countdown timers and closing announcements
Timers and closing notifications help wrap up discussions smoothly. Setting a visible countdown gives participants time to finalize key points and prepare to rejoin the main room. Broadcasting a short closing message or reminder ensures everyone transitions together, avoiding confusion or abrupt cutoffs. These small touches maintain structure, professionalism, and a positive meeting experience.
Related read:
- Zoom Phone Review (2025): Should You Pick Metered Calling?
- The 36 Best Realistic Zoom Virtual Backgrounds for Meetings
- Zoom: A cheat sheet about the video conferencing solution
Frequently asked questions (FAQs)
Can co-hosts create and manage breakout rooms?
Yes, co-hosts can manage breakout rooms once they’re created, but cannot create them initially. The main host must set them up.
Do participants need a Zoom account to join breakout rooms?
No, guests can join breakout rooms. However, if you pre-assign rooms, only authenticated users who sign in with their registered email will be correctly placed.
Can breakout rooms be created after the meeting starts?
Yes. You can create, rename, or delete rooms during a live session, even after participants have joined.
Can I move participants between breakout rooms after they’re open?
Absolutely. Use the Move To or Exchange options in the Breakout Rooms panel to reassign participants in real time.
Can I record all breakout rooms at once?
Not centrally. Only the main session can be cloud-recorded. To record breakouts, enable local recording for one participant per room.
Jameli Jimenez
Jame is a Senior Content Editor at TechnologyAdvice.com, specializing in VoIP and office technology. She leads developmental edits on topics related to business communication solutions, cloud-based phone systems, and workplace technology trends. With a background in corporate communications, her work has been featured in publications such as CNBC, Medium, and Thrive Global.