(this article is cross-posted on my personal blog)
Making a game on a custom bytecode VM in 7 days and 3kB
In the last few days, I built a shoot ’em up game by embedding a tiny custom bytecode VM and rendering the graphics using a fullscreen pixel shader. The result is a 3kB Windows executable.
This was done for Langjam Gamejam, a 7-day challenge where you create a programming language and then use it to build a game.
The project combines several interests of mine: language tooling, game development, procedural gr…
(this article is cross-posted on my personal blog)
Making a game on a custom bytecode VM in 7 days and 3kB
In the last few days, I built a shoot ’em up game by embedding a tiny custom bytecode VM and rendering the graphics using a fullscreen pixel shader. The result is a 3kB Windows executable.
This was done for Langjam Gamejam, a 7-day challenge where you create a programming language and then use it to build a game.
The project combines several interests of mine: language tooling, game development, procedural graphics, and demoscene-style size constraints. The game jam format forced me to keep the scope small and explore new ideas. Also, it was fun!
As always, my code is on GitHub.
The context
When I first heard about the game jam, I immediately got interested. I thought for a few days, as it’s not easy to find a game concept that would benefit from a new language (apart from, well, programming games like TIS-100).
Then I remembered demoscene productions that used custom bytecode to make things smaller. An example that came to mind was Ikadalawampu, a 2010 demo in 4kB that runs on Amiga. I was still a bit skeptical: is it really worth embedding an interpreter, just to make the actual code smaller? I had to give it a try.
Another inspiration of mine has been the first-person shooter video game, kkrieger, made in 2004 and that fits in 96kB. Since then, we’ve rarely seen good video games that were size-coded. Exploring this domain has been on the side of my mind for a while.
With all that in mind, I thought the game jam would be a good excuse for exploratory work.
The plan
- Design a language.
- Implement a compiler to compile it to bytecode, using F#.
- Write a bytecode interpreter, using C++.
- Create a shoot’em up game, using the custom language.
- Render the graphics, using a single GLSL shader.
Although the design choices were made with size-coding in mind, I also didn’t want to spend time optimizing the code. I originally estimated that the game would fit in 4 to 8kB, so I named the project shmup8. The executable turned out to be smaller than expected, but it’s also because I didn’t include music or 3D graphics. As always, the shader code is minified and the executable compressed with Crinkler.
Live-coding workflow
Coding is much more fun when there’s instant visual feedback. I wanted to be able to write the entire game logic and visuals without recompiling C++ code. The idea was to run the executable once, then iterate entirely through live reload.
Each time I edit the source code in my IDE, my custom compiler is invoked, it dumps bytecode in a file. Then the C++ project reloads the bytecode that it executes at every frame. In a similar way, the GLSL shader is also reloaded automatically when edited.
Early development screenshot: the game running on the top left, the custom language on the bottom left, the GLSL shader on the bottom right, and the console logs on the top right. As the custom language sends data to be displayed by the shader, having two live-coding environments makes it very easy to iterate.
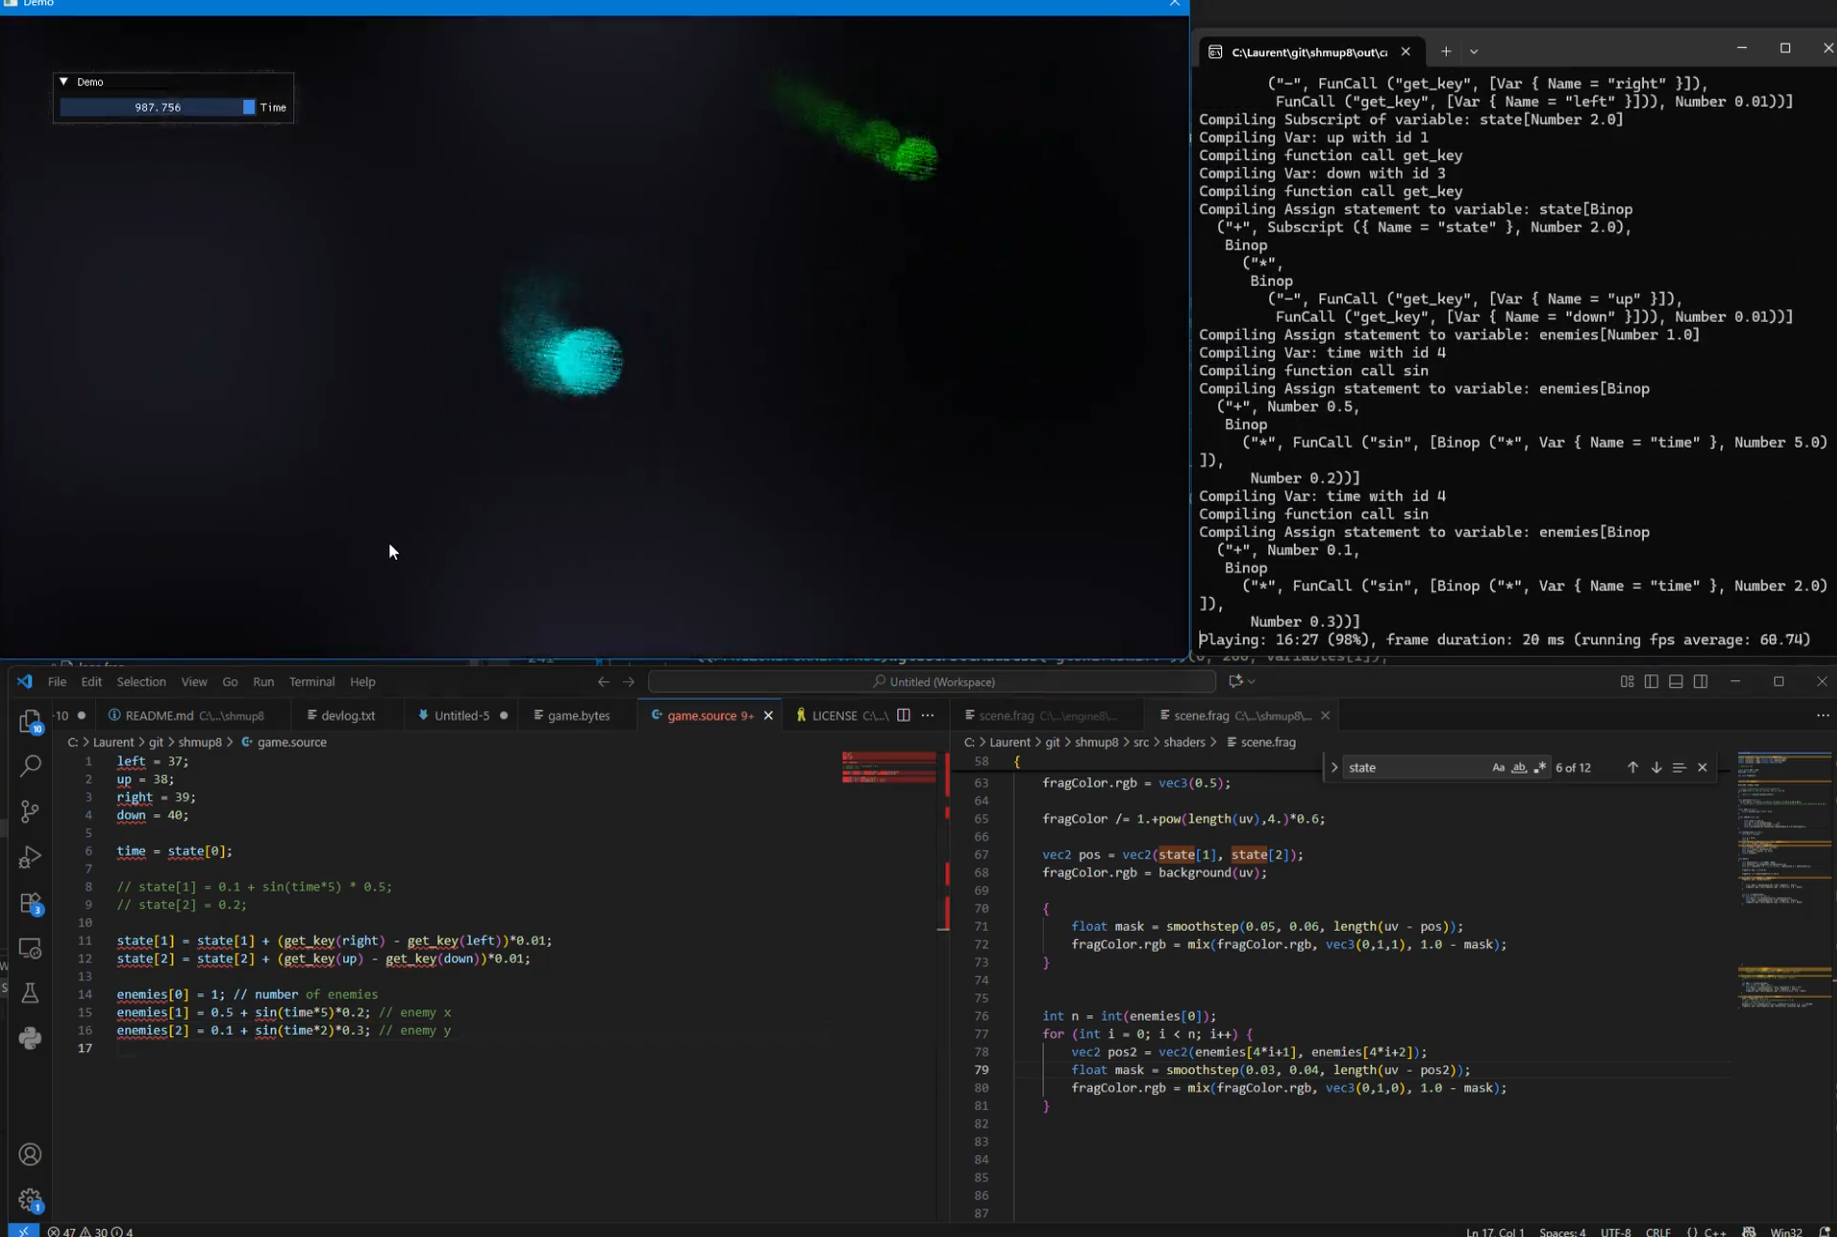
Rapid iteration is a critical feature for productivity, especially in creative environments where you can hardly predict what will feel good.
Bytecode design
I quickly decided that the communication between bytecode and shader would happen through float arrays.
With minimalism in mind, I decided that I needed just one type: float32. All values are stored in arrays. You want a local variable? Pick a slot in a float array and use it. How to index the array? Use a float, the interpreter will cast it to int. How to write conditions? Use a float, it’s true if it’s greater than 0.5.
The bytecode has only two kinds of statements: either you update a cell in an array; or you jump (possibly with a condition) to another address in the bytecode.
The bytecode also has a concept of expression: so when you update a cell, the value can be a complex math expression that references other array cells or functions (like sine).
Constants between 0 and 255 are stored one byte. Other float numbers are stored on 2 bytes using my favourite float trick!
This design avoids things like stacks, registers, and type tagging, which keeps both the interpreter and the bytecode compact.
See the list of bytecodes elements
Language design
The minimalist bytecode restricts what I can support in the language, but I still have the possibility of using syntactic sugar to make some things nicer.
Using a C-like syntax, I implemented support for assignments, if conditions and while loops. Syntactic sugar is used to allow augmented assignments and for loops.
Each time the compiler sees a variable, it gives it a location in a float array. When a value is to be shared with the shader, I have to give it a specific position. For example, I decided that state[5] would store the current score. For increased readability, I added support for inlining things. With:
inline score = state[5];
I can now use score for reading or writing to state[5].
While iterating on the game, I sometimes had to stop to add missing features. But in some cases, I also decided to work around the limitations; for example, I used a multiplication instead of && when writing conditions. It’s just the same… provided that the values are just 0s and 1s. :)
I used an array called missiles to store the position of every missile. The first cell indicates the number of missiles on screen. How to remove any element from an array without writing a loop? Swap it.
// remove missiles outside the screen
if (missiles[i*2 + 2] > 0.5) {
// O(1) removal: swap element with the last one in the array
missiles[i*2 + 1] = missiles[(missiles[0] - 1)*2 + 1]; // position.x
missiles[i*2 + 2] = missiles[(missiles[0] - 1)*2 + 2]; // position.y
missiles[0] -= 1;
}
Shader graphics
This is very similar to what we have in ShaderToy. It’s just about computing the color of a pixel based on the data provided by the game engine.
I kept the graphics code simple, as the game jam time is limited.
I used a feedback effect (blending the previous frame with the current frame) to make the visuals more interesting, and combined the effect with some noise functions.
Game design
The game design is also kept simple. The game is infinite. It starts with three enemies. It adds an enemy every 7 seconds. There are three kinds of enemies, each of them has its special behavior and visuals.
Contrary to what some might believe, enemies can’t die. When a missile hits an enemy, it gets teleported outside the screen, and it’s able to come back to the playing field.
This approach keeps the code very simple, while ensuring the game gets more and more. My first thought was to create a list of enemy waves, but that was harder to design and balance the difficulty.
Like in Super Hexagon, special care was taken to provide a rapid restart and encourage replays.
Conclusion
The quick iteration workflow was essential. Designing the bytecode and the game in parallel made it hard to predict which features would be needed upfront, and many constraints only became apparent once I started writing the game itself.
Of course, a question remains… Is the bytecode actually smaller than using compiled C++? I ported the game logic to C++, removed the bytecode interpreter and checked the size.
The C++ version is 90 bytes bigger than the bytecode version. So the savings from using bytecode are more important than the interpreter size. Some people might say that the C++ engine I ported was not really optimized; but neither are the interpreter and the bytecode. So take the actual numbers with a grain of salt.
Overall this was a fun project. It worked better than anticipated and I learned a few things. I’m sure I’ll do more game dev explorations in the future.