Introduction
Getting your applications up and running is often the main focus when you set up infrastructure, but shipping without hardening first can have serious consequences. A secure base configuration reduces your attack surface from day one and prevents reactive fixes after services are already live.
This guide focuses on practical server security fundamentals you can apply during provisioning: securing access, minimizing exposed services, keeping systems patched, and detecting suspicious activity early. Use it as a baseline and adapt it as your architecture and threat model evolve.
Key Takeaways
SSH keys reduce account compromise risk: Use key-based authentication and disable password and root SSH access to prevent brute-force …
Introduction
Getting your applications up and running is often the main focus when you set up infrastructure, but shipping without hardening first can have serious consequences. A secure base configuration reduces your attack surface from day one and prevents reactive fixes after services are already live.
This guide focuses on practical server security fundamentals you can apply during provisioning: securing access, minimizing exposed services, keeping systems patched, and detecting suspicious activity early. Use it as a baseline and adapt it as your architecture and threat model evolve.
Key Takeaways
SSH keys reduce account compromise risk: Use key-based authentication and disable password and root SSH access to prevent brute-force attacks and improve access auditing.
Firewalls enforce least-exposure by default: Apply a default-deny policy and explicitly allow only required ports (such as SSH and HTTPS) to minimize the public attack surface.
Private networking limits external reachability: Use VPCs and VPNs to keep internal service traffic off the public internet and isolate backend components from direct access.
Service auditing exposes hidden risks: Regularly inspect listening ports and running services to detect unnecessary exposures and configuration drift.
Automated patching closes known vulnerabilities faster: Enable unattended security updates to shorten the window between vulnerability disclosure and remediation.
TLS and PKI protect data in transit: Encrypt external and internal traffic to prevent interception, tampering, and impersonation attacks.
Monitoring and alerting enable early threat detection: Track authentication logs, privilege escalation, and new network listeners to identify suspicious behavior quickly.
Backups strengthen recovery posture: Maintain offsite backups, define RPO and RTO targets, and test restores to recover from ransomware, data loss, or system compromise.
Note: Security is iterative. Implement these measures when you first provision infrastructure, then reassess whenever you add services or change architecture.
SSH Keys
SSH (secure shell) is an encrypted protocol for administering and communicating with servers. SSH keys are a key pair (private + public) used for authentication instead of passwords: the private key stays on your machine; the public key goes on the server. This is asymmetric encryption and is the recommended way to log into Linux servers.
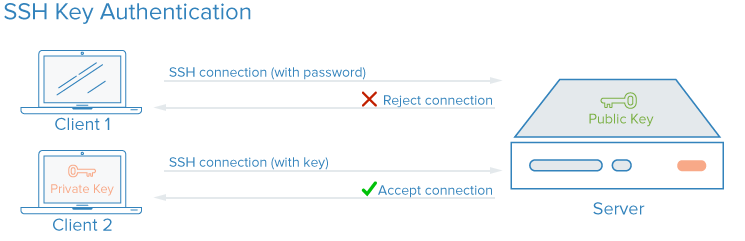
You configure SSH key authentication by placing your public key in the server’s ~/.ssh/authorized_keys file. For a deeper look at how SSH encryption and connections work, see Understanding the SSH Encryption and Connection Process.
Why SSH keys instead of passwords?
SSH encrypts all authentication, including passwords. The problem with password logins is that they can be brute-forced: automated bots can try many passwords against a public IP. Rate limiting and lockouts help but don’t remove the risk. Switching to SSH keys lets you turn off password authentication entirely. Keys have far more entropy than typical passwords (e.g., a 128-character key vs. a short password), making brute force impractical. Properly generated Ed25519 keys (and appropriately sized RSA keys) are computationally infeasible to brute-force with current practical capabilities.
How to Implement SSH Keys
Before you close your current SSH session, secure your login process by setting up SSH key authentication. Here’s the streamlined workflow:
Generate an SSH key on your local machine: Run ssh-keygen -t ed25519 -C "you@example.com" and hit Enter to accept the defaults. This creates your SSH key pair: ~/.ssh/id_ed25519 (private) and ~/.ssh/id_ed25519.pub (public).
1.
Upload your public key to the server:
Use ssh-copy-id user@your-server (swap out user and your-server for your actual username and server address). If ssh-copy-id isn’t available, copy the contents of ~/.ssh/id_ed25519.pub and manually add it to the ~/.ssh/authorized_keys file on your server.
1.
Harden your SSH configuration on the server: Open /etc/ssh/sshd_config in your preferred editor. Set PasswordAuthentication no to turn off password logins, and PermitRootLogin no to block direct root access. Save and close the file.
1.
Restart the SSH service for changes to take effect: On Debian/Ubuntu, restart ssh. On RHEL-family distributions (Rocky, AlmaLinux, CentOS), restart sshd. Keep your current session open until step 5 succeeds to avoid lockouts.
- Debian/Ubuntu:
sudo systemctl restart ssh - RHEL-family:
sudo systemctl restart sshd
Test new access in a separate terminal (don’t close your original session yet): Attempt to SSH into your server as your user with your private key. If that’s successful, also try logging in as root (ssh root@your-server); you should be denied. If key authentication fails, check permissions (~/.ssh should be 700, authorized_keys should be 600) and fix from your original session before disconnecting.
Need to preserve password access for legacy reasons or shared environments? Safeguard your server with fail2ban to block repeated failed logins. Grant users sudo privileges instead of allowing root SSH to follow the principle of least privilege. For a hands-on walkthrough, see How To Set Up SSH Keys for details covering Ubuntu, Debian, and CentOS.
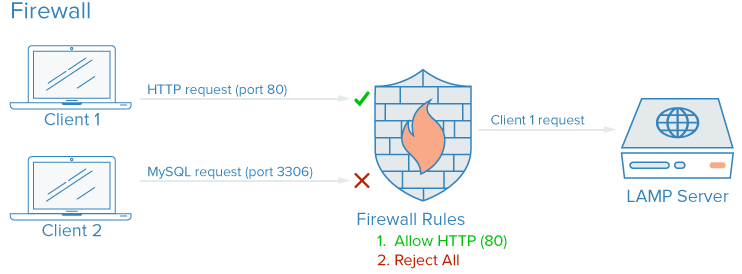
Firewalls
A firewall (software or hardware) controls which services are exposed and what traffic is allowed in and out. A well-configured firewall ensures only intended services are reachable from outside.
Traffic to your server generally falls into three categories:
- Public: Intended for anyone on the internet (e.g., your web server).
- Private: Only for authorized users or locations (e.g., a database admin panel like phpMyAdmin).
- Internal: Only from the same host (e.g., a database accepting only local connections).
Firewalls enforce these boundaries: public ports stay open, private ones are restricted (e.g., by IP or VPN), and internal ones are not exposed. Unused ports are blocked by default in a sensible setup.
How Do Firewalls Enhance Security?
Even if a service binds only to certain interfaces, a firewall adds a separate layer: it drops or allows traffic before it reaches the application. That reduces the impact of misconfiguration or a vulnerable service. In practice you open only the ports you need, commonly SSH (22), HTTP (80), and HTTPS (443), which shrinks your attack surface.
How to Implement Firewalls
On Ubuntu with UFW, a minimal sequence (allow SSH before enabling UFW or you can lock yourself out):
sudo ufw allow OpenSSH
sudo ufw allow 80/tcp
sudo ufw allow 443/tcp
sudo ufw enable
sudo ufw status
The OpenSSH application profile opens the correct SSH port (22 by default) and is distro-aware. If you use a custom SSH port, allow it explicitly (for example, sudo ufw allow 2222/tcp) before enabling UFW. You should see the allowed ports and default incoming deny. Test from another machine: a port you did not open (e.g. 3306) should be refused.
Change firewall rules whenever you add or remove services. Common options:
- UFW (Uncomplicated Firewall): Default on Ubuntu. See How To Set Up a Firewall with UFW on Ubuntu for setup. Compatible with Ubuntu 20.04 and 22.04.
- firewalld: Default on Red Hat, Rocky, and Fedora. See How To Set Up a Firewall Using firewalld.
- iptables: UFW and firewalld write rules to iptables. For direct control or debugging, see Iptables Essentials: Common Firewall Rules and Commands. Docker and similar tools also insert iptables rules and can bypass UFW; if you use both, either layer a cloud firewall in front of the host or bind container ports to specific IPs and restrict those in UFW.
Note: A cloud firewall at the network edge applies before host UFW and is not affected by Docker’s iptables rules. Use it when you need consistent rules across hosts running containers.
Best practice: Default to denying unknown traffic. New services stay unreachable until you explicitly allow them, which forces you to decide how each service should be accessed.
VPC Networks
A Virtual Private Cloud (VPC) is a private network for your provider’s resources. VPC interfaces are not reachable from the public internet, so traffic between your resources stays on the provider’s internal network.
How Do VPC Networks Enhance Security?
Many providers give each server a public and a private interface. If you disable or avoid using the public interface on backend nodes, they talk only over the private network. Traffic between those systems never crosses the public internet, reducing exposure and interception risk. You can then expose only a small set of ingress points (e.g., load balancers or gateways) to the internet, giving you clearer control and visibility. Kubernetes and similar platforms formalize this with ingress controllers and private pod networks.
How to Implement VPC Networks
Most cloud providers let you create a VPC and attach resources to it. Design your subnets and gateways when you provision; moving existing servers into a new VPC can require IP or routing changes. On DigitalOcean you can use How to Configure a Droplet as a VPC Gateway on Debian, Ubuntu, and CentOS-based servers.
For single-region cloud workloads use the provider’s VPC first; add a VPN only when you need encryption across regions, between clouds, or for remote users.
VPNs and Private Networking
A VPN (virtual private network) creates encrypted tunnels between machines and presents them as a single logical network; you can run services as if they were on a private LAN while the traffic is carried securely over the internet.
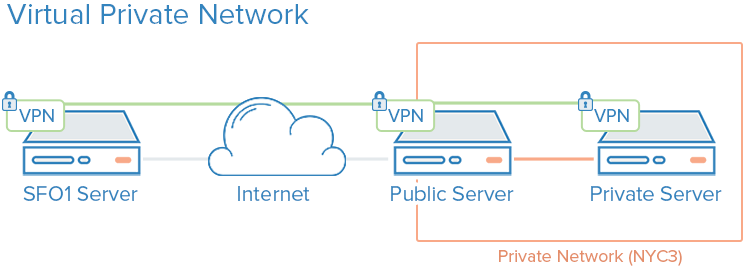
Provider private networks (e.g., DigitalOcean private networking) allow isolated communication between servers in the same account or team within a region, without VPN software. A VPN adds encryption and works across networks and providers.
How Do VPNs Enhance Security?
A VPN defines a private overlay network that only your configured peers can use. You then route application traffic over the VPN interface so that only services meant for the public internet listen on the public interface. That keeps database, admin, and internal API traffic off the open internet.
How to Implement VPNs
Private networks usually require you to choose interfaces and routing at deploy time. VPNs require installing and configuring VPN software on each host and then pointing applications at the VPN interface. Once the tunnel is up, each server must have the right keys and config to join the VPN.
- OpenVPN: How To Set Up and Configure an OpenVPN Server on Ubuntu (compatible with Ubuntu 20.04 and 22.04).
- WireGuard: Modern, minimal config: How To Set Up WireGuard on Ubuntu.
Use the provider’s private network when all servers are in one cloud and region; add a VPN when you need encrypted links across regions, between clouds, or for remote users.
Service Auditing
Service auditing means listing which services are listening, on which ports and interfaces, and which protocols they use; that information drives firewall rules, monitoring, and alerting.

Every listening service increases your attack surface. Auditing answers: Should this run? On which interfaces? Is the firewall correctly allowing or blocking traffic? Do you get security advisories for this software?
How Does Service Auditing Enhance Security?
You can’t harden what you don’t know about. Once you have a list of listeners, you can turn off unneeded services, bind others to localhost or a private IP only, and align firewall rules with actual use. Re-run audits when you install new software or change roles; periodic audits catch configuration drift.
How to Implement Service Auditing
Use ss to list TCP and UDP listeners with process and PID:
sudo ss -plunt
p: process using the socketl: listening onlyu: UDPn: numeric addresses/portst: TCP
Example output:
Netid  State   Recv-Q  Send-Q  Local Address:Port  Peer Address:Port  Process
tcp    LISTEN  0       128     0.0.0.0:22          0.0.0.0:*          users:(("sshd",pid=812,fd=3))
tcp    LISTEN  0       511     0.0.0.0:80          0.0.0.0:*          users:(("nginx",pid=69226,fd=6),("nginx",pid=69225,fd=6))
tcp    LISTEN  0       128     [::]:22             [::]:*            users:(("sshd",pid=812,fd=4))
tcp    LISTEN  0       511     [::]:80             [::]:*            users:(("nginx",pid=69226,fd=7),("nginx",pid=69225,fd=7))
Focus on Netid, Local Address:Port, and Process. 0.0.0.0 means “all IPv4 interfaces”; [::] means “all IPv6.” In the example, SSH and Nginx listen on all interfaces; acceptable for a web/SSH host, but for a database you’d want something like 127.0.0.1:3306 or a private IP only. Disable or restrict services that don’t need to be reachable from the network.
Monitoring, Logging, and Alerting
Logging and alerting let you detect misuse and configuration drift before it becomes an incident. Without them, compromise or misconfiguration can go unnoticed until damage is done.
What to log and where:
- Authentication: SSH and sudo activity. On Linux, auth events typically go to
auth.log(Debian/Ubuntu:/var/log/auth.log) orsecure(RHEL:/var/log/secure). Failed logins, successful logins, and privilege escalation appear here. - Privilege escalation: Track
sudousage. Centralize logs so you can audit who ran what and when. - Listening ports: Run
ss -plunt(or equivalent) periodically and diff against a baseline; new listeners may indicate a new service or a backdoor.
What to alert on:
- Spike in failed SSH attempts (brute force or credential stuffing).
- New TCP/UDP listeners that were not in your baseline (e.g. a new process bound to 0.0.0.0).
- Unusual sudo usage (first-time users, sensitive commands, or off-hours).
Example: tail auth log for recent SSH failures:
grep -Ei "failed|invalid" /var/log/auth.log | tail -20
On RHEL-family systems, replace /var/log/auth.log with /var/log/secure.
Define a baseline of expected listeners and alert when it changes. Combine with intrusion detection (e.g. fail2ban, OSSEC) or a SIEM for production.
Unattended Updates
Enable automatic security updates so critical patches are applied soon after release. Unattended upgrades shorten the window between vulnerability disclosure and remediation and reduce the operational burden of manual patching.
How Do Unattended Updates Enhance Security?
The longer a fix exists but isn’t applied, the longer the server is exposed. Automated updates reduce that window and the operational burden of manual patching. Configure unattended upgrades for security updates at a minimum; many teams also allow other updates with appropriate testing or staging.
How to Implement Unattended Updates
On Ubuntu, install and enable unattended-upgrades. The main config is in /etc/apt/apt.conf.d/50unattended-upgrades: ensure the security origin is allowed (e.g. Unattended-Upgrade::Allowed-Origins includes "${distro_id}:${distro_codename}-security"). Reboot or restart services after kernel or critical library updates; for production, many teams use maintenance windows or staged rollouts. Full setup: How to Keep Ubuntu Servers Updated.
Production caveat: Test unattended upgrades in staging. For critical systems, some teams prefer to stage patches and apply them during change windows rather than fully automatic reboots.
Public Key Infrastructure and SSL/TLS
Public Key Infrastructure (PKI) is the system of certificate authorities (CAs), certificates, and validation used to identify parties and encrypt communication; SSL/TLS certificates authenticate servers (and optionally clients) and encrypt traffic in transit.

How Does PKI Enhance Security?
Certificates signed by a trusted CA help prevent man-in-the-middle attacks where an attacker impersonates a server. Internal CAs let you trust only your own infrastructure. TLS ensures confidentiality and integrity for traffic between clients and servers and between services.
How to Implement PKI
For public-facing HTTPS, use Let’s Encrypt (e.g. with certbot) or your provider’s TLS offering. For internal service-to-service auth, a private CA and internally signed certificates are an option. Setting up and maintaining a CA and certificate lifecycle takes effort; see How To Set Up and Configure a Certificate Authority (CA) for Linux. Until you need full PKI, securing traffic with TLS (e.g., via a reverse proxy with certificates) or a VPN is often enough.
Backup and Recovery as a Security Control
Backups are a security control: they limit damage from ransomware, accidental deletion, and compromise. An attacker who wipes or encrypts data cannot be fully mitigated by access controls alone; recoverable copies and tested restores are required.
Snapshot and backup strategy:
- Take regular snapshots or image-based backups at a cadence that matches your change rate. For stateful services, combine filesystem or DB dumps with snapshots so restores are consistent.
- Store at least one copy offsite (different region or provider). On-prem backups in the same building as production do not survive physical disaster or site takeover.
- Test restores periodically. Backups that have never been restored often fail when needed; document RPO (recovery point objective) and RTO (recovery time objective) and validate that your procedures meet them.
RPO is how much data loss you accept (e.g. last 24 hours). RTO is how long you accept to be down. Align backup frequency and retention with RPO, and run restore drills to meet RTO. See How To Build a Multi-Region Disaster Recovery Strategy for more.
Server Security Checklist
Use this as a quick pass when bringing a new server into production or reviewing an existing one:
| Area | Action |
|---|---|
| Access | SSH keys only; password auth disabled; root login disabled; sudo user verified |
| Firewall | Default deny; only required ports open (e.g., 22, 80, 443); rules reviewed |
| Services | ss -plunt reviewed; unnecessary services stopped/disabled; bindings correct |
| Updates | Unattended security updates enabled; reboot/maintenance process defined |
| Secrets | No secrets in config repos; env vars or secret manager; minimal permissions |
| Cloud | VPC/private networking used where possible; metadata service access restricted if applicable |
| Monitoring | Logging and alerts in place; known-good baseline to detect drift |
Cloud-specific: On cloud instances, restrict access to the cloud provider’s instance metadata service (for example, the DigitalOcean Droplet Metadata Service) where possible to reduce the impact of SSRF attacks or compromised workloads. Apply IAM or role-based access with least privilege so credentials and permissions are narrowly scoped.
Common Server Security Mistakes
These misconfigurations show up often in audits and post-incident reviews. Avoid them.
- Database or internal service bound to 0.0.0.0: MySQL, PostgreSQL, Redis, or admin UIs listening on all interfaces get exposed to the internet. Bind to 127.0.0.1 or a private IP and restrict with the firewall.
- Password authentication left on for SSH: Enables brute force. Disable it once key-based auth is verified from a second session.
- Root SSH allowed: Single point of failure; no audit trail per user. Use a sudo-capable user and set
PermitRootLogin no. - Firewall enabled before allowing SSH: Admins lock themselves out by running
ufw enablebeforeufw allow OpenSSH(or allow 22). Always allow SSH first. - No alerting on auth or port changes: Compromise or misconfiguration can go unnoticed. At minimum, alert on failed SSH spikes and new listening ports.
- Instance metadata service wide open: On cloud VMs, the metadata endpoint can leak credentials. Restrict or disable it for workloads that do not need it (e.g. use IMDSv2, or block metadata for worker nodes).
- Secrets in environment files or config repos: Env files committed to git or left on disk are a common leak. Use a secret manager or encrypted storage and restrict read access.
- Unrestricted egress: Servers that can reach anywhere make exfiltration and C2 easier. Restrict outbound traffic where feasible (e.g. allow only required APIs and update mirrors).
- Unattended upgrades not configured or not tested: Security updates pile up; one delayed patch can be enough for compromise. Enable unattended security updates and test in staging.
- Backups not tested: Backups that have never been restored often fail. Schedule restore tests and document RPO/RTO.
Troubleshooting Common Issues
Locked out after disabling password auth or root: The usual cause is closing the first session before verifying key-based login from a second terminal. Always test key login and sudo from a second session before disconnecting. If locked out, use the provider’s console (e.g., DigitalOcean Droplet Console) or recovery mode to fix /etc/ssh/sshd_config or restore ~/.ssh/authorized_keys. Admins often forget to confirm the sudo user can log in before disabling root.
Firewall blocking your SSH: Allow SSH before enabling UFW or you lock yourself out. Run sudo ufw allow OpenSSH (or sudo ufw allow 22 if you use a custom port), then sudo ufw enable. Confirm you are testing from an allowed IP if you use source restrictions.
Docker and UFW: Docker inserts iptables rules that can bypass UFW. Mitigate by layering a cloud firewall in front of the host (rules apply before Docker) or by binding container ports to specific IPs and restricting those in UFW. See Docker’s docs on iptables.
Unattended upgrades and reboots: If the server reboots during critical work, adjust Unattended-Upgrade::Automatic-Reboot and timing in /etc/apt/apt.conf.d/50unattended-upgrades (Ubuntu), or use a maintenance window.
Service listening on 0.0.0.0 unintentionally: Use ss -plunt to find the process; then change the service config to bind to 127.0.0.1 or a specific IP and restart. Restrict with the firewall as a second layer.
FAQ
What are the most important server security measures?
Prioritize: (1) SSH keys and no root SSH, (2) a default-deny firewall with only needed ports open, (3) regular patching (e.g., unattended security updates), (4) knowing what’s listening (service audit), and (5) TLS for public and sensitive traffic. Then add VPC/VPN and PKI as your environment grows.
How do attackers typically compromise servers?
Common paths include unpatched vulnerabilities, weak or leaked credentials, misconfigured or over-exposed services (e.g., open database ports), and phishing or supply-chain issues. Hardening (firewall, SSH keys, patching, least privilege) addresses many of these.
How often should servers be patched?
At least as soon as security updates are available for the OS and critical packages. Unattended security updates handle this daily on many setups; for critical systems, use staged rollouts and change windows. High-severity issues may warrant out-of-band patches.
Are cloud servers more secure than on-prem?
They can be, because providers manage physical security, hypervisor, and often baseline hardening. You still must secure the OS, apps, firewall, and access (SSH, IAM, secrets). Cloud adds considerations like metadata service and IAM misuse, so apply least privilege and restrict metadata access where possible.
What ports should never be publicly exposed?
Do not expose database ports (e.g., MySQL 3306, PostgreSQL 5432, Redis 6379), admin panels, or internal APIs to 0.0.0.0 unless they’re explicitly designed for it and protected. Restrict them to localhost or a private network and access them via SSH tunnel, VPN, or a bastion.
How do you monitor servers for security threats?
Use a combination of: OS and app logging (e.g., syslog, auth logs, access logs), centralized log aggregation and alerting, intrusion detection (e.g., fail2ban, OSSEC, or cloud IDS), and vulnerability scanning. Define what “normal” looks like and alert on anomalies and known-bad patterns.
Conclusion
These measures provide a strong baseline for most Linux servers: SSH keys with no root login, a default-deny firewall, private networking where appropriate, regular service auditing, monitoring and alerting, unattended security updates, TLS for sensitive traffic, and tested backups.
Revalidate this baseline whenever you deploy new services or change architecture. Re-run ss -plunt, review firewall rules, confirm unattended updates are active, and check authentication logs against your normal baseline. Treat security as part of routine operations, not a one-time setup step.
Further Learning
- SSH Essentials: Working with SSH Servers, Clients, and Keys
- How To Harden OpenSSH on Ubuntu
- How To Build a Multi-Region Disaster Recovery Strategy
- Initial Server Setup with Ubuntu: First steps for a new server
References
- OpenSSH Manual: SSH client and server
- UFW Community Help: Ubuntu firewall
- RFC 8446 - TLS 1.3: TLS specification
- DigitalOcean Cloud Firewalls: Managed firewall product docs
- Principle of Least Privilege (Wikipedia)
This work is licensed under a Creative Commons Attribution-NonCommercial- ShareAlike 4.0 International License.